
본 게시물은 CloudNet@에서 진행하는 AEWS (Amazon EKS Workshop Study) 스터디에 참여하며 정리한 내용입니다.
0. 실습 환경
이번 실습에서는 명령어 콘솔로 원클릭 배포를 해보고자 한다. 다음 명령어를 사용하여 실습 환경을 준비하였다. 그 전에 CloudFormation에 해당하는 eks-oneclick2.yaml 파일이 이전 EKS Networking 실습때 사용한 스크립트와 어떤 차이가 있는지 간략히 살펴보자. diff 명령을 통해 이전 실습 파일인 eks-oneclick.yaml과 이번 실습 파일인 eks-oneclick2.yaml 파일을 비교해보았다. "diff A B"와 같이 실행하였을 때 > 로 나오면 B 파일에 추가된 내용을 이야기하며 < 로 나오면 A 파일에 추가된 내용이라고 알려준다. 아래 결과를 통해 살펴볼 때, 이번 스토리지 실습을 위해 Amazon Elastic File System (EFS) 사용을 위한 보안 그룹 및 마운트 대상을 지정하고, bastion에 해당하는 EC2 VM에 amazon-efs-utils 및 df-pv 도구를 미리 설치 및 이전 EKS Networking 실습때 확인하였던 AWS Load Balancer Controller를 위한 IRSA 생성까지를 더 준비하는 것으로 확인된다.
$ diff eks-oneclick.yaml eks-oneclick2.yaml
287a288,330
> # EFS
>   EFSSG:
>     Type: AWS::EC2::SecurityGroup
>     Properties:
>       VpcId: !Ref EksVPC
>       GroupDescription: EFS Security Group
>       Tags:
>       - Key : Name
>         Value : !Sub ${ClusterBaseName}-EFS
>       SecurityGroupIngress:
>       - IpProtocol: tcp
>         FromPort: '2049'
>         ToPort: '2049'
>         CidrIp: !Ref VpcBlock
>
>   ElasticFileSystem:
>     Type: AWS::EFS::FileSystem
>     Properties:
>       FileSystemTags:
>         - Key: Name
>           Value: !Sub ${ClusterBaseName}-EFS
>   ElasticFileSystemMountTarget0:
>     Type: AWS::EFS::MountTarget
>     Properties:
>       FileSystemId: !Ref ElasticFileSystem
>       SecurityGroups:
>       - !Ref EFSSG
>       SubnetId: !Ref PublicSubnet1
>   ElasticFileSystemMountTarget1:
>     Type: AWS::EFS::MountTarget
>     Properties:
>       FileSystemId: !Ref ElasticFileSystem
>       SecurityGroups:
>       - !Ref EFSSG
>       SubnetId: !Ref PublicSubnet2
>   ElasticFileSystemMountTarget2:
>     Type: AWS::EFS::MountTarget
>     Properties:
>       FileSystemId: !Ref ElasticFileSystem
>       SecurityGroups:
>       - !Ref EFSSG
>       SubnetId: !Ref PublicSubnet3
>
311c354
<           Value: !Sub ${ClusterBaseName}-bastion-EC2
---
>           Value: !Sub ${ClusterBaseName}-bastion
329c372
<             hostnamectl --static set-hostname "${ClusterBaseName}-bastion-EC2"
---
>             hostnamectl --static set-hostname "${ClusterBaseName}-bastion"
345c388
<             yum -y install tree jq git htop
---
>             yum -y install tree jq git htop amazon-efs-utils
396c439
<             kubectl krew install ctx ns get-all neat # ktop df-pv mtail tree
---
>             kubectl krew install ctx ns get-all neat df-pv # ktop mtail tree
411a455
>             echo "export AWS_REGION=$AWS_DEFAULT_REGION" >> /etc/profile
438a483,499
>             # Setting EFS Filesystem
>             mkdir -p /mnt/myefs
>             echo "export EfsFsId=${ElasticFileSystem}" >> /etc/profile
>             #mount -t nfs4 -o nfsvers=4.1,rsize=1048576,wsize=1048576,hard,timeo=600,retrans=2,noresvport ${ElasticFileSystem}.efs.ap-northeast-2.amazonaws.com:/ /mnt/myefs
>
>             # Install VS Code in the browser https://github.com/coder/code-server
>             # curl -fOL https://github.com/coder/code-server/releases/download/v4.22.1/code-server_4.22.1_amd64.deb
>             # mkdir -p /root/.config/code-server
>             # cat << EOT > /root/.config/code-server/config.yaml
>             # bind-addr: 0.0.0.0:80
>             # auth: password
>             # password: Cloudnet@AEWS2!
>             # cert: false
>             # EOT
>             # dpkg -i code-server_4.22.1_amd64.deb
>             # systemctl enable --now code-server@$USER
>
440c501
<             eksctl create cluster --name $CLUSTER_NAME --region=$AWS_DEFAULT_REGION --nodegroup-name=ng1 --node-type=${WorkerNodeInstanceType} --nodes ${WorkerNodeCount} --node-volume-size=${WorkerNodeVolumesize} --vpc-public-subnets "$PubSubnet1","$PubSubnet2","$PubSubnet3" --version ${KubernetesVersion} --ssh-access --ssh-public-key /root/.ssh/id_rsa.pub --with-oidc --external-dns-access --full-ecr-access --dry-run > myeks.yaml
---
>             eksctl create cluster --name $CLUSTER_NAME --region=$AWS_DEFAULT_REGION --nodegroup-name=ng1 --node-type=${WorkerNodeInstanceType} --nodes ${WorkerNodeCount} --node-volume-size=${WorkerNodeVolumesize} --vpc-public-subnets "$PubSubnet1","$PubSubnet2","$PubSubnet3" --version ${KubernetesVersion} --max-pods-per-node 100 --ssh-access --ssh-public-key /root/.ssh/id_rsa.pub --with-oidc --external-dns-access --full-ecr-access --dry-run > myeks.yaml
455a517,525
>             cat <<EOT > irsa.yaml
>               serviceAccounts:
>               - metadata:
>                   name: aws-load-balancer-controller
>                   namespace: kube-system
>                 wellKnownPolicies:
>                   awsLoadBalancerController: true
>             EOT
>             sed -i -n -e '/withOIDC/r irsa.yaml' -e '1,$p' myeks.yaml
다음과 같이 명령어로 실행하여 배포를 진행하였다.
# YAML 파일 다운로드
curl -O https://s3.ap-northeast-2.amazonaws.com/cloudformation.cloudneta.net/K8S/eks-oneclick2.yaml

# CloudFormation 스택 배포
aws cloudformation deploy --template-file eks-oneclick2.yaml --stack-name myeks --parameter-overrides KeyName=kp-ian SgIngressSshCidr=$(curl -s ipinfo.io/ip)/32  MyIamUserAccessKeyID=`cat ~/.aws/credentials | grep aws_access_key_id | awk '{print $3}'` MyIamUserSecretAccessKey=`cat ~/.aws/credentials | grep aws_secret_access_key | awk '{print $3}'` ClusterBaseName=myeks --region ap-northeast-2

# CloudFormation 스택 배포 완료 후 작업용 EC2 IP 출력
aws cloudformation describe-stacks --stack-name myeks --query 'Stacks[*].Outputs[0].OutputValue' --output text

# 작업용 EC2 SSH 접속
ssh -i ~/.ssh/kp-ian.pem ec2-user@$(aws cloudformation describe-stacks --stack-name myeks --query 'Stacks[*].Outputs[0].OutputValue' --output text)
or
ssh -i ~/.ssh/kp-ian.pem root@$(aws cloudformation describe-stacks --stack-name myeks --query 'Stacks[*].Outputs[0].OutputValue' --output text)
~ password: qwe123
기본 설정 및 EFS를 확인해보자.
# default 네임스페이스 적용
kubectl ns default
# EFS 확인 : AWS 관리콘솔 EFS 확인해보자
echo $EfsFsId
mount -t efs -o tls $EfsFsId:/ /mnt/myefs
df -hT --type nfs4
echo "efs file test" > /mnt/myefs/memo.txt**
cat /mnt/myefs/memo.txt
rm -f /mnt/myefs/memo.txt
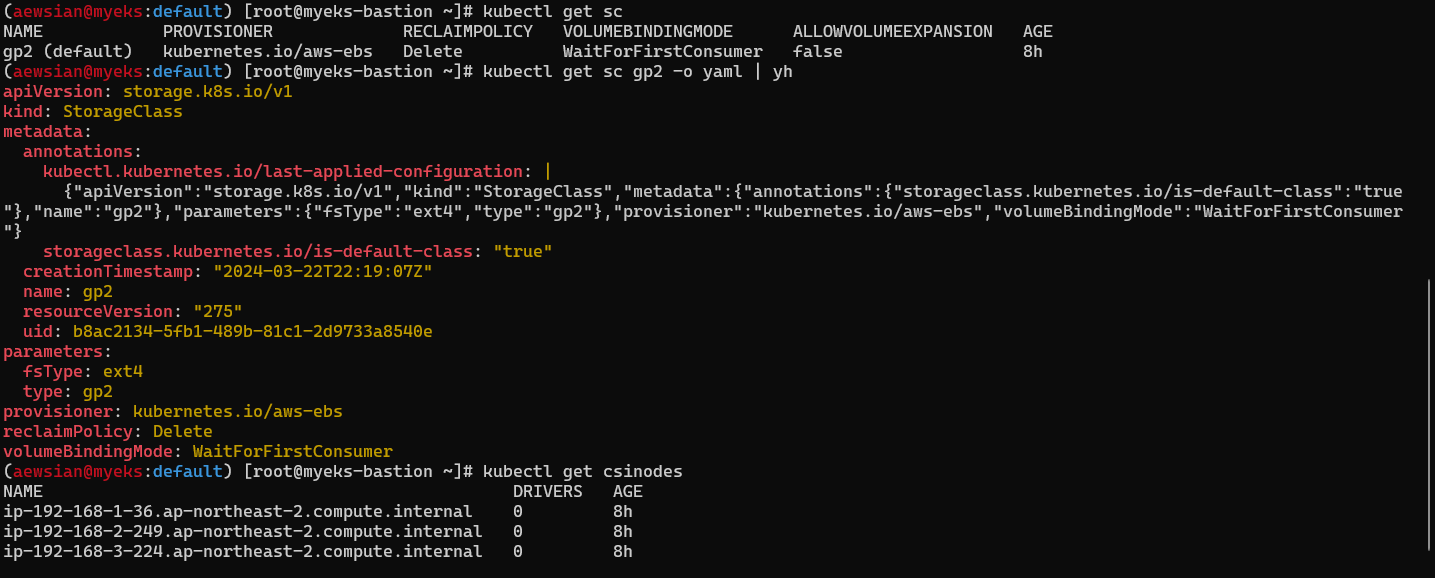
# 스토리지클래스 및 CSI 노드 확인
kubectl get sc
kubectl get sc gp2 -o yaml | yh
kubectl get csinodes
# 노드 정보 확인
kubectl get node --label-columns=node.kubernetes.io/instance-type,eks.amazonaws.com/capacityType,topology.kubernetes.io/zone
EFS 마운트를 성송하여 파일 쓰기 및 파일 내용 확인, 파일 삭제가 가능하였으며
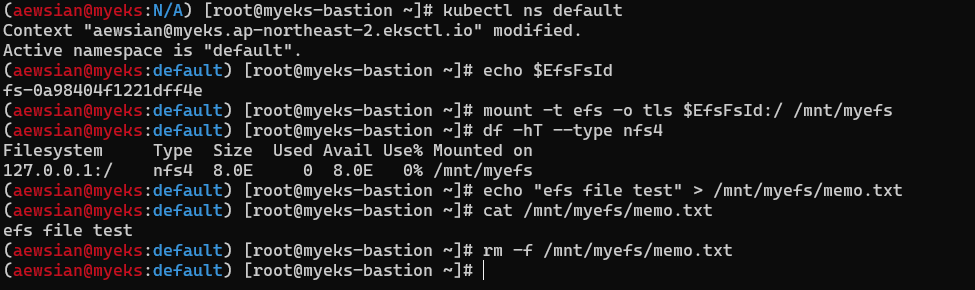
스토리지 클래스 및 CSI 노드 정보 확인 또한 완료하였다.

이후 원활한 실습을 위해 아래를 참고하여 AWS LB/ExternalDNS, kube-ops-view를 구성하자.
# AWS LB Controller
helm repo add eks https://aws.github.io/eks-charts
helm repo update
helm install aws-load-balancer-controller eks/aws-load-balancer-controller -n kube-system --set clusterName=$CLUSTER_NAME \
--set serviceAccount.create=false --set serviceAccount.name=aws-load-balancer-controller
# ExternalDNS
MyDomain=sdndev.net
MyDnsHostedZoneId=$(aws route53 list-hosted-zones-by-name --dns-name "${MyDomain}." --query "HostedZones[0].Id" --output text)
echo $MyDomain, $MyDnsHostedZoneId
curl -s -O https://raw.githubusercontent.com/gasida/PKOS/main/aews/externaldns.yaml
sed -i "s/0.13.4/0.14.0/g" externaldns.yaml
MyDomain=$MyDomain MyDnsHostedZoneId=$MyDnsHostedZoneId envsubst < externaldns.yaml | kubectl apply -f -
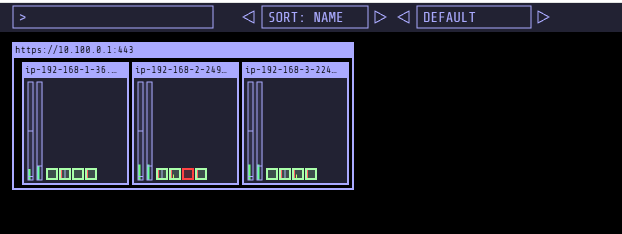
# kube-ops-view
helm repo add geek-cookbook https://geek-cookbook.github.io/charts/
helm install kube-ops-view geek-cookbook/kube-ops-view --version 1.2.2 --set env.TZ="Asia/Seoul" --namespace kube-system
kubectl patch svc -n kube-system kube-ops-view -p '{"spec":{"type":"LoadBalancer"}}'
kubectl annotate service kube-ops-view -n kube-system "external-dns.alpha.kubernetes.io/hostname=kubeopsview.$MyDomain"
echo -e "Kube Ops View URL = http://kubeopsview.$MyDomain:8080/#scale=1.5"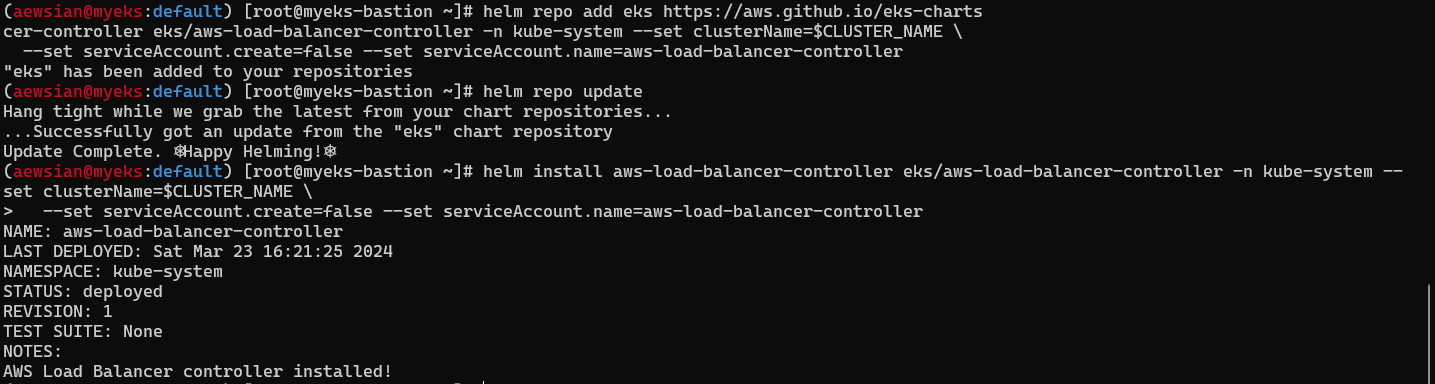

1. 스토리지 이해
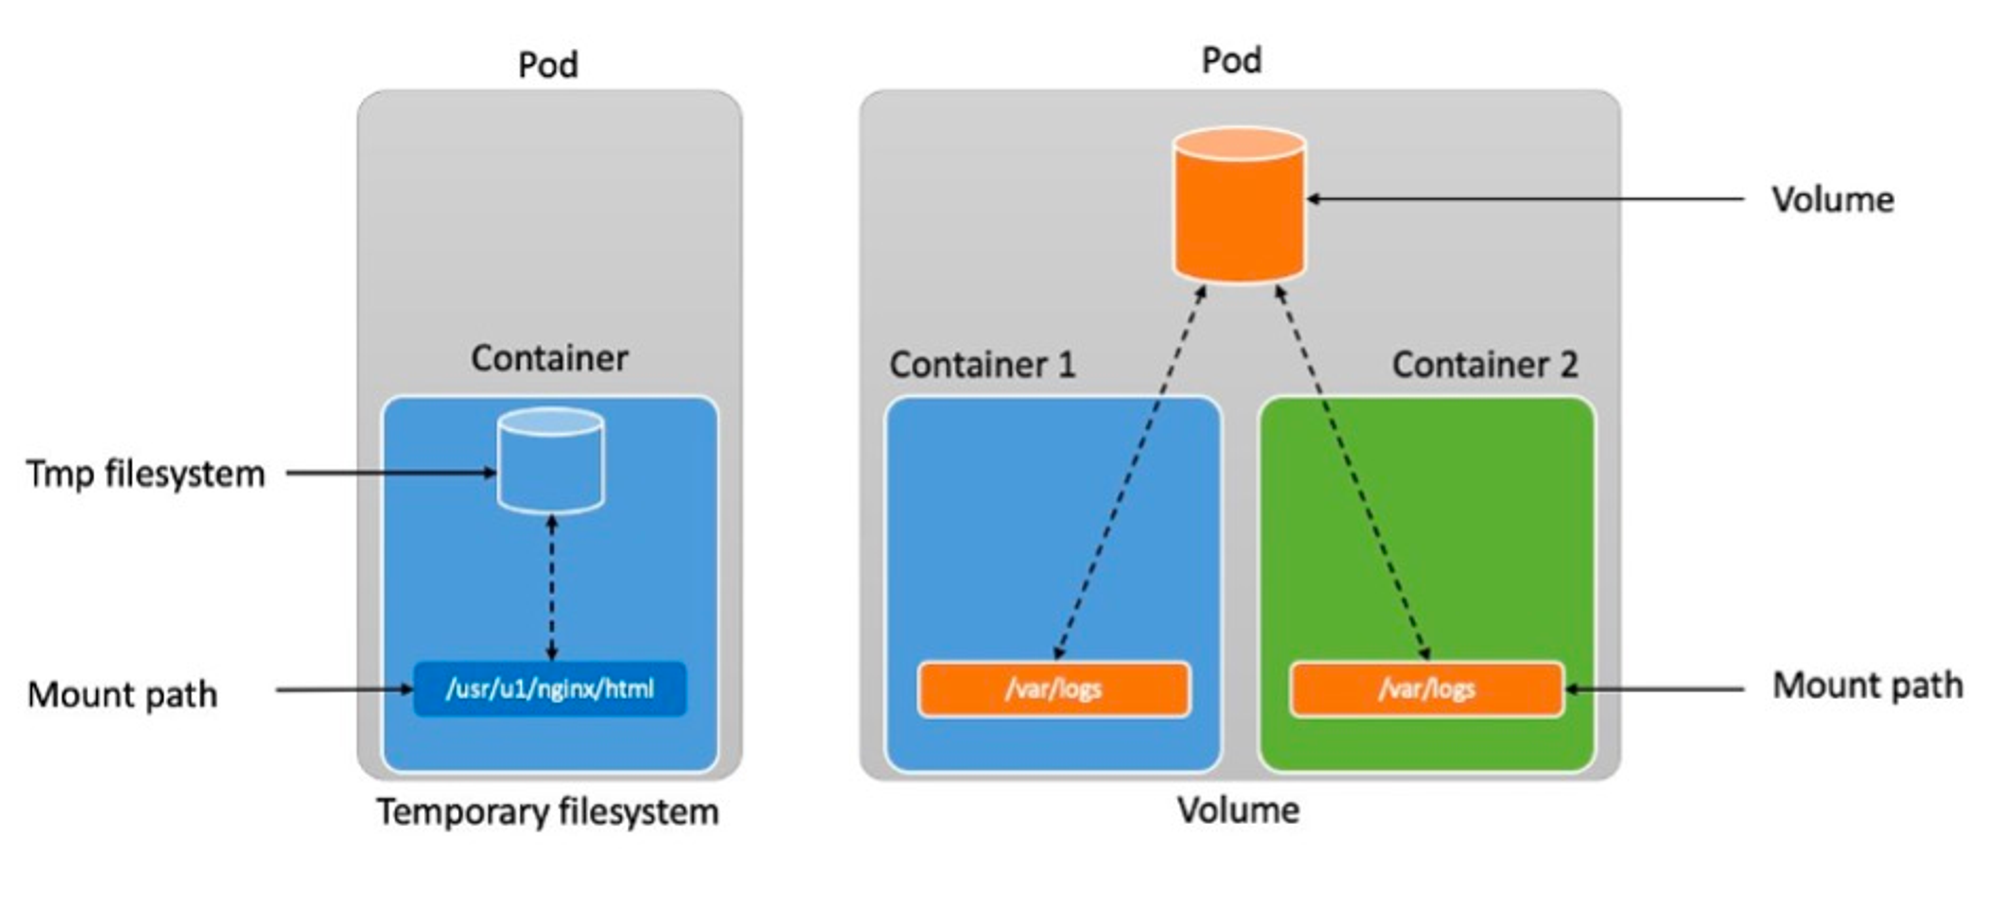
파드 내부 데이터는 파드가 정지가 되면 모두 삭제가 된다. 이유는 컨테이너가 구동될 때 임시 파일 시스템을 사용하기 때문과 동시에 개별 파드는 모두 상태가 없는 (Stateless) 애플리케이션이기 때문이다. 따라서 상태가 있는 (Stateful) 애플리케이션을 구축하기 위해서는 데이터 보존이 필요하며 쿠버네티스 환경에서는 이를 퍼시스턴트 볼륨 (Persistent Volume, PV)라는 개념으로 부르고 있다.
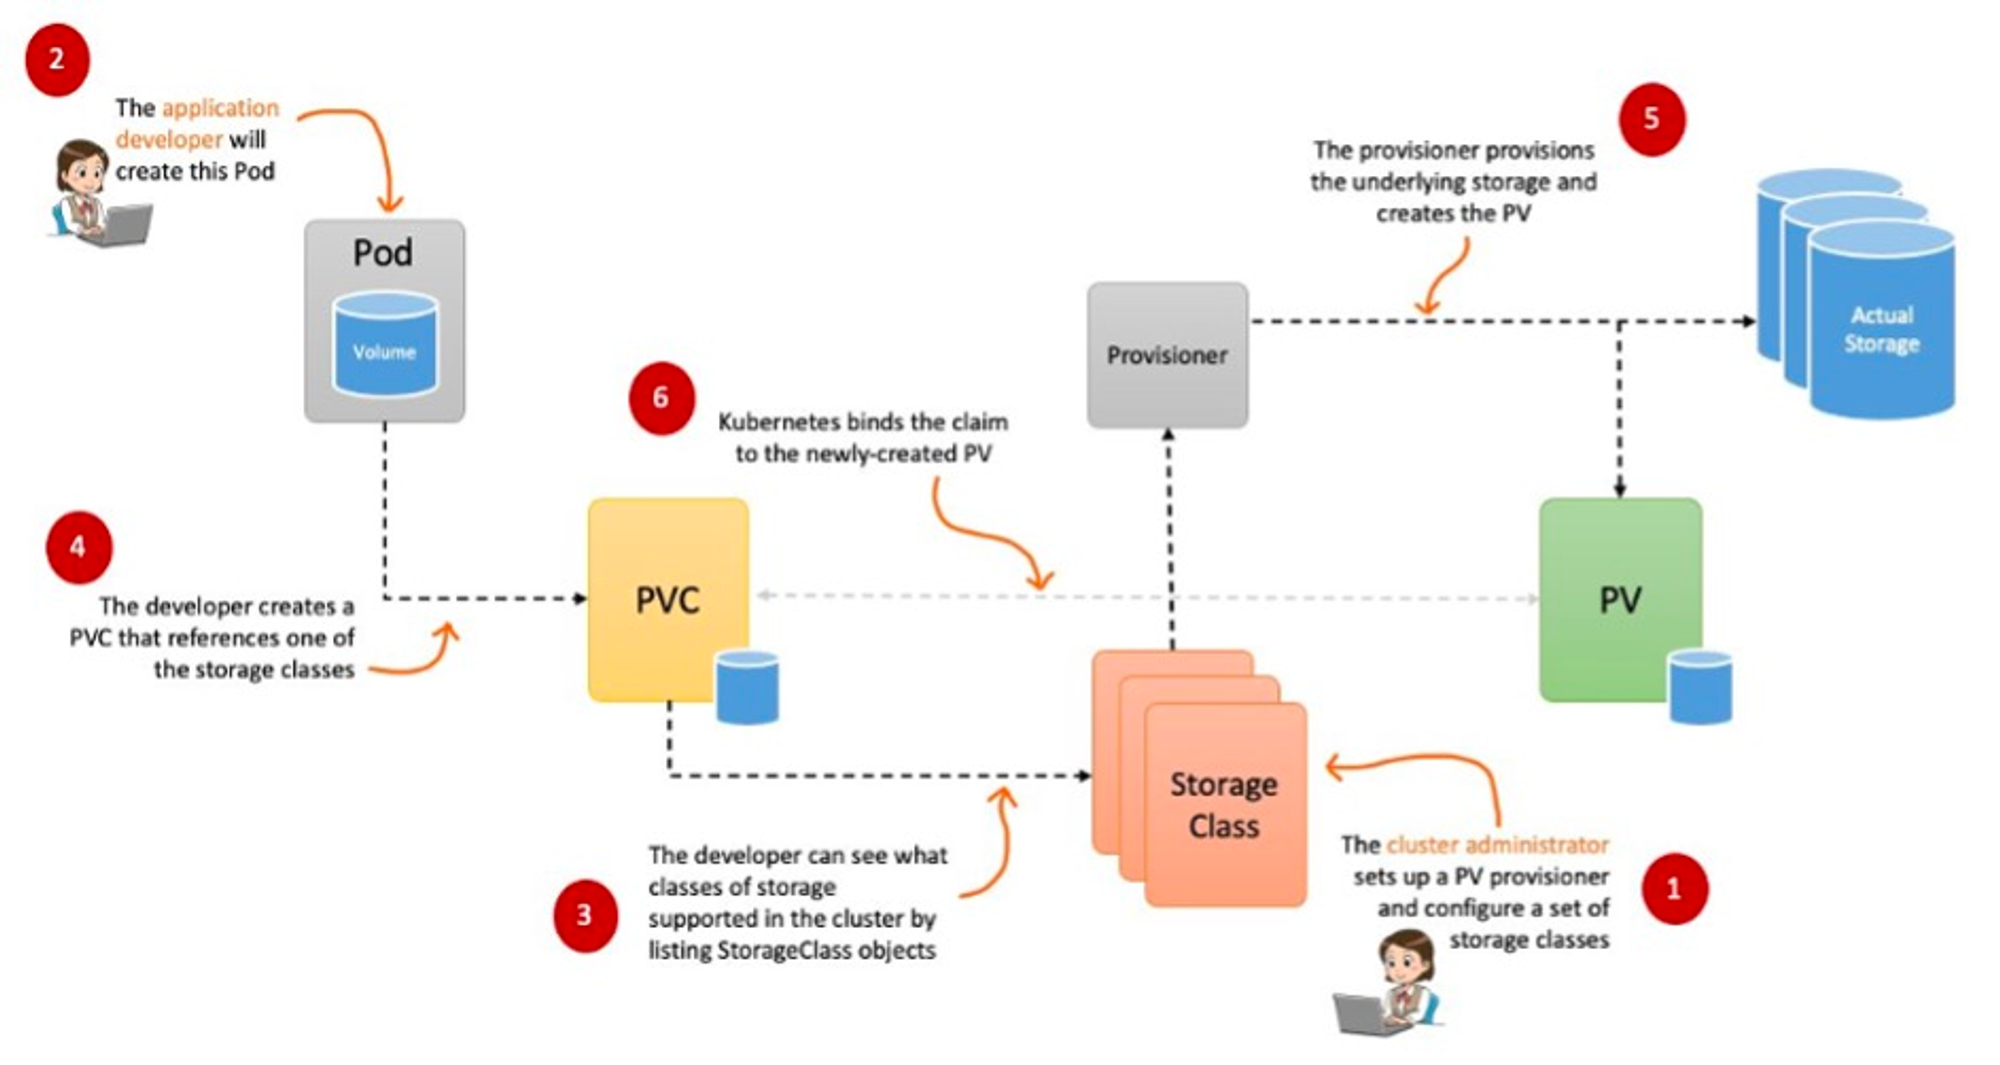
정확하게는 PV와 PVC 2개의 개념으로 나뉜다. PV는 볼륨 입장에서 물리 저장소 공간을 바라본다고 할 수 있고, PVC (Persistent Volume Claim)은 파드에서 PV를 사용한다고 클레임/주장할 수 있도록 하는 개념이라고 할 수 있겠다. 이를 스토리지 클래스라는 체계적인 단위로 프로비저닝을 하여 관리하는 방식으로 쿠버네티스에서는 권장하고 있다. 또한 퍼시스턴트 볼륨 사용이 끝났을 때 해당 볼륨은 어떻게 초기화할 것인지 별도로 설정할 수 있는데, 쿠버네티스에서는 이를 Reclaim Policy라고 부른다. Reclaim Policy에는 크게 Retain(보존), Delete(삭제, 즉 EBS 볼륨도 삭제됨) 방식이 있다고 한다.
이전 EKS 네트워킹 스터디에서 CNI가 있는 것처럼 스토리지에는 CSI (Container Storage Interface)가 있다. https://kubernetes-csi.github.io/docs/ 에 있는 내용을 번역해보았다:
CSI( 컨테이너 스토리지 인터페이스)는 Kubernetes와 같은 CO(컨테이너 오케스트레이션 시스템)의 컨테이너화된 워크로드에 임의의 블록 및 파일 스토리지 시스템을 노출하기 위한 표준이다. CSI 제3자 스토리지 제공자를 사용하면 핵심 Kubernetes 코드를 건드릴 필요 없이 Kubernetes에서 새로운 스토리지 시스템을 노출하는 플러그인을 작성하고 배포할 수 있다.
그렇다면 임시 파일 시스템을 사용할 때와 스토리지를 사용할 때를 비교해보도록 하자.
a. 기본 컨테이너 환경에서 임시 파일 시스템 사용
# 파드 배포 - date 명령어로 현재 시간을 10초 간격으로 /home/pod-out.txt 파일에 저장
curl -s -O https://raw.githubusercontent.com/gasida/PKOS/main/3/date-busybox-pod.yaml
cat date-busybox-pod.yaml | yh
kubectl apply -f date-busybox-pod.yaml

# 파일 확인
kubectl get pod
kubectl exec busybox -- tail -f /home/pod-out.txt

# 파드 삭제 후 다시 생성 후 파일 정보 확인
kubectl delete pod busybox
kubectl apply -f date-busybox-pod.yaml
kubectl exec busybox -- cat /home/pod-out.txt
kubectl exec busybox -- tail -f /home/pod-out.txt

# 실습 완료 후 삭제
kubectl delete pod busybox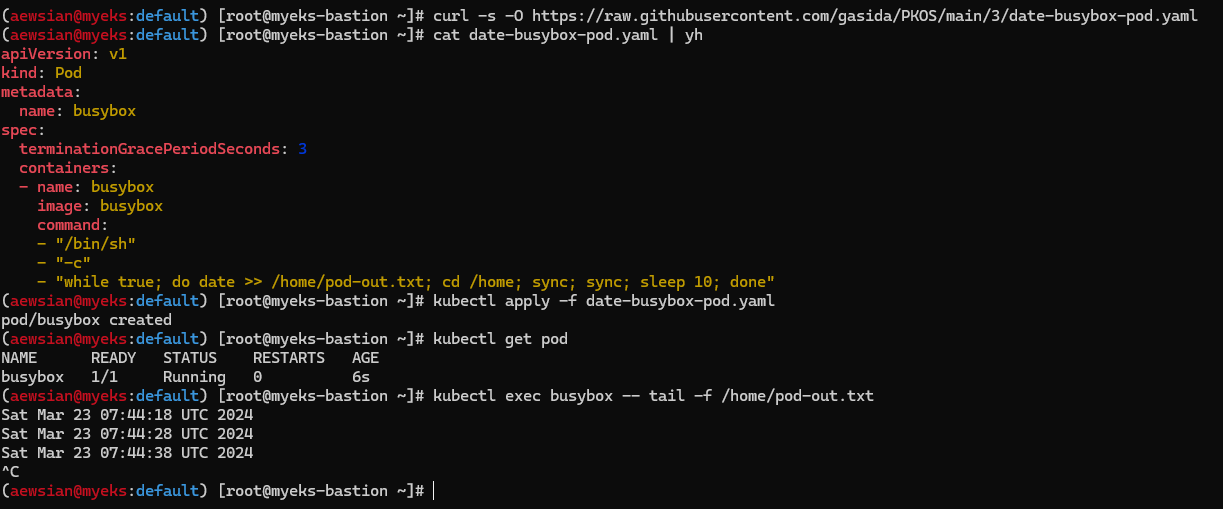
파드를 지우고 다시 접속하여 cat으로 조회해보면 이전 내용이 보이지 않는 것을 확인할 수 있다.

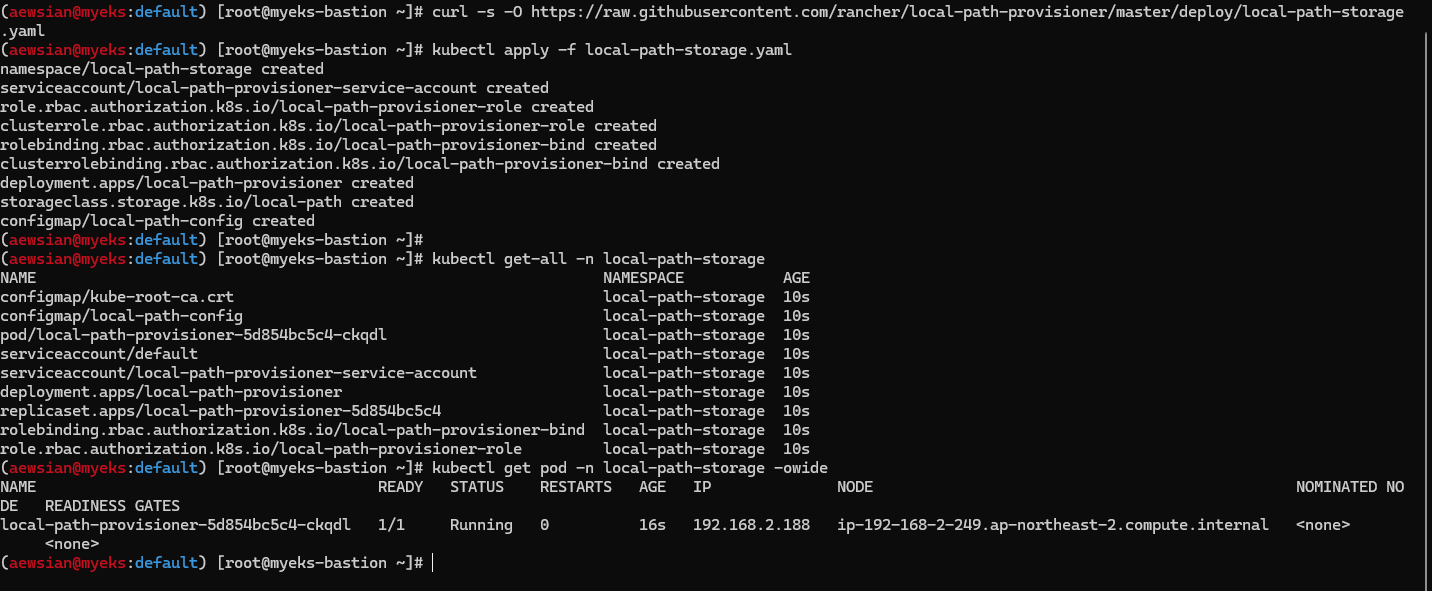
b. 호스트 Path 를 사용하는 PV/PVC : local-path-provisioner 스토리지 클래스로 배포하여 실습해보자.
링크에 보면 장단점이 잘 명시되어 있다. 번역한 내용을 아래에 붙인다.
장점
- HostPath 또는 local 을 사용하여 볼륨을 동적으로 프로비저닝한다.
- 현재 Kubernetes 로컬 볼륨 프로비저너는 로컬 볼륨에 대한 동적 프로비저닝을 수행할 수 없다.로컬 기반 영구 볼륨은 실험적인 기능이다.
단점
- 현재 볼륨 용량 제한을 지원하지 않는다.용량 제한을 무시한다.
# 배포
curl -s -O https://raw.githubusercontent.com/rancher/local-path-provisioner/master/deploy/local-path-storage.yaml
kubectl apply -f local-path-storage.yaml

# 확인
kubectl get-all -n local-path-storage
kubectl get pod -n local-path-storage -owide
kubectl describe cm -n local-path-storage local-path-config
kubectl get sc
kubectl get sc local-path
NAME         PROVISIONER             RECLAIMPOLICY   VOLUMEBINDINGMODE      ALLOWVOLUMEEXPANSION   AGE
local-path   rancher.io/local-path   Delete          WaitForFirstConsumer   false
# PVC 생성
curl -s -O https://raw.githubusercontent.com/gasida/PKOS/main/3/localpath1.yaml
cat localpath1.yaml | yh
kubectl apply -f localpath1.yaml
# PVC 확인
kubectl get pvc
kubectl describe pvc
# 파드 생성
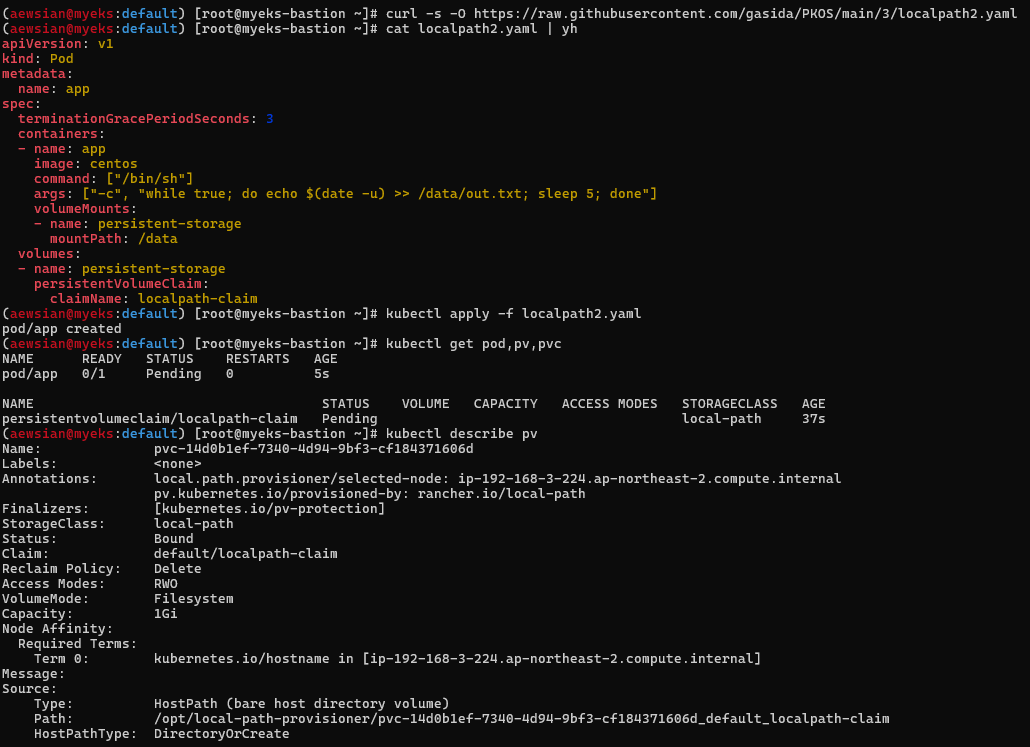
curl -s -O https://raw.githubusercontent.com/gasida/PKOS/main/3/localpath2.yaml
cat localpath2.yaml | yh
kubectl apply -f localpath2.yaml
# 파드 확인
kubectl get pod,pv,pvc
kubectl describe pv # Node Affinity 확인
kubectl exec -it app -- tail -f /data/out.txt
# 파드 삭제 후 PV/PVC 확인
kubectl delete pod app
kubectl get pod,pv,pvc
for node in $N1 $N2 $N3; do ssh ec2-user@$node tree /opt/local-path-provisioner; done
# 파드 다시 실행
kubectl apply -f localpath2.yaml
# 확인
kubectl exec -it app -- head /data/out.txt
kubectl exec -it app -- tail -f /data/out.txt
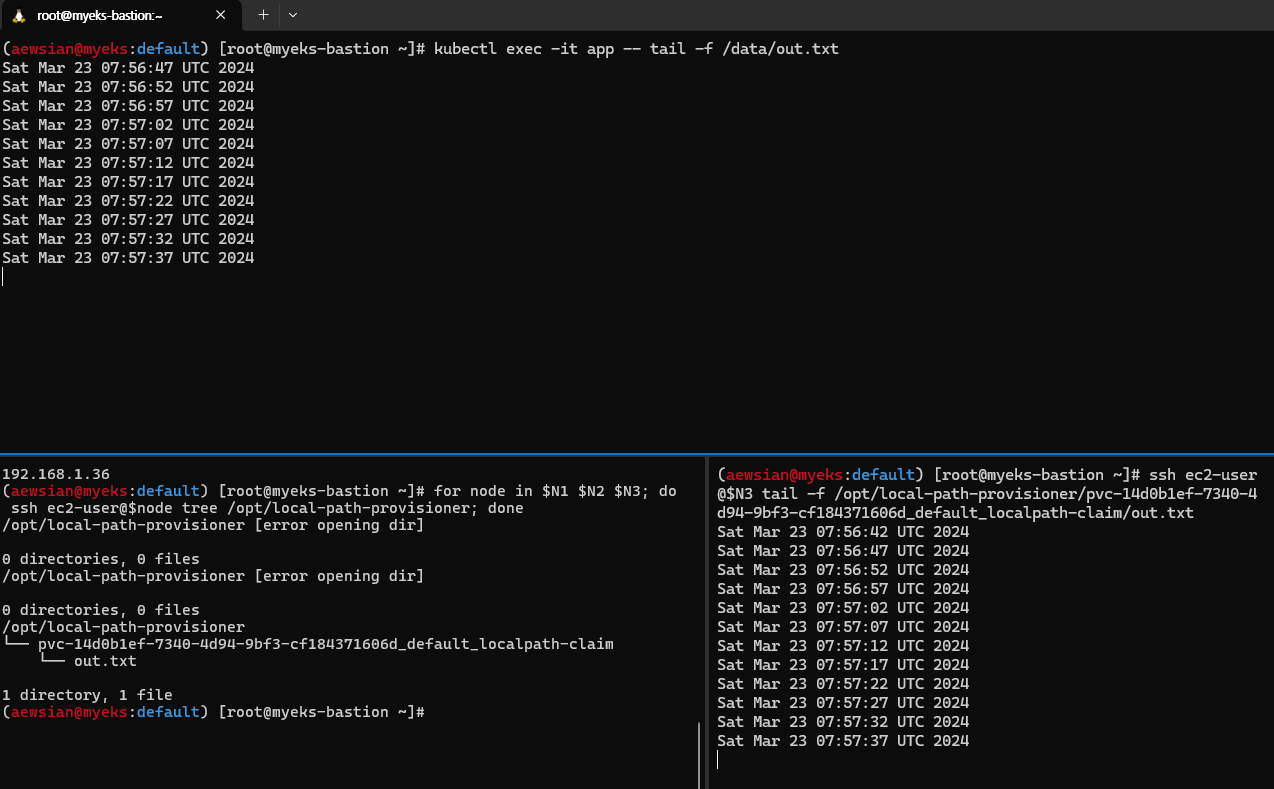

예상한 대로 Node Affinity를 가진 상태에서 파드를 다시 시작하더라도 동일 경로에 있는 파일을 액세스하는 것을 확인할 수 있었다. 다음 실습을 위해 파드와 만든 PVC를 삭제하자.
# 파드와 PVC 삭제
kubectl delete pod app
kubectl get pv,pvc
kubectl delete pvc localpath-claim

# 확인
kubectl get pv
for node in $N1 $N2 $N3; do ssh ec2-user@$node tree /opt/local-path-provisioner; done
2. AWS EBS Controller
지난 실습에서 살펴보았던 AWS LoadBalancer Controller (6번 항목)과 비슷하다고도 볼 수 있을텐데, EKS에서 EBS와 같은 AWS 스토리지를 다룰 때 AWS API를 호출하면서 AWS 스토리지를 관리하는 CSI Controller와 관련해 EBS에 해당하는 부분이 바로 AWS EBS Controller라 할 수 있겠다. 따라서 Amazon EKS add-on 형태로 Amazon EBS CSI driver를 설치하여 사용하며, 관련한 자세한 내용은 AWS 문서를 통해서도 확인 가능하다.
# 아래는 aws-ebs-csi-driver 전체 버전 정보와 기본 설치 버전(True) 정보 확인
aws eks describe-addon-versions \
--addon-name aws-ebs-csi-driver \
--kubernetes-version 1.28 \
--query "addons[].addonVersions[].[addonVersion, compatibilities[].defaultVersion]" \
--output text
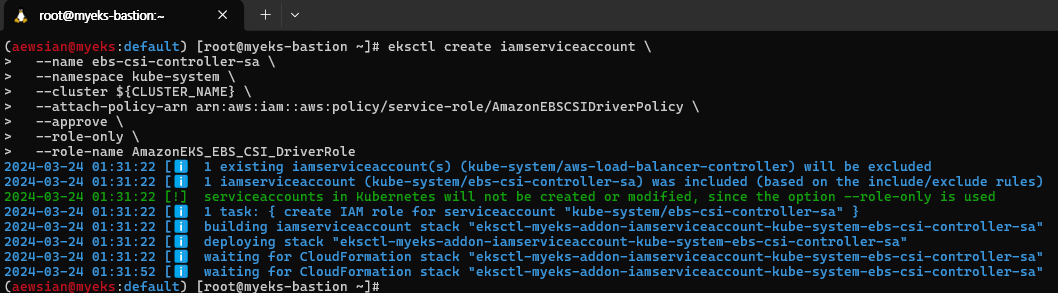
# ISRA 설정 : AWS관리형 정책 AmazonEBSCSIDriverPolicy 사용
eksctl create iamserviceaccount \
--name ebs-csi-controller-sa \
--namespace kube-system \
--cluster ${CLUSTER_NAME} \
--attach-policy-arn arn:aws:iam::aws:policy/service-role/AmazonEBSCSIDriverPolicy \
--approve \
--role-only \
--role-name AmazonEKS_EBS_CSI_DriverRole
# ISRA 확인
eksctl get iamserviceaccount --cluster myeks
NAMESPACE NAME ROLE ARN
kube-system ebs-csi-controller-sa arn:aws:iam::911283464785:role/AmazonEKS_EBS_CSI_DriverRole
...
# Amazon EBS CSI driver addon 추가
eksctl create addon --name aws-ebs-csi-driver --cluster ${CLUSTER_NAME} --service-account-role-arn arn:aws:iam::${ACCOUNT_ID}:role/AmazonEKS_EBS_CSI_DriverRole --force
kubectl get sa -n kube-system ebs-csi-controller-sa -o yaml | head -5
# 확인
eksctl get addon --cluster ${CLUSTER_NAME}
kubectl get deploy,ds -l=app.kubernetes.io/name=aws-ebs-csi-driver -n kube-system
kubectl get pod -n kube-system -l 'app in (ebs-csi-controller,ebs-csi-node)'
kubectl get pod -n kube-system -l app.kubernetes.io/component=csi-driver
# ebs-csi-controller 파드에 6개 컨테이너 확인
kubectl get pod -n kube-system -l app=ebs-csi-controller -o jsonpath='{.items[0].spec.containers[*].name}' ; echo
ebs-plugin csi-provisioner csi-attacher csi-snapshotter csi-resizer liveness-probe
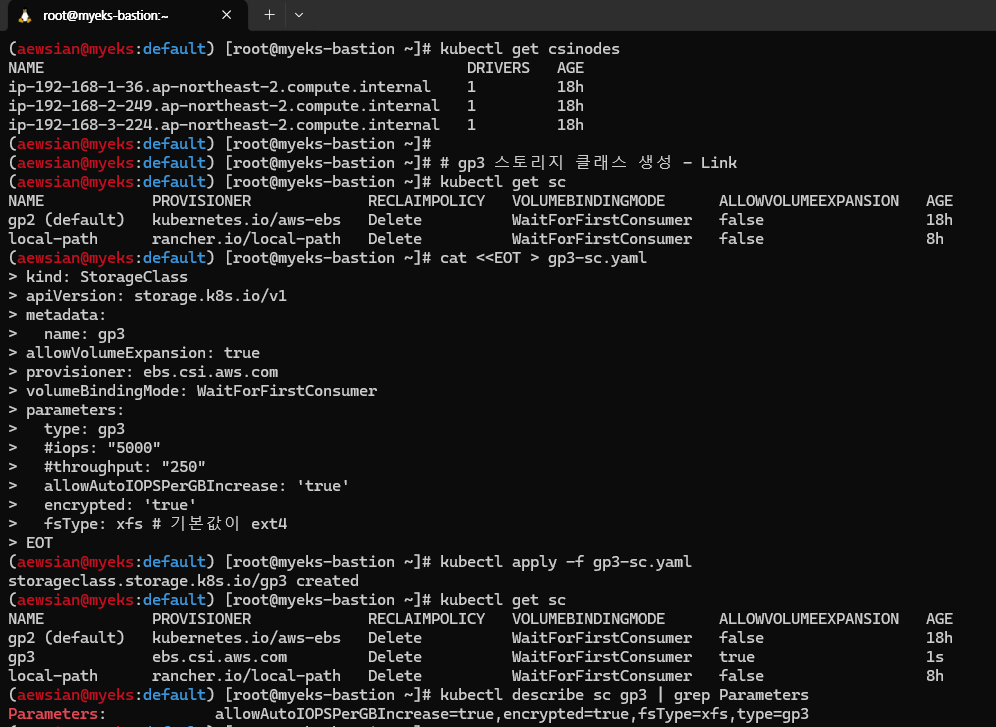
# csinodes 확인
kubectl get csinodes
# gp3 스토리지 클래스 생성 - Link
kubectl get sc
cat <<EOT > gp3-sc.yaml
kind: StorageClass
apiVersion: storage.k8s.io/v1
metadata:
name: gp3
allowVolumeExpansion: true
provisioner: ebs.csi.aws.com
volumeBindingMode: WaitForFirstConsumer
parameters:
type: gp3
#iops: "5000"
#throughput: "250"
allowAutoIOPSPerGBIncrease: 'true'
encrypted: 'true'
fsType: xfs # 기본값이 ext4
EOT
kubectl apply -f gp3-sc.yaml
kubectl get sc
kubectl describe sc gp3 | grep Parameters
IRSA 서비스 계정을 생성하고 gp3라는 스토리지 클래스를 생성해 보았다.
이제 PVC/PV 파트 테스트를 해보자.
# 워커노드의 EBS 볼륨 확인 : tag(키/값) 필터링 - 링크
aws ec2 describe-volumes --filters Name=tag:Name,Values=$CLUSTER_NAME-ng1-Node --output table
aws ec2 describe-volumes --filters Name=tag:Name,Values=$CLUSTER_NAME-ng1-Node --query "Volumes[*].Attachments" | jq
aws ec2 describe-volumes --filters Name=tag:Name,Values=$CLUSTER_NAME-ng1-Node --query "Volumes[*].{ID:VolumeId,Tag:Tags}" | jq
aws ec2 describe-volumes --filters Name=tag:Name,Values=$CLUSTER_NAME-ng1-Node --query "Volumes[].[VolumeId, VolumeType, Attachments[].[InstanceId, State][]][]" | jq
aws ec2 describe-volumes --filters Name=tag:Name,Values=$CLUSTER_NAME-ng1-Node --query "Volumes[].{VolumeId: VolumeId, VolumeType: VolumeType, InstanceId: Attachments[0].InstanceId, State: Attachments[0].State}" | jq

# 워커노드에서 파드에 추가한 EBS 볼륨 확인
aws ec2 describe-volumes --filters Name=tag:ebs.csi.aws.com/cluster,Values=true --output table
aws ec2 describe-volumes --filters Name=tag:ebs.csi.aws.com/cluster,Values=true --query "Volumes[*].{ID:VolumeId,Tag:Tags}" | jq
aws ec2 describe-volumes --filters Name=tag:ebs.csi.aws.com/cluster,Values=true --query "Volumes[].{VolumeId: VolumeId, VolumeType: VolumeType, InstanceId: Attachments[0].InstanceId, State: Attachments[0].State}" | jq

# 워커노드에서 파드에 추가한 EBS 볼륨 모니터링
while true; do aws ec2 describe-volumes --filters Name=tag:ebs.csi.aws.com/cluster,Values=true --query "Volumes[].{VolumeId: VolumeId, VolumeType: VolumeType, InstanceId: Attachments[0].InstanceId, State: Attachments[0].State}" --output text; date; sleep 1; done

# PVC 생성
cat <<EOT > awsebs-pvc.yaml
apiVersion: v1
kind: PersistentVolumeClaim
metadata:
  name: ebs-claim
spec:
  accessModes:
    - ReadWriteOnce
  resources:
    requests:
      storage: 4Gi
  storageClassName: gp3
EOT
kubectl apply -f awsebs-pvc.yaml
kubectl get pvc,pv

# 파드 생성
cat <<EOT > awsebs-pod.yaml
apiVersion: v1
kind: Pod
metadata:
  name: app
spec:
  terminationGracePeriodSeconds: 3
  containers:
  - name: app
    image: centos
    command: ["/bin/sh"]
    args: ["-c", "while true; do echo \$(date -u) >> /data/out.txt; sleep 5; done"]
    volumeMounts:
    - name: persistent-storage
      mountPath: /data
  volumes:
  - name: persistent-storage
    persistentVolumeClaim:
      claimName: ebs-claim
EOT
kubectl apply -f awsebs-pod.yaml

# PVC, 파드 확인
kubectl get pvc,pv,pod
kubectl get VolumeAttachment

# 추가된 EBS 볼륨 상세 정보 확인
aws ec2 describe-volumes --volume-ids $(kubectl get pv -o jsonpath="{.items[0].spec.csi.volumeHandle}") | jq

# PV 상세 확인 : nodeAffinity 내용의 의미는?
kubectl get pv -o yaml | yh
...
    nodeAffinity:
      required:
        nodeSelectorTerms:
        - matchExpressions:
          - key: topology.ebs.csi.aws.com/zone
            operator: In
            values:
            - ap-northeast-2b
...

kubectl get node --label-columns=topology.ebs.csi.aws.com/zone,topology.kubernetes.io/zone
kubectl describe node | more

# 파일 내용 추가 저장 확인
kubectl exec app -- tail -f /data/out.txt

# 아래 명령어는 확인까지 다소 시간이 소요됨
kubectl df-pv

## 파드 내에서 볼륨 정보 확인
kubectl exec -it app -- sh -c 'df -hT --type=overlay'
kubectl exec -it app -- sh -c 'df -hT --type=xfs'
실제 확인을 해보니 gp3 스토리지 클래스에 대해 PVC 클레임이 완료되고 /data 마운트 포인트에 대해 PV 활용을 하는 파드에서 확인이 잘 이루어졌다.

볼륨 증가 또한 가능한데, 이 때 늘릴 수는 있으나 줄일 수는 없다는 점을 참고하도록 하자. 자세한 부분은 링크를 통해 내용을 참고한다. 아래 실습을 통해 10G로 볼륨 크기가 늘어남을 확인할 수 있었다.
# 현재 pv 의 이름을 기준하여 4G > 10G 로 증가 : .spec.resources.requests.storage의 4Gi 를 10Gi로 변경
kubectl get pvc ebs-claim -o jsonpath={.spec.resources.requests.storage} ; echo
kubectl get pvc ebs-claim -o jsonpath={.status.capacity.storage} ; echo
kubectl patch pvc ebs-claim -p '{"spec":{"resources":{"requests":{"storage":"10Gi"}}}}'

# 확인 : 볼륨 용량 수정 반영이 되어야 되니, 수치 반영이 조금 느릴수 있다
kubectl exec -it app -- sh -c 'df -hT --type=xfs'
kubectl df-pv
aws ec2 describe-volumes --volume-ids $(kubectl get pv -o jsonpath="{.items[0].spec.csi.volumeHandle}") | jq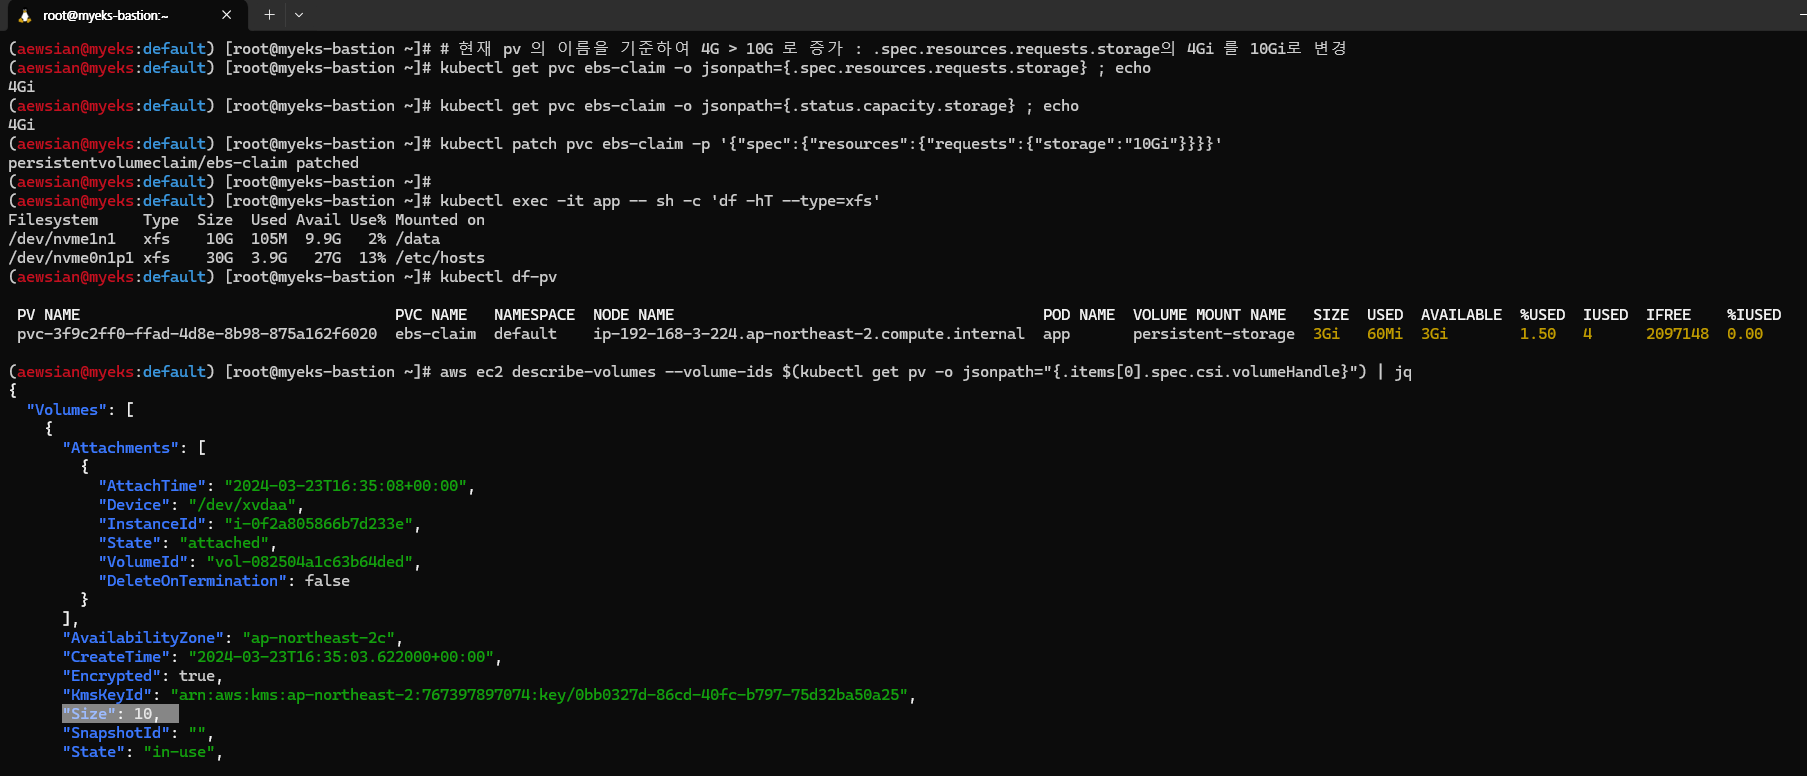
실습을 완료한 다음에는 관련 파드 및 PVC를 삭제하도록 하자.
kubectl delete pod app & kubectl delete pvc ebs-claim3. AWS Volume SnapShots Controller
볼륨에 대한 스냅샷은 특정 시점에 볼륨 상태가 어떠했는지 일종의 백업 형태로 바라볼 수 있겠다. 블로그에도 언급된 AWS Volume SnapShots Controller 부분을 실습해보도록 하자.
# (참고) EBS CSI Driver에 snapshots 기능 포함 될 것으로 보임
kubectl describe pod -n kube-system -l app=ebs-csi-controller

# Install Snapshot CRDs
curl -s -O https://raw.githubusercontent.com/kubernetes-csi/external-snapshotter/master/client/config/crd/snapshot.storage.k8s.io_volumesnapshots.yaml
curl -s -O https://raw.githubusercontent.com/kubernetes-csi/external-snapshotter/master/client/config/crd/snapshot.storage.k8s.io_volumesnapshotclasses.yaml
curl -s -O https://raw.githubusercontent.com/kubernetes-csi/external-snapshotter/master/client/config/crd/snapshot.storage.k8s.io_volumesnapshotcontents.yaml
kubectl apply -f snapshot.storage.k8s.io_volumesnapshots.yaml,snapshot.storage.k8s.io_volumesnapshotclasses.yaml,snapshot.storage.k8s.io_volumesnapshotcontents.yaml
kubectl get crd | grep snapshot
kubectl api-resources  | grep snapshot

# Install Common Snapshot Controller
curl -s -O https://raw.githubusercontent.com/kubernetes-csi/external-snapshotter/master/deploy/kubernetes/snapshot-controller/rbac-snapshot-controller.yaml
curl -s -O https://raw.githubusercontent.com/kubernetes-csi/external-snapshotter/master/deploy/kubernetes/snapshot-controller/setup-snapshot-controller.yaml
kubectl apply -f rbac-snapshot-controller.yaml,setup-snapshot-controller.yaml
kubectl get deploy -n kube-system snapshot-controller
kubectl get pod -n kube-system -l app=snapshot-controller

# Install Snapshotclass
curl -s -O https://raw.githubusercontent.com/kubernetes-sigs/aws-ebs-csi-driver/master/examples/kubernetes/snapshot/manifests/classes/snapshotclass.yaml
kubectl apply -f snapshotclass.yaml
kubectl get vsclass # 혹은 volumesnapshotclasses
아래와 같이 테스트 PVC/파드를 먼저 생성해본다.
# PVC 생성
kubectl apply -f awsebs-pvc.yaml

# 파드 생성
kubectl apply -f awsebs-pod.yaml

# 파일 내용 추가 저장 확인
kubectl exec app -- tail -f /data/out.txt

# VolumeSnapshot 생성 : Create a VolumeSnapshot referencing the PersistentVolumeClaim name >> EBS 스냅샷 확인
curl -s -O https://raw.githubusercontent.com/gasida/PKOS/main/3/ebs-volume-snapshot.yaml
cat ebs-volume-snapshot.yaml | yh
kubectl apply -f ebs-volume-snapshot.yaml

# VolumeSnapshot 확인
kubectl get volumesnapshot
kubectl get volumesnapshot ebs-volume-snapshot -o jsonpath={.status.boundVolumeSnapshotContentName} ; echo
kubectl describe volumesnapshot.snapshot.storage.k8s.io ebs-volume-snapshot
kubectl get volumesnapshotcontents

# VolumeSnapshot ID 확인
kubectl get volumesnapshotcontents -o jsonpath='{.items[*].status.snapshotHandle}' ; echo

# AWS EBS 스냅샷 확인
aws ec2 describe-snapshots --owner-ids self | jq
aws ec2 describe-snapshots --owner-ids self --query 'Snapshots[]' --output table

# app & pvc 제거 : 강제로 장애 재현
kubectl delete pod app && kubectl delete pvc ebs-claim
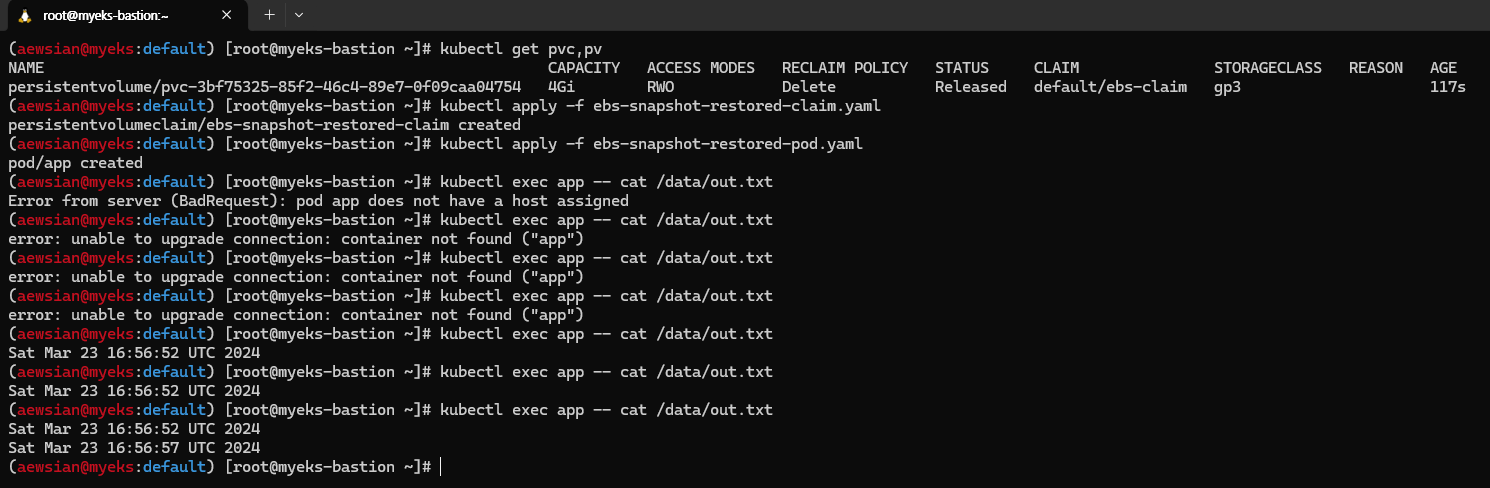
강제로 장애를 재현하였는데 이 때 스냅샷을 통해 PVC로 복원이 가능하다.
# 스냅샷에서 PVC 로 복원
kubectl get pvc,pv
cat <<EOT > ebs-snapshot-restored-claim.yaml
apiVersion: v1
kind: PersistentVolumeClaim
metadata:
  name: ebs-snapshot-restored-claim
spec:
  storageClassName: gp3
  accessModes:
    - ReadWriteOnce
  resources:
    requests:
      storage: 4Gi
  dataSource:
    name: ebs-volume-snapshot
    kind: VolumeSnapshot
    apiGroup: snapshot.storage.k8s.io
EOT
cat ebs-snapshot-restored-claim.yaml | yh
kubectl apply -f ebs-snapshot-restored-claim.yaml

# 확인
kubectl get pvc,pv

# 파드 생성
curl -s -O https://raw.githubusercontent.com/gasida/PKOS/main/3/ebs-snapshot-restored-pod.yaml
cat ebs-snapshot-restored-pod.yaml | yh
kubectl apply -f ebs-snapshot-restored-pod.yaml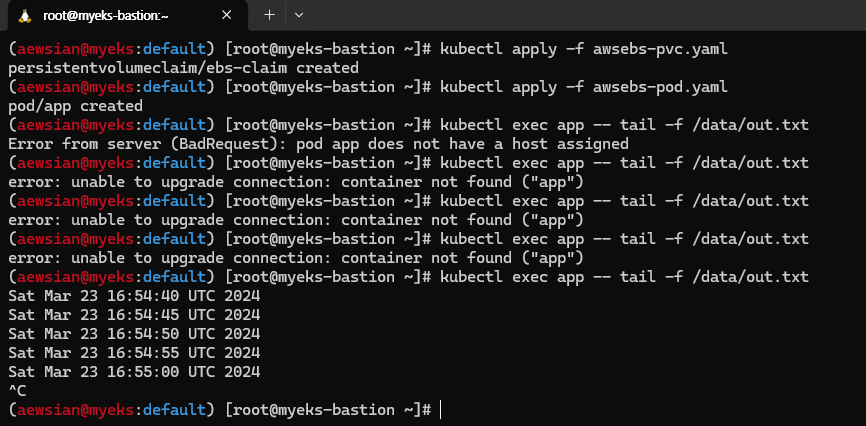
실제 실습을 할 때에는 충분히 out.txt 파일에 데이터가 기록된 상태에서 볼륨 스냅샷을 생성하는 것이 중요하다. 본인이 실습할 때에는 볼륨 스냅샷 생성을 할 때 out.txt 파일에 아무것도 기록되어 있지 않은 상태에서 진행하였기에 스냅샷 복원 후 이전 데이터가 모두 보이지 않는 것이 정상인 상황이었다.
실습을 완료하였다면 관련 리소스를 삭제하도록 하자.
kubectl delete pod app && kubectl delete pvc ebs-snapshot-restored-claim && kubectl delete volumesnapshots ebs-volume-snapshot4. AWS EFS Controller
EFS를 EKS에서 사용하면 여러 AZ에 걸쳐 데이터를 저장하여 높은 수준의 가용성과 내구성을 제공할 수 있다.
아래 명령어를 참고하여 EFS Controller를 직접 설치해보았다.
# EFS 정보 확인
aws efs describe-file-systems --query "FileSystems[*].FileSystemId" --output text
# IAM 정책 생성
curl -s -O https://raw.githubusercontent.com/kubernetes-sigs/aws-efs-csi-driver/master/docs/iam-policy-example.json
aws iam create-policy --policy-name AmazonEKS_EFS_CSI_Driver_Policy --policy-document file://iam-policy-example.json
# ISRA 설정 : 고객관리형 정책 AmazonEKS_EFS_CSI_Driver_Policy 사용
eksctl create iamserviceaccount \
--name efs-csi-controller-sa \
--namespace kube-system \
--cluster ${CLUSTER_NAME} \
--attach-policy-arn arn:aws:iam::${ACCOUNT_ID}:policy/AmazonEKS_EFS_CSI_Driver_Policy \
--approve
# ISRA 확인
kubectl get sa -n kube-system efs-csi-controller-sa -o yaml | head -5
eksctl get iamserviceaccount --cluster myeks
# EFS Controller 설치
helm repo add aws-efs-csi-driver https://kubernetes-sigs.github.io/aws-efs-csi-driver/
helm repo update
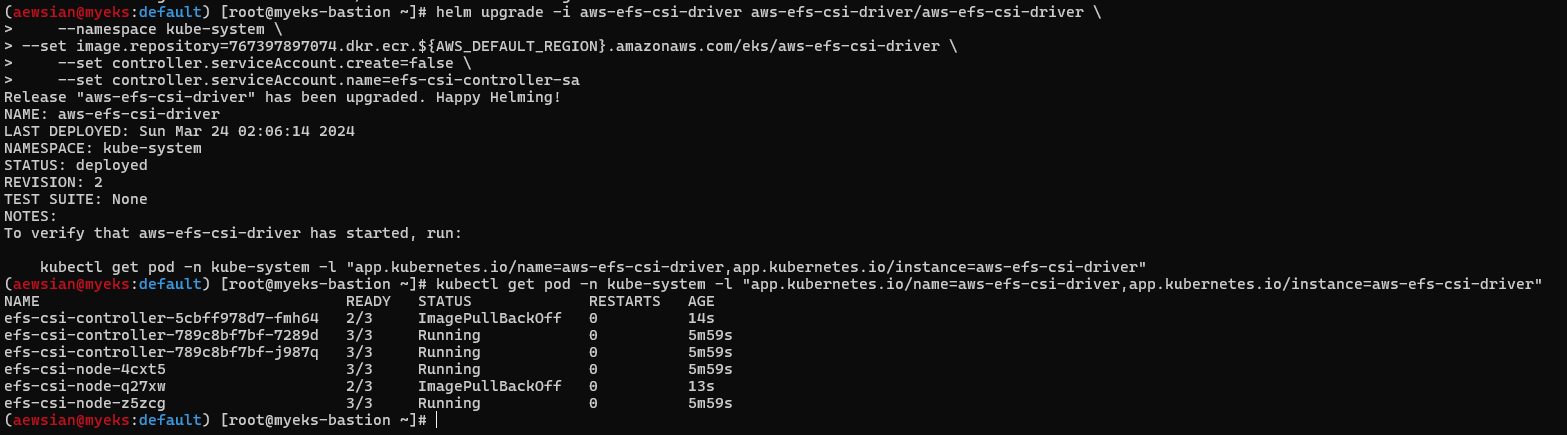
helm upgrade -i aws-efs-csi-driver aws-efs-csi-driver/aws-efs-csi-driver \
--namespace kube-system \
--set image.repository=${ACCOUNT_ID}.dkr.ecr.${AWS_DEFAULT_REGION}.amazonaws.com/eks/aws-efs-csi-driver \
--set controller.serviceAccount.create=false \
--set controller.serviceAccount.name=efs-csi-controller-sa
# 확인
helm list -n kube-system
kubectl get pod -n kube-system -l "app.kubernetes.io/name=aws-efs-csi-driver,app.kubernetes.io/instance=aws-efs-csi-driver"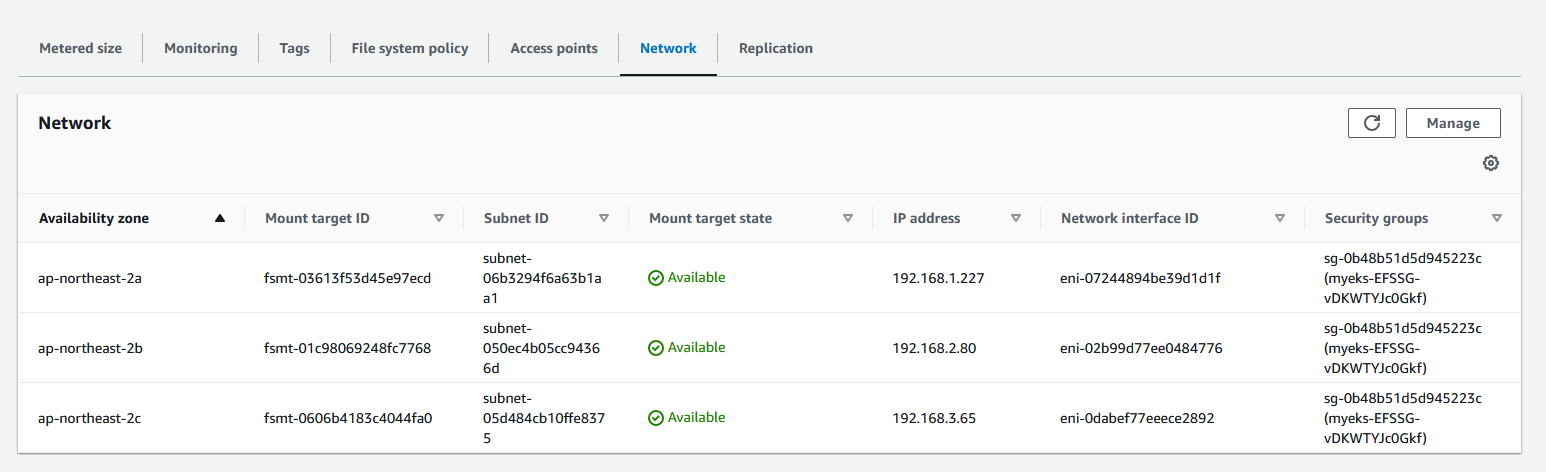
그 다음, EFS 파일 시스템을 다수의 파드가 사용하도록 설정해보자.
# 모니터링
watch 'kubectl get sc efs-sc; echo; kubectl get pv,pvc,pod'

# 실습 코드 clone
git clone https://github.com/kubernetes-sigs/aws-efs-csi-driver.git /root/efs-csi
cd /root/efs-csi/examples/kubernetes/multiple_pods/specs && tree

# EFS 스토리지클래스 생성 및 확인
cat storageclass.yaml | yh
kubectl apply -f storageclass.yaml
kubectl get sc efs-sc

# PV 생성 및 확인 : volumeHandle을 자신의 EFS 파일시스템ID로 변경
EfsFsId=$(aws efs describe-file-systems --query "FileSystems[*].FileSystemId" --output text)
sed -i "s/fs-4af69aab/$EfsFsId/g" pv.yaml

cat pv.yaml | yh
apiVersion: v1
kind: PersistentVolume
metadata:
  name: efs-pv
spec:
  capacity:
    storage: 5Gi
  volumeMode: Filesystem
  accessModes:
    - ReadWriteMany
  persistentVolumeReclaimPolicy: Retain
  storageClassName: efs-sc
  csi:
    driver: efs.csi.aws.com
    volumeHandle: fs-05699d3c12ef609e2

kubectl apply -f pv.yaml
kubectl get pv; kubectl describe pv

# PVC 생성 및 확인
cat claim.yaml | yh
kubectl apply -f claim.yaml
kubectl get pvc

# 파드 생성 및 연동 : 파드 내에 /data 데이터는 EFS를 사용
cat pod1.yaml pod2.yaml | yh
kubectl apply -f pod1.yaml,pod2.yaml
kubectl df-pv

# 파드 정보 확인 : PV에 5Gi 와 파드 내에서 확인한 NFS4 볼륨 크리 8.0E의 차이는 무엇? 파드에 6Gi 이상 저장 가능한가?
kubectl get pods
kubectl exec -ti app1 -- sh -c "df -hT -t nfs4"
kubectl exec -ti app2 -- sh -c "df -hT -t nfs4"
Filesystem           Type            Size      Used Available Use% Mounted on
127.0.0.1:/          nfs4            8.0E         0      8.0E   0% /data

# 공유 저장소 저장 동작 확인
tree /mnt/myefs              # 작업용EC2에서 확인
tail -f /mnt/myefs/out1.txt  # 작업용EC2에서 확인
kubectl exec -ti app1 -- tail -f /data/out1.txt
kubectl exec -ti app2 -- tail -f /data/out2.txt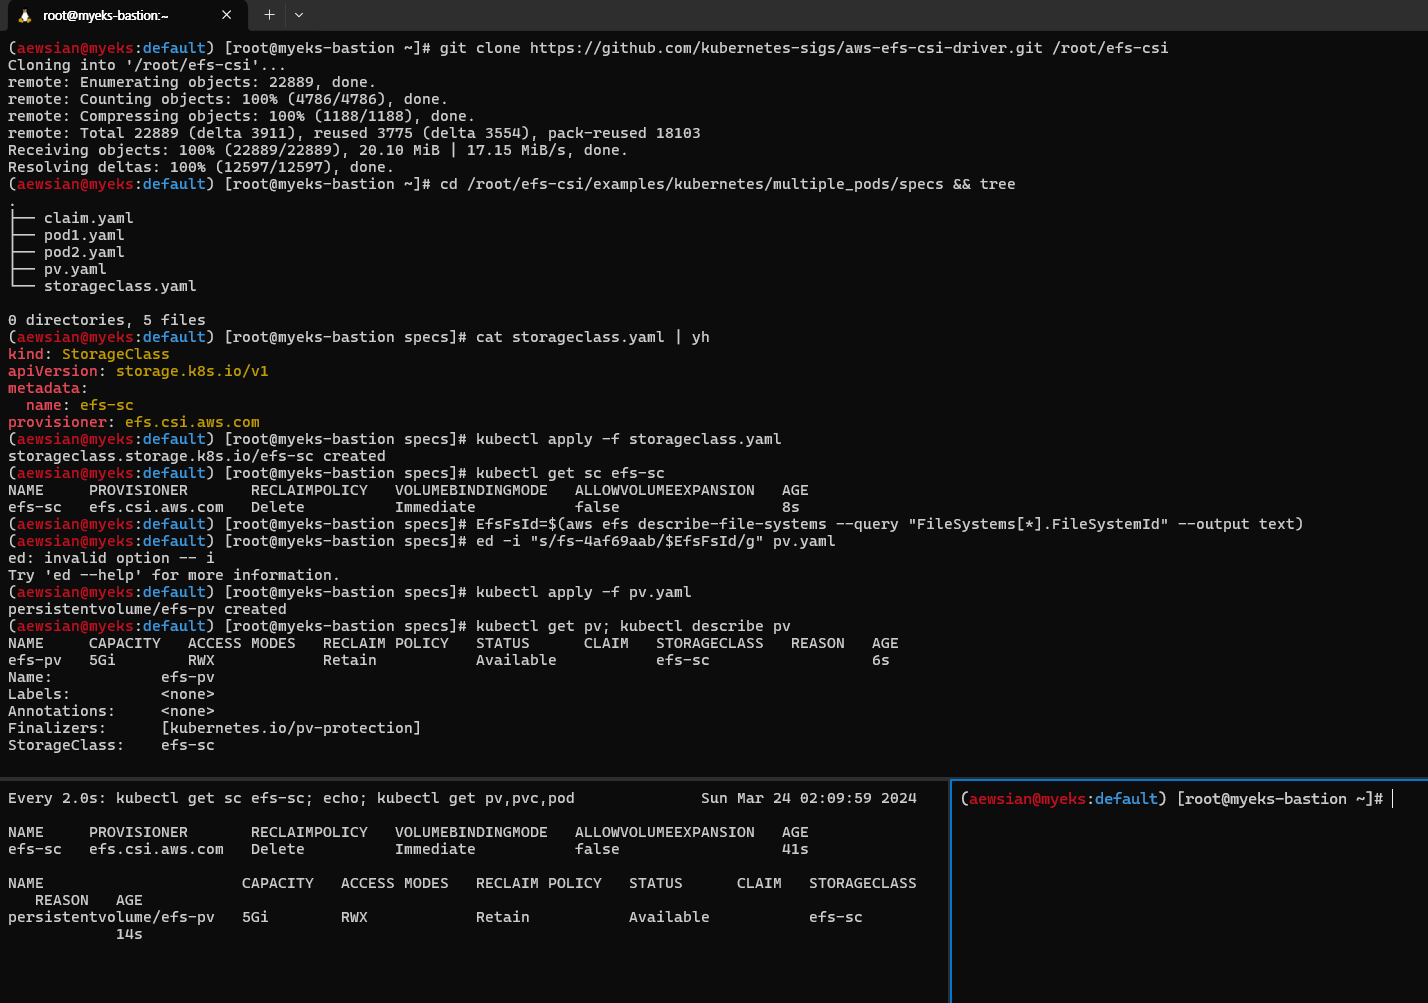
실습을 완료한 다음에는 꼭 삭제를 하도록 하자.
# 쿠버네티스 리소스 삭제
kubectl delete pod app1 app2
kubectl delete pvc efs-claim && kubectl delete pv efs-pv && kubectl delete sc efs-sc
5. EKS Persistent Volumes for Instance Store & Add NodeGroup
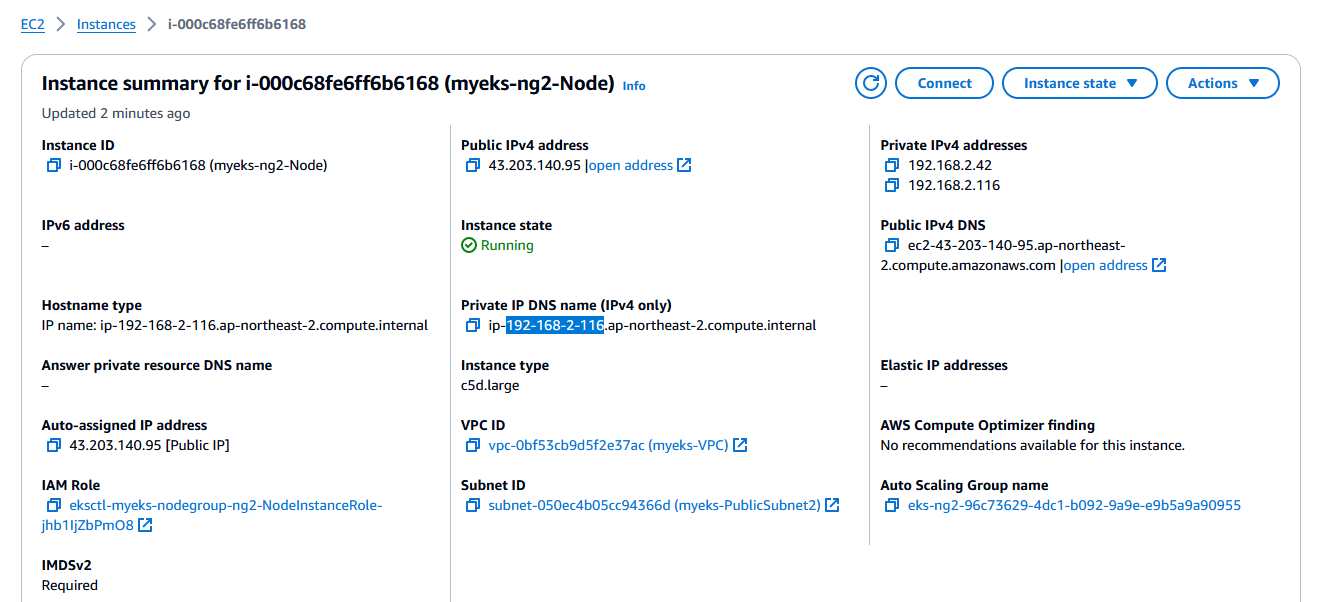
새로 노드 그룹을 생성해보는 과정을 실습해보도록 하자. 인스턴스 스토어는 EC2 스토리지 (EBS) 정보에 출력되지는 않는다고 한다.
# 인스턴스 스토어 볼륨이 있는 c5 모든 타입의 스토리지 크기
aws ec2 describe-instance-types \
--filters "Name=instance-type,Values=c5*" "Name=instance-storage-supported,Values=true" \
--query "InstanceTypes[].[InstanceType, InstanceStorageInfo.TotalSizeInGB]" \
--output table
--------------------------
| DescribeInstanceTypes |
+---------------+--------+
| c5d.large | 50 |
| c5d.12xlarge | 1800 |
...
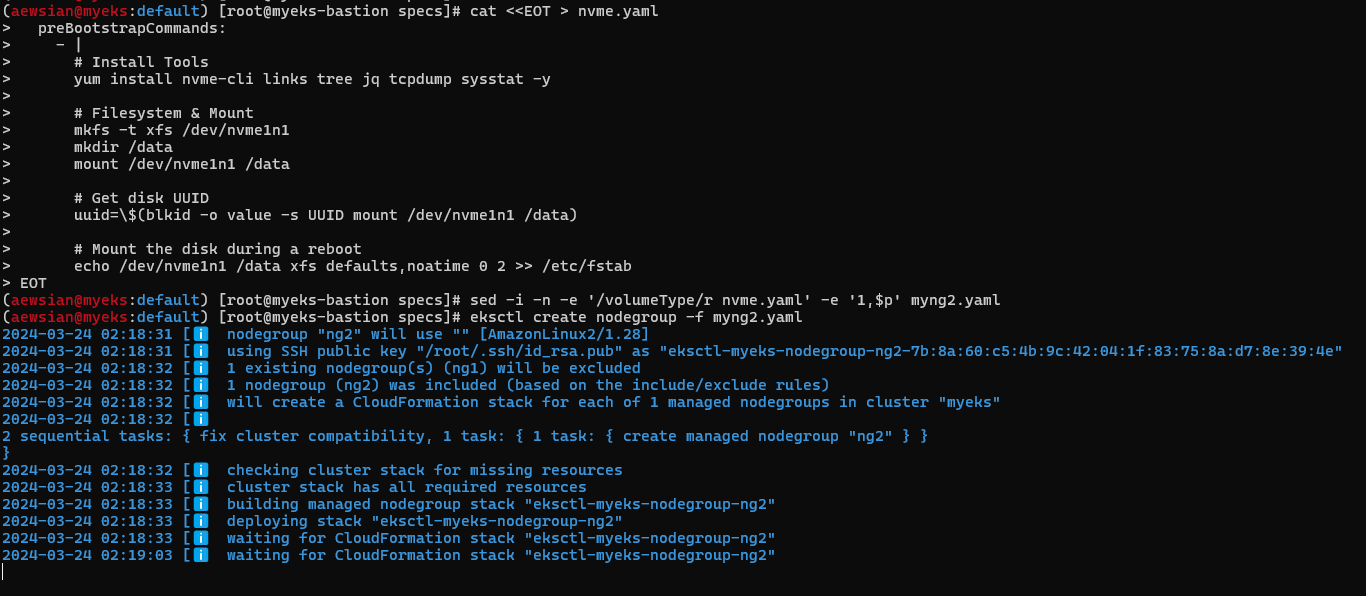
# 신규 노드 그룹 생성
eksctl create nodegroup --help
eksctl create nodegroup -c $CLUSTER_NAME -r $AWS_DEFAULT_REGION --subnet-ids "$PubSubnet1","$PubSubnet2","$PubSubnet3" --ssh-access \
-n ng2 -t c5d.large -N 1 -m 1 -M 1 --node-volume-size=30 --node-labels disk=nvme --max-pods-per-node 100 --dry-run > myng2.yaml
cat <<EOT > nvme.yaml
preBootstrapCommands:
- |
# Install Tools
yum install nvme-cli links tree jq tcpdump sysstat -y
# Filesystem & Mount
mkfs -t xfs /dev/nvme1n1
mkdir /data
mount /dev/nvme1n1 /data
# Get disk UUID
uuid=\$(blkid -o value -s UUID mount /dev/nvme1n1 /data)
# Mount the disk during a reboot
echo /dev/nvme1n1 /data xfs defaults,noatime 0 2 >> /etc/fstab
EOT
sed -i -n -e '/volumeType/r nvme.yaml' -e '1,$p' myng2.yaml
eksctl create nodegroup -f myng2.yaml
# 노드 보안그룹 ID 확인
NG2SGID=$(aws ec2 describe-security-groups --filters Name=group-name,Values=*ng2* --query "SecurityGroups[*].[GroupId]" --output text)
aws ec2 authorize-security-group-ingress --group-id $NG2SGID --protocol '-1' --cidr 192.168.1.100/32
# 워커 노드 SSH 접속
N4=<각자 자신의 워커 노드4번 Private IP 지정>
ssh ec2-user@$N4 hostname
# 확인
ssh ec2-user@$N4 sudo nvme list
ssh ec2-user@$N4 sudo lsblk -e 7 -d
ssh ec2-user@$N4 sudo df -hT -t xfs
ssh ec2-user@$N4 sudo tree /data
ssh ec2-user@$N4 sudo cat /etc/fstab
# (옵션) max-pod 확인
kubectl describe node -l disk=nvme | grep Allocatable: -A7
Allocatable:
attachable-volumes-aws-ebs: 25
cpu: 1930m
ephemeral-storage: 27905944324
hugepages-1Gi: 0
hugepages-2Mi: 0
memory: 3097552Ki
pods: 100
# (옵션) kubelet 데몬 파라미터 확인 : --max-pods=29 --max-pods=100
ssh ec2-user@$N4 sudo ps -ef | grep kubelet
root 2972 1 0 16:03 ? 00:00:09 /usr/bin/kubelet --config /etc/kubernetes/kubelet/kubelet-config.json --kubeconfig /var/lib/kubelet/kubeconfig --container-runtime-endpoint unix:///run/containerd/containerd.sock --image-credential-provider-config /etc/eks/image-credential-provider/config.json --image-credential-provider-bin-dir /etc/eks/image-credential-provider --node-ip=192.168.3.131 --pod-infra-container-image=602401143452.dkr.ecr.ap-northeast-2.amazonaws.com/eks/pause:3.5 --v=2 --cloud-provider=aws --container-runtime=remote --node-labels=eks.amazonaws.com/sourceLaunchTemplateVersion=1,alpha.eksctl.io/cluster-name=myeks,alpha.eksctl.io/nodegroup-name=ng2,disk=nvme,eks.amazonaws.com/nodegroup-image=ami-0da378ed846e950a4,eks.amazonaws.com/capacityType=ON_DEMAND,eks.amazonaws.com/nodegroup=ng2,eks.amazonaws.com/sourceLaunchTemplateId=lt-030e6043923ce712b --max-pods=29 --max-pods=100

스토리지 클래스를 재생성하고 Read 성능을 측정해보자.
# 기존 삭제
#curl -s -O https://raw.githubusercontent.com/rancher/local-path-provisioner/master/deploy/local-path-storage.yaml
cd
kubectl delete -f local-path-storage.yaml

#
sed -i 's/opt/data/g' local-path-storage.yaml
kubectl apply -f local-path-storage.yaml

# 모니터링
watch 'kubectl get pod -owide;echo;kubectl get pv,pvc'
ssh ec2-user@$N4 iostat -xmdz 1 -p nvme1n1

# 측정 : Read
#curl -s -O https://raw.githubusercontent.com/wikibook/kubepractice/main/ch10/fio-read.fio
kubestr fio -f fio-read.fio -s local-path --size 10G --nodeselector disk=nvme

성능 측정을 해보니 20,308.923828 IOPS를 얻을 수가 있었다. 일반 EBS는 약 3,000 IOPS가 나온다고 한다. 즉 인스턴스 스토어가 약 7배 빠르다. 실습을 다한 후에는 자원을 꼭 삭제하자.
kubectl delete -f local-path-storage.yaml

eksctl delete nodegroup -c $CLUSTER_NAME -n ng2
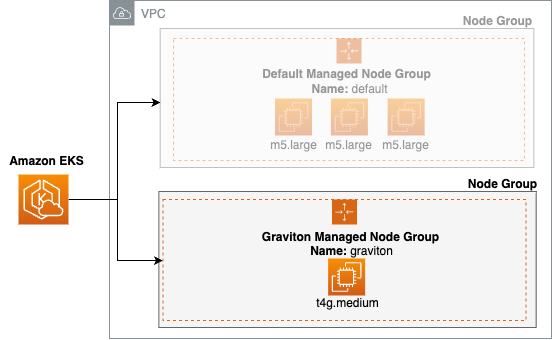
6. 노드 그룹
EKS 워크샵에 보면 Graviton (ARM) 인스턴스에 대해 설명하는 내용이 있다.Graviton 인스턴스의 경우 Processor family에 'g'라는 글씨를 추가로 붙여 인스턴스 유형을 나타내며 EKS 환경에서 Graviton에 해당하는 노드 그룹을 생성하여 관리를 할 수가 있다.
kubectl get nodes -L kubernetes.io/arch

# 신규 노드 그룹 생성
eksctl create nodegroup --help
eksctl create nodegroup -c $CLUSTER_NAME -r $AWS_DEFAULT_REGION --subnet-ids "$PubSubnet1","$PubSubnet2","$PubSubnet3" --ssh-access \
  -n ng3 -t t4g.medium -N 1 -m 1 -M 1 --node-volume-size=30 --node-labels family=graviton --dry-run > myng3.yaml
eksctl create nodegroup -f myng3.yaml

# 확인
kubectl get nodes --label-columns eks.amazonaws.com/nodegroup,kubernetes.io/arch
kubectl describe nodes --selector family=graviton
aws eks describe-nodegroup --cluster-name $CLUSTER_NAME --nodegroup-name ng3 | jq .nodegroup.taints

# taints 셋팅 -> 적용에 2~3분 정도 시간 소요
aws eks update-nodegroup-config --cluster-name $CLUSTER_NAME --nodegroup-name ng3 --taints "addOrUpdateTaints=[{key=frontend, value=true, effect=NO_EXECUTE}]"

# 확인
kubectl describe nodes --selector family=graviton | grep Taints
aws eks describe-nodegroup --cluster-name $CLUSTER_NAME --nodegroup-name ng3 | jq .nodegroup.taints
위 실습 스크립트와 같이 Graviton 노드 그룹을 생성한 다음, 생성한 Graviton 노드 그룹에 taint를 설정한다. Taint는 굳이 번역하자면 일종의 '오점'이 되는데, 즉 설정된 노드에 일종의 오점을 지정하여 파드를 배치할 때 이 Taint(오점)을 용인한다는 Toleration 옵션을 설정해야 Taint가 있는 노드에 배치가 될 수가 있다.

2-3분 지난 후 Taint 결과를 확인해보자. 참고로 Taint는 다음과 같은 속성이 있다고 한다.
# NO_SCHEDULE - This corresponds to the Kubernetes NoSchedule taint effect. This configures the managed node group with a taint that repels all pods that don't have a matching toleration. All running pods are not evicted from the manage node group's nodes.
# NO_EXECUTE - This corresponds to the Kubernetes NoExecute taint effect. Allows nodes configured with this taint to not only repel newly scheduled pods but also evicts any running pods without a matching toleration.
# PREFER_NO_SCHEDULE - This corresponds to the Kubernetes PreferNoSchedule taint effect. If possible, EKS avoids scheduling Pods that do not tolerate this taint onto the node.
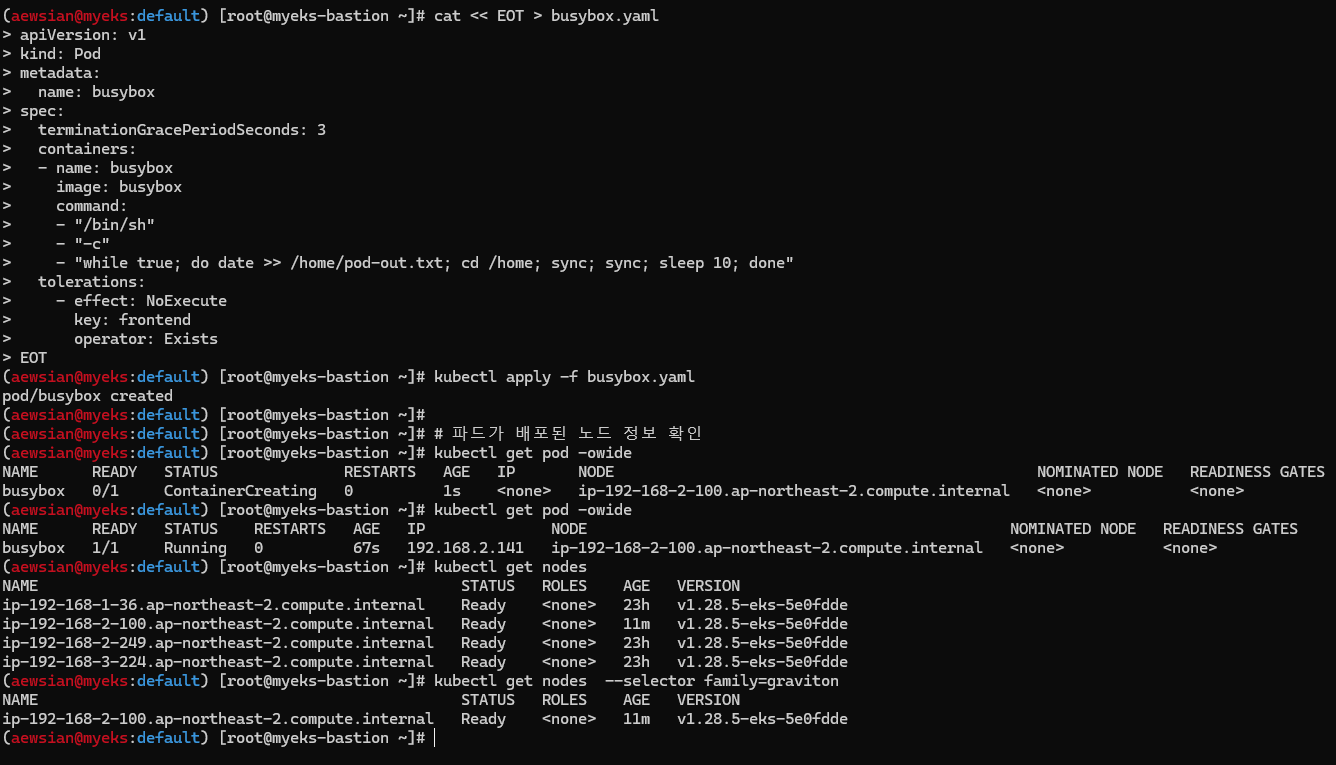
실제 Graviton 노드 그룹에 파드를 배치시켜보자.
cat << EOT > busybox.yaml
apiVersion: v1
kind: Pod
metadata:
  name: busybox
spec:
  terminationGracePeriodSeconds: 3
  containers:
  - name: busybox
    image: busybox
    command:
    - "/bin/sh"
    - "-c"
    - "while true; do date >> /home/pod-out.txt; cd /home; sync; sync; sleep 10; done"
  tolerations:
    - effect: NoExecute
      key: frontend
      operator: Exists
EOT
kubectl apply -f busybox.yaml

# 파드가 배포된 노드 정보 확인
kubectl get pod -owide
아래 스크린샷과 같이 파드에 배포할 때 toletations 속성을 지정하고 이에 따라 파드가 배포된 노드가 Gravition 노드 그룹임을 확인할 수 있었다.
이렇게 노드 그룹을 사용하여 특정 노드 그룹 Family에 대해 관리가 가능하다. 실습을 완료한 다음에는 자원을 삭제한다.
kubectl delete pod busybox
eksctl delete nodegroup -c $CLUSTER_NAME -n ng3
스팟 인스턴스 또한 노드 그룹 설정을 통해 사용할 수 있다 (관련 EKS 워크샵 내용: 링크). 사용 가능한 스팟 인스턴스를 확인하는 도구로 ec2-instance-selector가 있다. 이를 설치하여 실행해보자.
# ec2-instance-selector 설치
curl -Lo ec2-instance-selector https://github.com/aws/amazon-ec2-instance-selector/releases/download/v2.4.1/ec2-instance-selector-`uname | tr '[:upper:]' '[:lower:]'`-amd64 && chmod +x ec2-instance-selector
mv ec2-instance-selector /usr/local/bin/
ec2-instance-selector --version

# 사용
ec2-instance-selector --vcpus 2 --memory 4 --gpus 0 --current-generation -a x86_64 --deny-list 't.*' --output table-wide
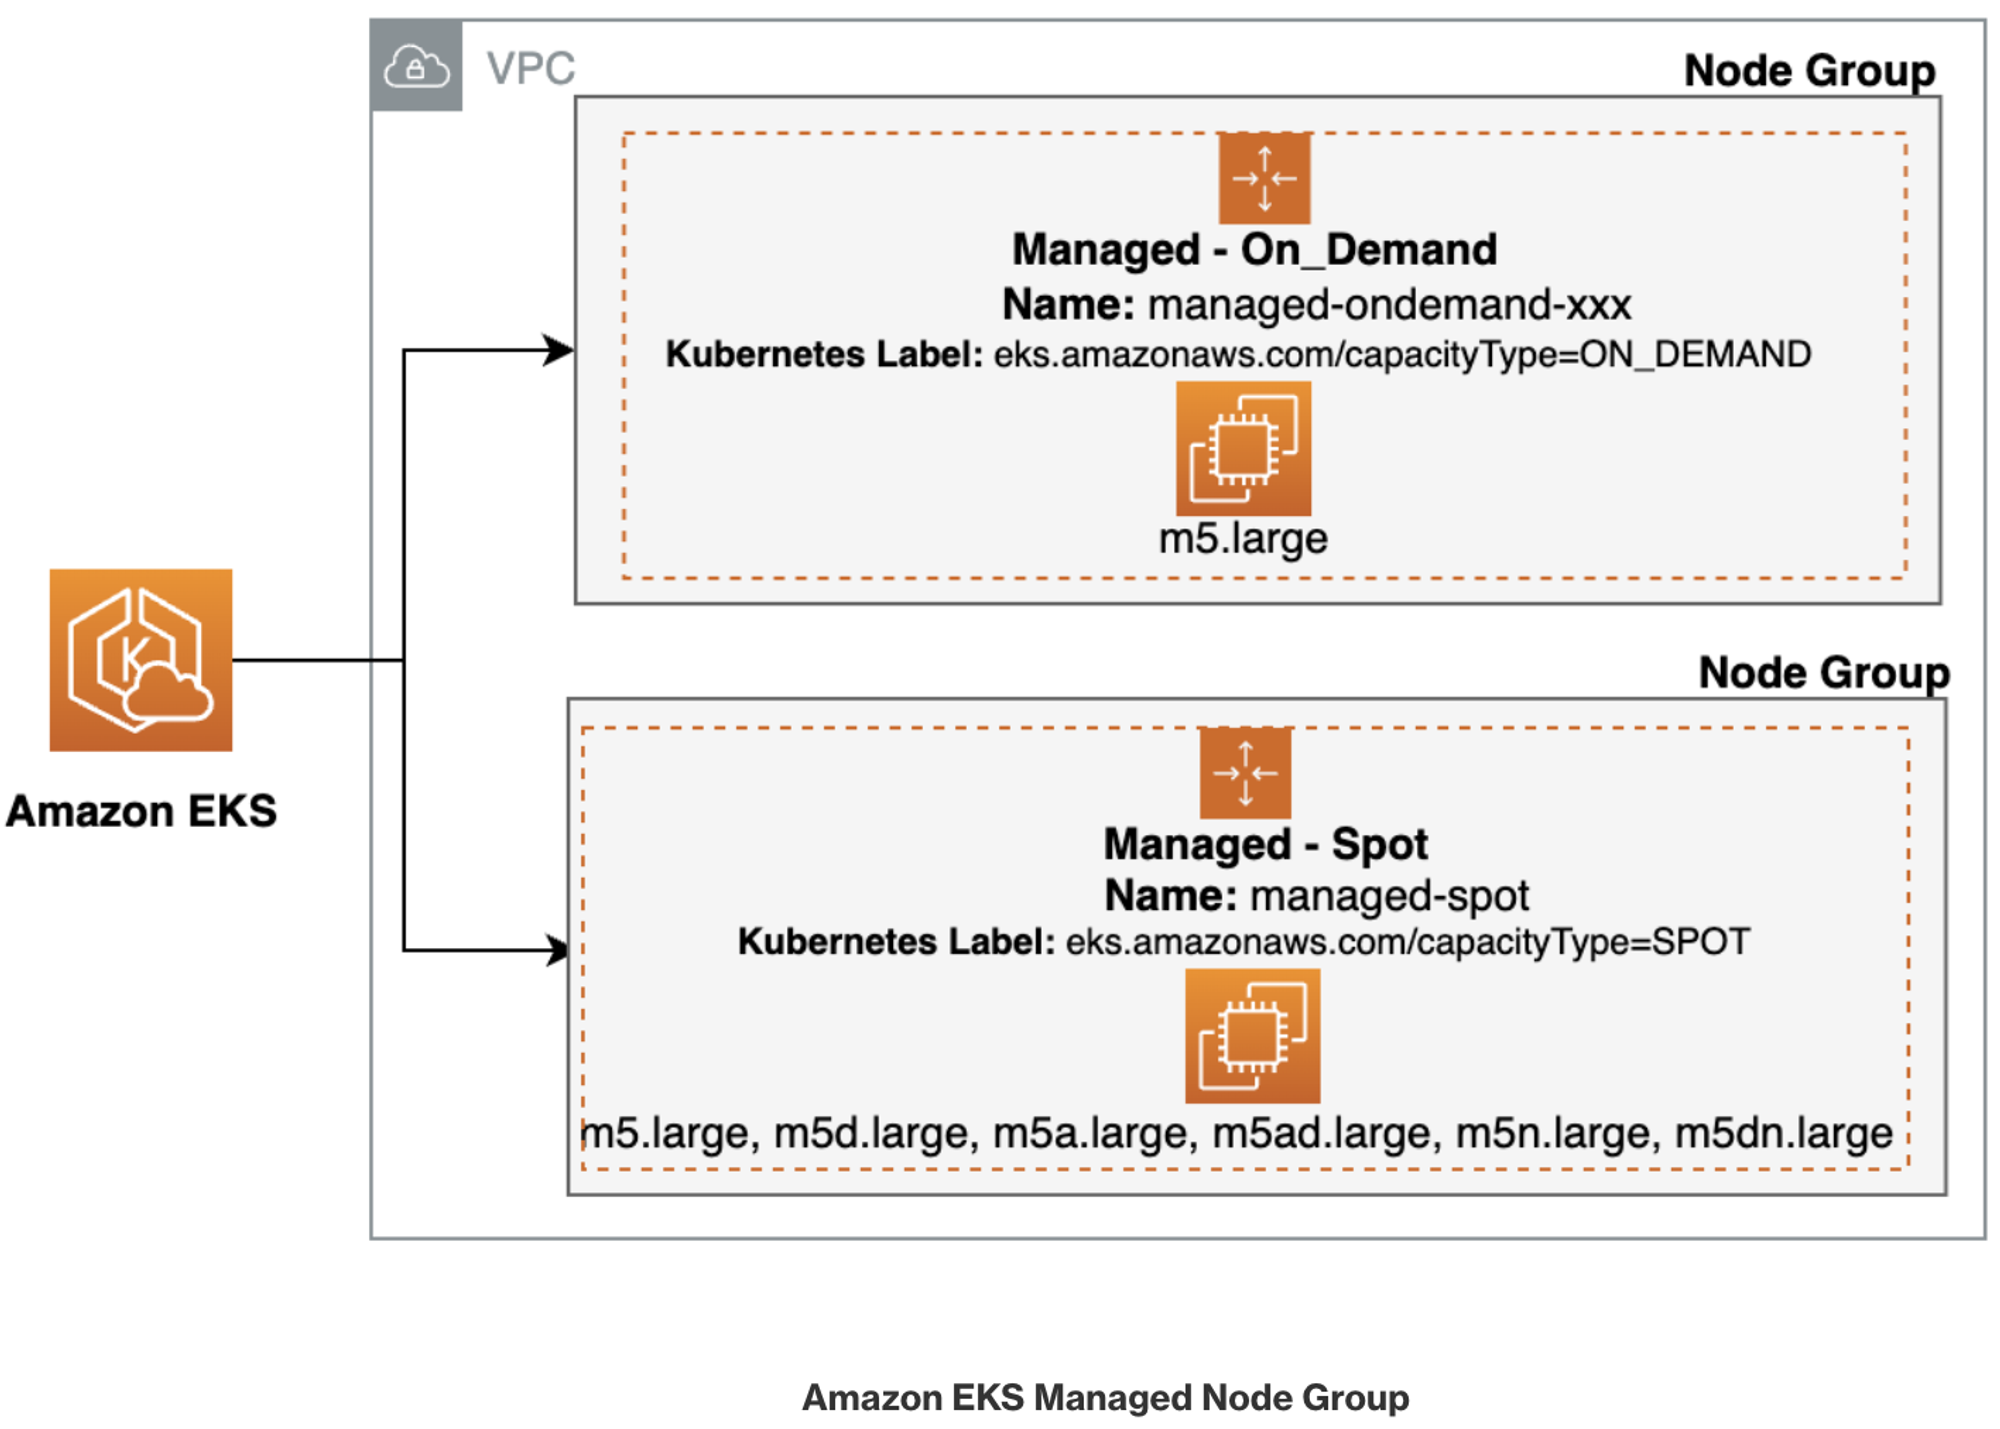
스팟 인스턴스 노드 그룹을 생성하기 위해서는 노드 그룹에 해당하는 Role의 ARN 정보를 가져올 필요가 있다. 이 정보는 AWS 콘솔에서 IAM -> Roles에 가서 NodeInstance와 같이 필터링을 하여 Role 이름을 확인할 수 있다.

kubectl get nodes -l eks.amazonaws.com/capacityType=ON_DEMAND
kubectl get nodes -L eks.amazonaws.com/capacityType
NAME                                              STATUS   ROLES    AGE   VERSION               CAPACITYTYPE
ip-192-168-1-65.ap-northeast-2.compute.internal   Ready    <none>   75m   v1.28.5-eks-5e0fdde   ON_DEMAND
ip-192-168-2-89.ap-northeast-2.compute.internal   Ready    <none>   75m   v1.28.5-eks-5e0fdde   ON_DEMAND
ip-192-168-3-39.ap-northeast-2.compute.internal   Ready    <none>   75m   v1.28.5-eks-5e0fdde   ON_DEMAND

# 생성 : 아래 node-role 은 각자 자신의 노드롤 ARN을 입력하자 ($ACCOUNT_ID로 대체)
# role AWSServiceRoleForAmazonEKSNodegroup 테스트해보자
aws eks create-nodegroup \
  --cluster-name $CLUSTER_NAME \
  --nodegroup-name managed-spot \
  --subnets $PubSubnet1 $PubSubnet2 $PubSubnet3 \
  --node-role arn:aws:iam::$ACCOUNT_ID:role/eksctl-myeks-nodegroup-ng1-NodeInstanceRole-wvZ2FX2m79Vv \
  --instance-types c5.large c5d.large c5a.large \
  --capacity-type SPOT \
  --scaling-config minSize=2,maxSize=3,desiredSize=2 \
  --disk-size 20

  aws eks wait nodegroup-active --cluster-name $CLUSTER_NAME --nodegroup-name managed-spot

  kubectl get nodes -L eks.amazonaws.com/capacityType,eks.amazonaws.com/nodegroup
AWS 콘솔에서도 결과를 확인할 수 있다.

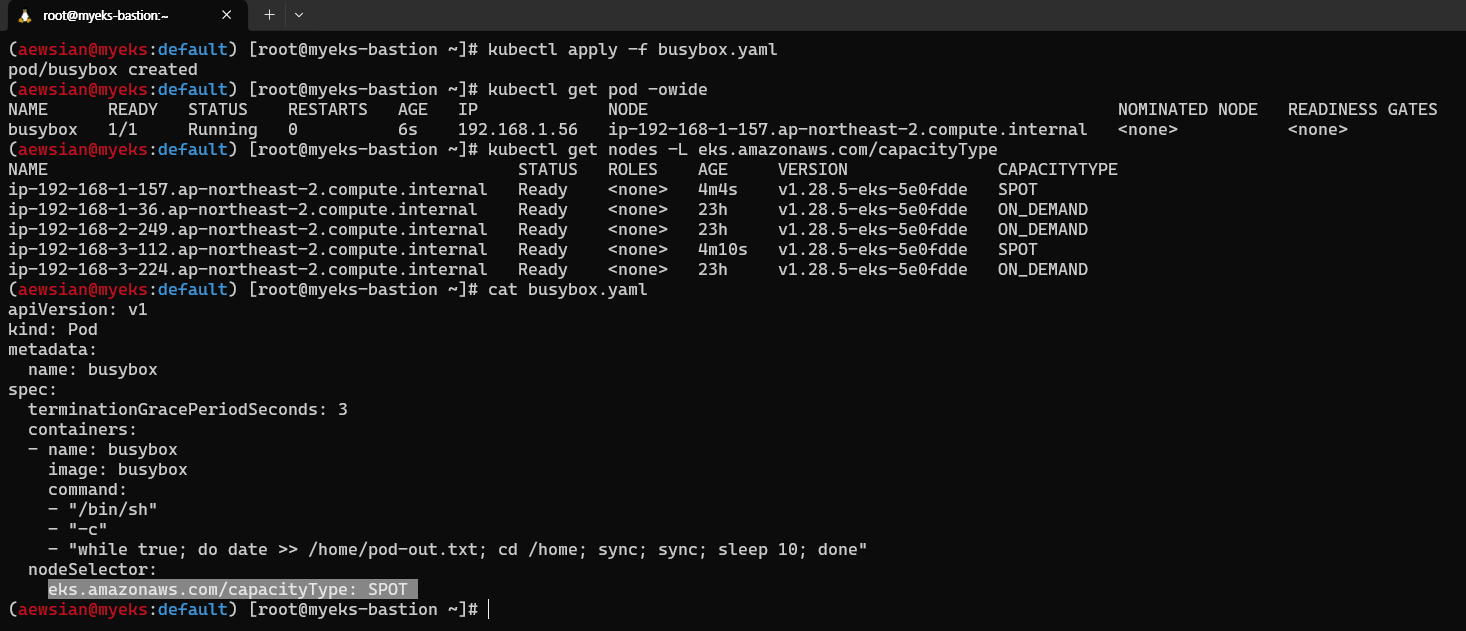
스팟 인스턴스에 파드를 생성하고 삭제하는 것으로 실습을 완료해보자.
#
cat << EOT > busybox.yaml
apiVersion: v1
kind: Pod
metadata:
  name: busybox
spec:
  terminationGracePeriodSeconds: 3
  containers:
  - name: busybox
    image: busybox
    command:
    - "/bin/sh"
    - "-c"
    - "while true; do date >> /home/pod-out.txt; cd /home; sync; sync; sleep 10; done"
  nodeSelector:
    eks.amazonaws.com/capacityType: SPOT
EOT
kubectl apply -f busybox.yaml

# 파드가 배포된 노드 정보 확인
kubectl get pod -owide

# 삭제
kubectl delete pod busybox
eksctl delete nodegroup -c $CLUSTER_NAME -n managed-spot
nodeSelector에 의해 스팟 인스턴스를 지정하였고 이에 따라 위애 생성 요청을 한 파드가 스팟 인스턴스 노드에서 실행되고 있음을 확인하였다.
항상 그렇듯이 실습을 모두 완료한 이후에는 생성된 전체 자원을 꼭 삭제하도록 하자.
eksctl delete cluster --name $CLUSTER_NAME && aws cloudformation delete-stack --stack-name $CLUSTER_NAME
'Amazon EKS (Elastic Kubernetes Service)' 카테고리의 다른 글
| [AEWS] 스터디 6주차 - EKS Security (0) | 2024.04.14 |
|---|---|
| [AEWS] 스터디 5주차 - EKS Autoscaling (0) | 2024.04.07 |
| [AEWS] 스터디 4주차 - Observability (0) | 2024.03.31 |
| [AEWS] 스터디 2주차 - EKS Networking (0) | 2024.03.17 |
| [AEWS] 스터디 1주차 - Amazon EKS 설치 및 기본 사용 (0) | 2024.03.10 |