본 게시물은 CloudNet@에서 진행하는 AEWS (Amazon EKS Workshop Study) 스터디에 참여하며 정리한 내용입니다.
0. 실습 환경 배포 & 소개
이번 시간 역시 원클릭 배포를 먼저 진행한다. 작업용 EC2 IP 주소 확인이 가능한 때 접속한 후, 이후 EKS 배포가 완료되기를 약 20분 정도 기다리자.
# YAML 파일 다운로드
curl -O https://s3.ap-northeast-2.amazonaws.com/cloudformation.cloudneta.net/K8S/eks-oneclick6.yaml

# CloudFormation 스택 배포
aws cloudformation deploy --template-file eks-oneclick6.yaml --stack-name myeks --parameter-overrides KeyName=kp-ian SgIngressSshCidr=$(curl -s ipinfo.io/ip)/32  MyIamUserAccessKeyID=`cat ~/.aws/credentials | grep aws_access_key_id | awk '{print $3}'` MyIamUserSecretAccessKey=`cat ~/.aws/credentials | grep aws_secret_access_key | awk '{print $3}'` ClusterBaseName=myeks --region ap-northeast-2

# CloudFormation 스택 배포 완료 후 작업용 EC2 IP 출력
aws cloudformation describe-stacks --stack-name myeks --query 'Stacks[*].Outputs[0].OutputValue' --output text

# 작업용 EC2 SSH 접속
ssh -i ~/.ssh/kp-ian.pem ec2-user@$(aws cloudformation describe-stacks --stack-name myeks --query 'Stacks[*].Outputs[0].OutputValue' --output text)
or
ssh -i ~/.ssh/kp-ian.pem root@$(aws cloudformation describe-stacks --stack-name myeks --query 'Stacks[*].Outputs[0].OutputValue' --output text)
~ password: qwe123
그 다음 기본 설정을 진행한다.
# default 네임스페이스 적용
kubectl ns default

# 노드 정보 확인 : t3.medium
kubectl get node --label-columns=node.kubernetes.io/instance-type,eks.amazonaws.com/capacityType,topology.kubernetes.io/zone

# ExternalDNS
MyDomain=sdndev.link
echo "export MyDomain=sdndev.link" >> /etc/profile
MyDnzHostedZoneId=$(aws route53 list-hosted-zones-by-name --dns-name "${MyDomain}." --query "HostedZones[0].Id" --output text)
echo $MyDomain, $MyDnzHostedZoneId
curl -s -O https://raw.githubusercontent.com/gasida/PKOS/main/aews/externaldns.yaml
MyDomain=$MyDomain MyDnzHostedZoneId=$MyDnzHostedZoneId envsubst < externaldns.yaml | kubectl apply -f -

# kube-ops-view
helm repo add geek-cookbook https://geek-cookbook.github.io/charts/
helm install kube-ops-view geek-cookbook/kube-ops-view --version 1.2.2 --set env.TZ="Asia/Seoul" --namespace kube-system
kubectl patch svc -n kube-system kube-ops-view -p '{"spec":{"type":"LoadBalancer"}}'
kubectl annotate service kube-ops-view -n kube-system "external-dns.alpha.kubernetes.io/hostname=kubeopsview.$MyDomain"
echo -e "Kube Ops View URL = http://kubeopsview.$MyDomain:8080/#scale=1.5"

# AWS LB Controller
helm repo add eks https://aws.github.io/eks-charts
helm repo update
helm install aws-load-balancer-controller eks/aws-load-balancer-controller -n kube-system --set clusterName=$CLUSTER_NAME \
  --set serviceAccount.create=false --set serviceAccount.name=aws-load-balancer-controller

# gp3 스토리지 클래스 생성
kubectl apply -f https://raw.githubusercontent.com/gasida/PKOS/main/aews/gp3-sc.yaml

# 노드 보안그룹 ID 확인
NGSGID=$(aws ec2 describe-security-groups --filters Name=group-name,Values=*ng1* --query "SecurityGroups[*].[GroupId]" --output text)
aws ec2 authorize-security-group-ingress --group-id $NGSGID --protocol '-1' --cidr 192.168.1.100/32
프로메테우스와 그라파나도 미리 설치하도록 하자.
# 사용 리전의 인증서 ARN 확인
CERT_ARN=`aws acm list-certificates --query 'CertificateSummaryList[].CertificateArn[]' --output text`
echo $CERT_ARN

# repo 추가
helm repo add prometheus-community https://prometheus-community.github.io/helm-charts

# 파라미터 파일 생성 : PV/PVC(AWS EBS) 삭제에 불편하니, 4주차 실습과 다르게 PV/PVC 미사용
cat <<EOT > monitor-values.yaml
prometheus:
  prometheusSpec:
    podMonitorSelectorNilUsesHelmValues: false
    serviceMonitorSelectorNilUsesHelmValues: false
    retention: 5d
    retentionSize: "10GiB"

  ingress:
    enabled: true
    ingressClassName: alb
    hosts:
      - prometheus.$MyDomain
    paths:
      - /*
    annotations:
      alb.ingress.kubernetes.io/scheme: internet-facing
      alb.ingress.kubernetes.io/target-type: ip
      alb.ingress.kubernetes.io/listen-ports: '[{"HTTPS":443}, {"HTTP":80}]'
      alb.ingress.kubernetes.io/certificate-arn: $CERT_ARN
      alb.ingress.kubernetes.io/success-codes: 200-399
      alb.ingress.kubernetes.io/load-balancer-name: myeks-ingress-alb
      alb.ingress.kubernetes.io/group.name: study
      alb.ingress.kubernetes.io/ssl-redirect: '443'

grafana:
  defaultDashboardsTimezone: Asia/Seoul
  adminPassword: prom-operator
  defaultDashboardsEnabled: false

  ingress:
    enabled: true
    ingressClassName: alb
    hosts:
      - grafana.$MyDomain
    paths:
      - /*
    annotations:
      alb.ingress.kubernetes.io/scheme: internet-facing
      alb.ingress.kubernetes.io/target-type: ip
      alb.ingress.kubernetes.io/listen-ports: '[{"HTTPS":443}, {"HTTP":80}]'
      alb.ingress.kubernetes.io/certificate-arn: $CERT_ARN
      alb.ingress.kubernetes.io/success-codes: 200-399
      alb.ingress.kubernetes.io/load-balancer-name: myeks-ingress-alb
      alb.ingress.kubernetes.io/group.name: study
      alb.ingress.kubernetes.io/ssl-redirect: '443'

alertmanager:
  enabled: false
EOT
cat monitor-values.yaml | yh

# 배포
kubectl create ns monitoring
helm install kube-prometheus-stack prometheus-community/kube-prometheus-stack --version 57.2.0 \
--set prometheus.prometheusSpec.scrapeInterval='15s' --set prometheus.prometheusSpec.evaluationInterval='15s' \
-f monitor-values.yaml --namespace monitoring

# Metrics-server 배포
kubectl apply -f https://github.com/kubernetes-sigs/metrics-server/releases/latest/download/components.yaml

# 프로메테우스 ingress 도메인으로 웹 접속
echo -e "Prometheus Web URL = https://prometheus.$MyDomain"

# 그라파나 웹 접속 : 기본 계정 - admin / prom-operator
echo -e "Grafana Web URL = https://grafana.$MyDomain"
1. Docker
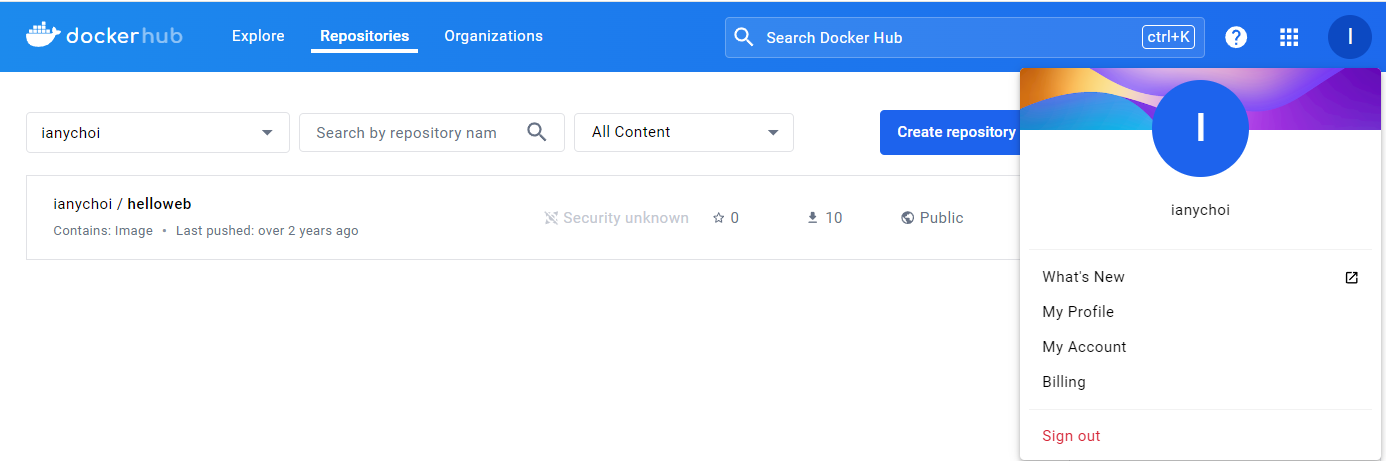
도커 허브 (https://hub.docker.com)에 회원 가입되지 않았다면 회원 가입을 먼저 진행한다.
# ubuntu 이미지 다운로드
docker pull ubuntu:20.04
docker images
# 실습을 위한 디렉터리 생성 및 이동
mkdir -p /root/myweb && cd /root/myweb
# Dockerfile 파일 생성
vi Dockerfile
FROM ubuntu:20.04
ENV TZ=Asia/Seoul VERSION=1.0.0 NICK=sdndev
RUN ln -snf /usr/share/zoneinfo/$TZ /etc/localtime && echo $TZ > /etc/timezone && \
sed -i 's/archive.ubuntu.com/mirror.kakao.com/g' /etc/apt/sources.list && \
sed -i 's/security.ubuntu.com/mirror.kakao.com/g' /etc/apt/sources.list && \
apt-get update && apt-get install -y apache2 figlet && \
echo "$NICK Web Server $VERSION<br>" > /var/www/html/index.html && \
echo "<pre>" >> /var/www/html/index.html && \
figlet AEWS Study >> /var/www/html/index.html && \
echo "</pre>" >> /var/www/html/index.html
EXPOSE 80
CMD ["usr/sbin/apache2ctl", "-DFOREGROUND"]
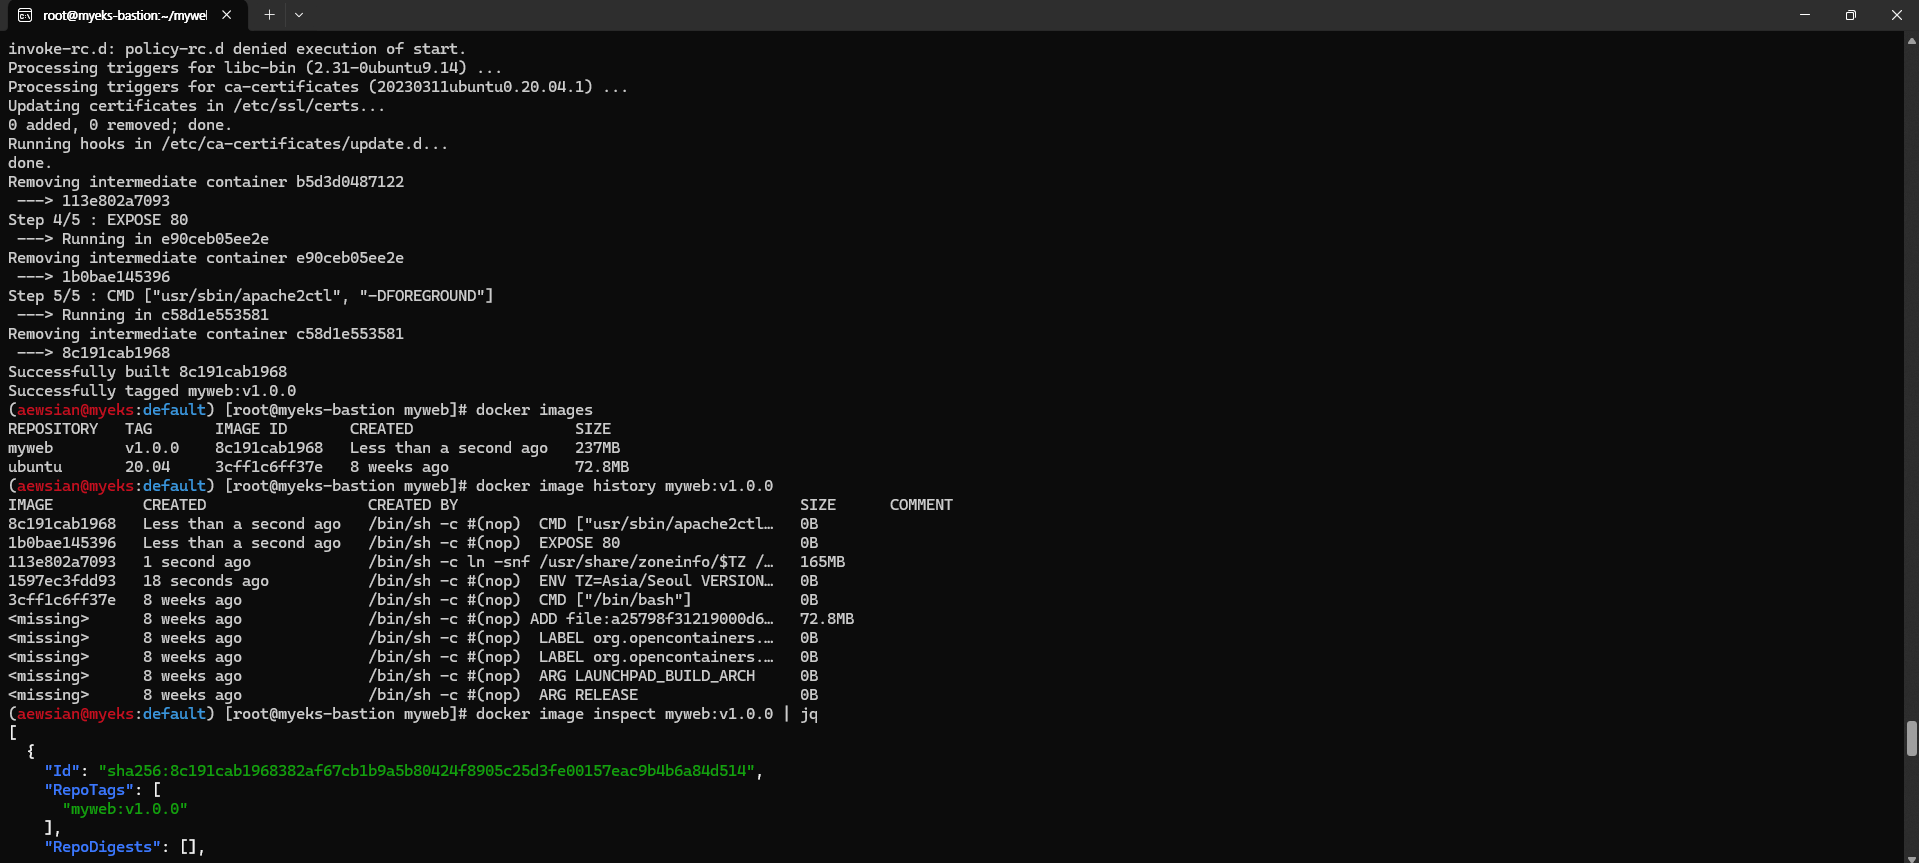
# 이미지 빌드
cat Dockerfile
docker build -t myweb:v1.0.0 .
docker images
docker image history myweb:v1.0.0
docker image inspect myweb:v1.0.0 | jq
# 컨테이너 실행
docker run -d -p 80:80 --rm --name myweb myweb:v1.0.0
docker ps
curl localhost
# 웹 접속 확인
curl -s ipinfo.io/ip | awk '{ print "myweb = http://"$1"" }'
Docker 이미지 빌드가 잘 되고 컨테이너 이미지 실행 및 로컬 & 웹 접속이 잘 되는 것을 확인할 수 있었다.

그 다음 도커 허브에 업로드해본다.
#
#DHUB=<도커 허브 계정>
DHUB=ianychoi
docker tag myweb:v1.0.0 $DHUB/myweb:v1.0.0
docker images

# 도커 허브 로그인
docker login
Username: <자신의 ID>
Password: <암호>
## 로그인 정보는 /[계정명]/.docker/config.json 에 저장됨. docker logout 시 삭제됨
## cat /root/.docker/config.json | jq

# push 로 이미지를 저장소에 업로드
docker push $DHUB/myweb:v1.0.0
도커 허브에서 업로드된 이미지 확인을 완료하였다.


해당 저장소 이미지를 활용해본다.
# 컨테이너 종료
docker rm -f myweb
docker ps

# 로컬 이미지 삭제
docker rmi $DHUB/myweb:v1.0.0
docker images

#
docker run -d -p 80:80 --rm --name myweb $DHUB/myweb:v1.0.0
docker images

# 확인
docker ps
curl localhost
curl -s ipinfo.io/ip | awk '{ print "myweb = http://"$1"" }'

# 삭제
docker rm -f myweb
로컬에 이미지가 없는 상황에서 도커 허브로부터 이미지를 가져와 잘 실행됨을 확인하였다.

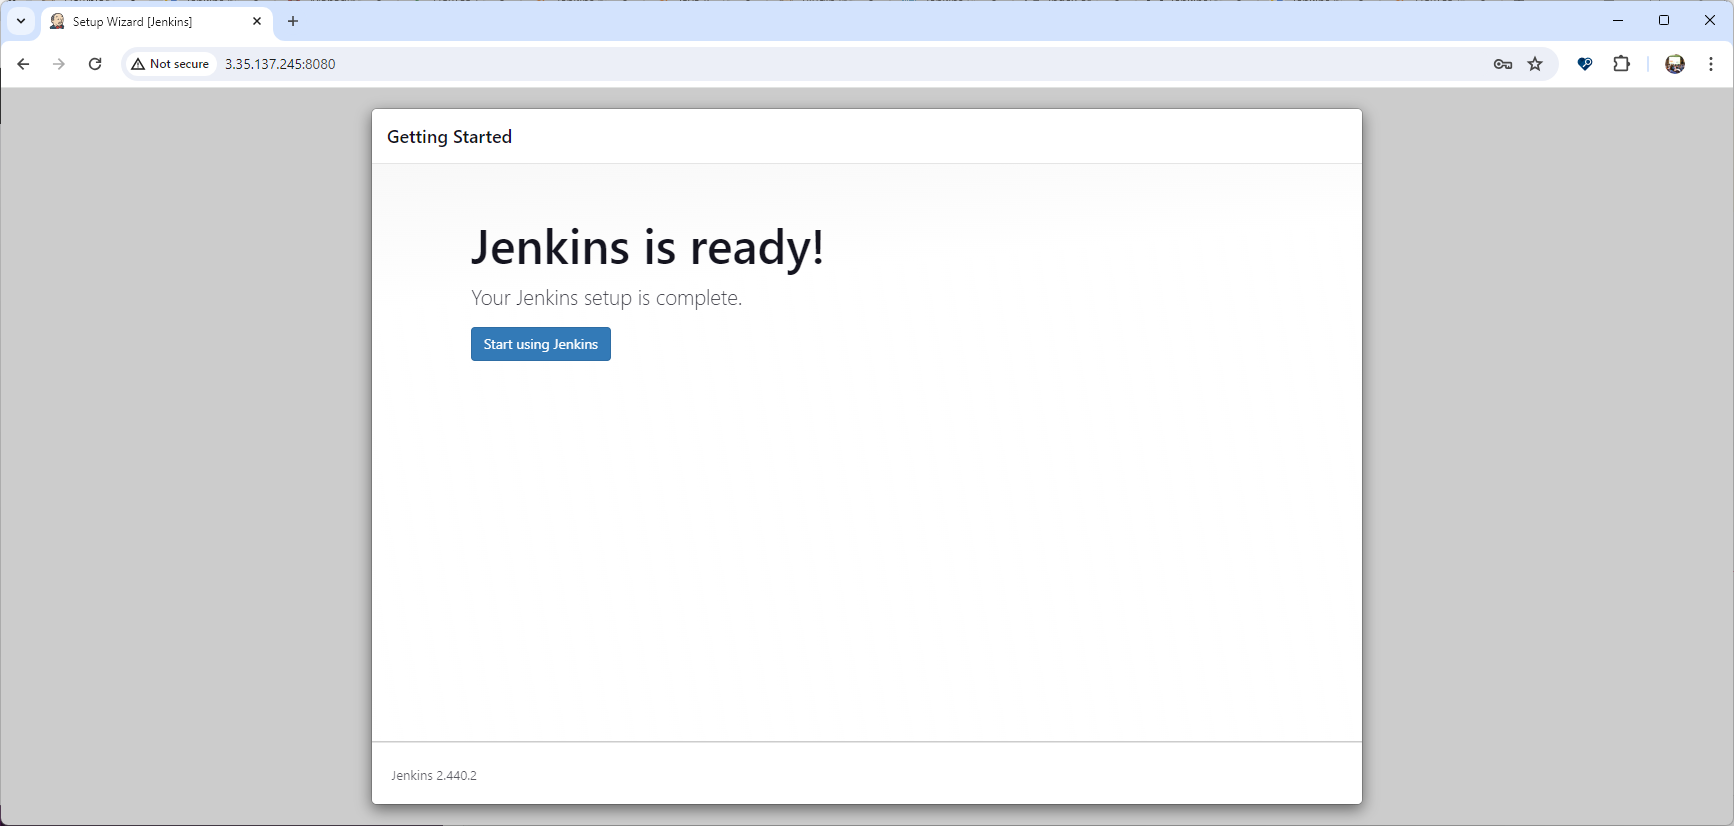
2. Jenkins
CI/CD 툴인 Jenkins를 EC2 Bastion VM에 설치해보자.
# 실습 편리를 위해서 root 계정 전환
sudo su -

# Add required dependencies for the jenkins package
# https://docs.aws.amazon.com/corretto/latest/corretto-17-ug/amazon-linux-install.html
sudo yum install fontconfig java-17-amazon-corretto -y
java -version
alternatives --display java
JAVA_HOME=/usr/lib/jvm/java-17-amazon-corretto.x86_64
echo $JAVA_HOME

# 젠킨스 설치
sudo wget -O /etc/yum.repos.d/jenkins.repo https://pkg.jenkins.io/redhat-stable/jenkins.repo
sudo rpm --import https://pkg.jenkins.io/redhat-stable/jenkins.io-2023.key
sudo yum upgrade
sudo yum install jenkins -y
sudo systemctl daemon-reload
sudo systemctl enable jenkins && sudo systemctl start jenkins
sudo systemctl status jenkins

# 초기 암호 확인
sudo systemctl status jenkins
cat /var/lib/jenkins/secrets/initialAdminPassword

# 접속 주소 확인
curl -s ipinfo.io/ip | awk '{ print "Jenkins = http://"$1":8080" }'
Jenkins = http://43.202.2.88:8080

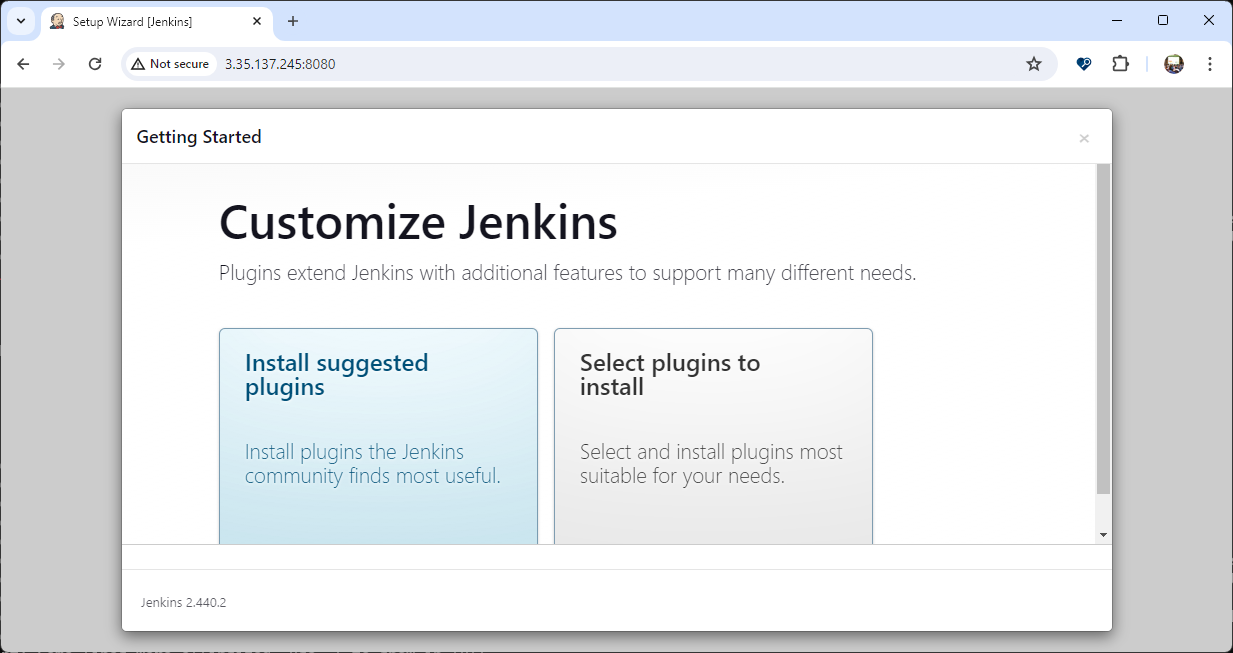
설치가 완료된 다음에는 몇 가지 세팅을 진행한다. 먼저 초기 암호를 입력한다. 그 다음 제안 플러그인을 설치하자. "Install suggested plugins"를 클릭한다.
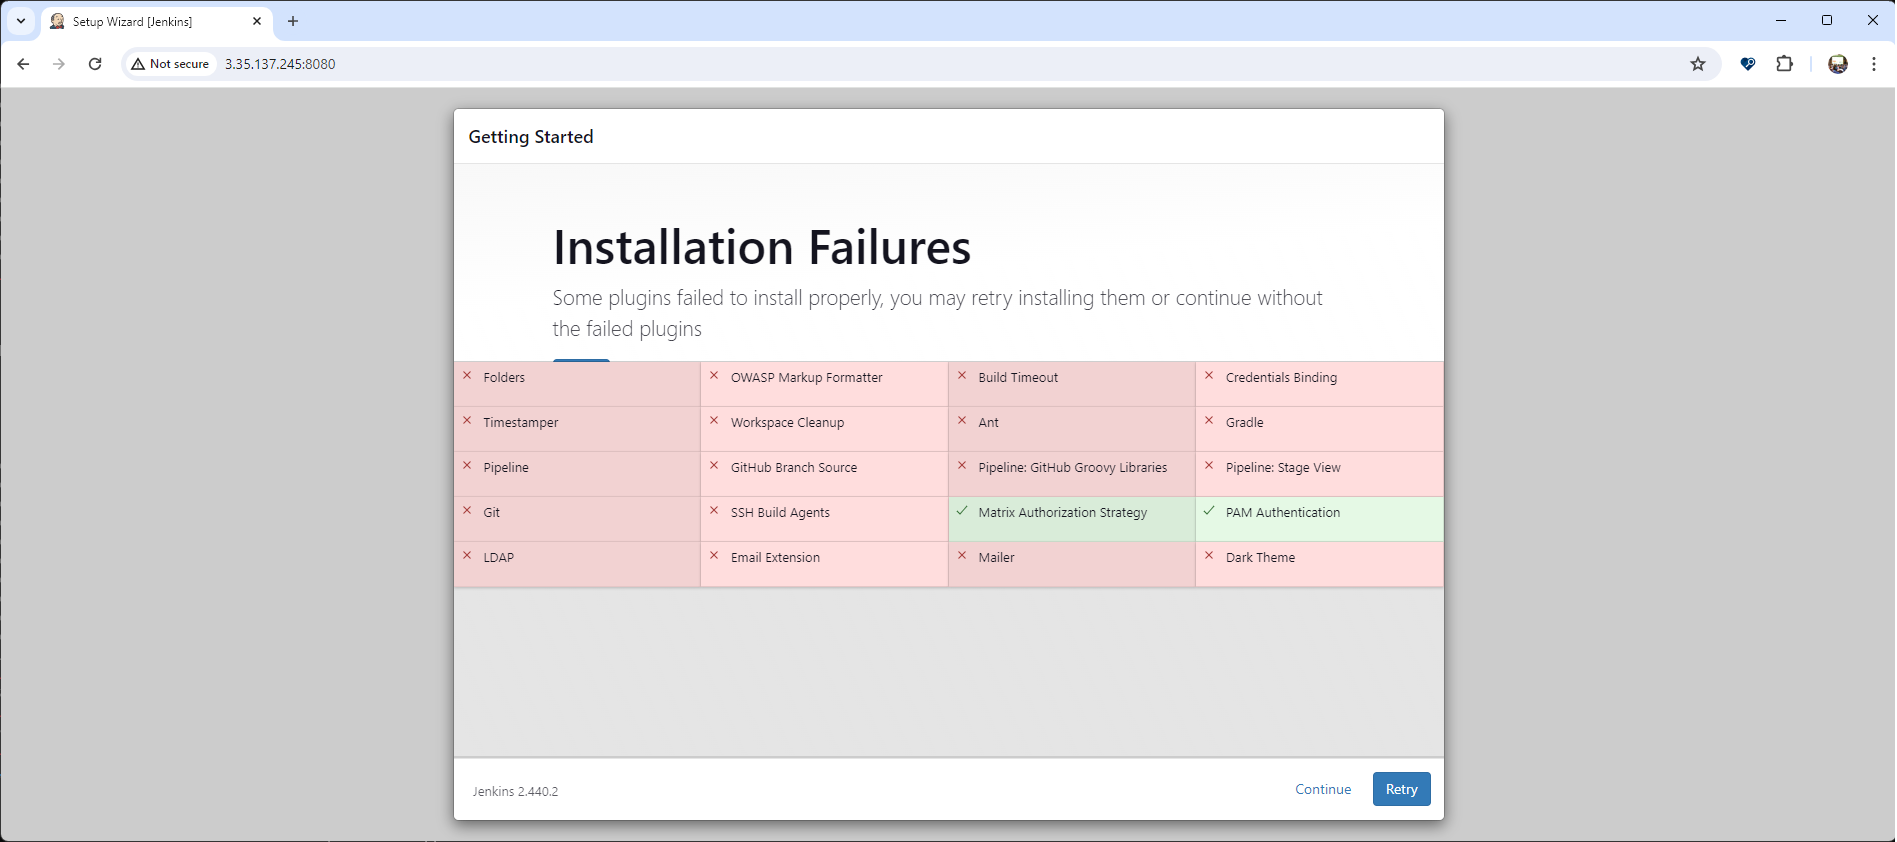
다음과 같이 플러그인 설치가 이루어진다.

다만 본인은 설치할 때 미러링 서버에 이슈가 있어서 그런지 아래 스크린샷과 같이 잘 설치가 되지 않았다. 이를 해결하고자 다른 리눅스 환경에서 동일한 Jenkins를 설치하고 플러그인 설치를 모두 완료한 상태에서 /var/lib/jenkins 폴더 전체를 tar 압축 후 가져오는 형태로 해결을 하였다.
플러그인 설치가 잘 되면 그 다음 사용자를 생성하고 Jenkins를 사용하면 된다.

Jenkins 관리에서 First-Project를 생성을 해볼 것이다. 그 전에 먼저 "Manage Jenkins" -> "Tools" -> "JDK installations" 부분에 "Add JDK"를 선택 후 아래 스크린샷과 같이 jdk-17, /usr/lib/jvm/java-17-amazon-corretto.x86_64 값을 각각 입력 후 "Save" 버튼을 클릭한다.

그 다음에 왼쪽 메뉴에서 "New Item"을 클릭하면 새로운 아이템을 입력하는 화면이 나타난다. "First-Project"라고 이름을 적고 "Freestyle project"를 선택한 다음 하단 "OK"를 클릭하자.

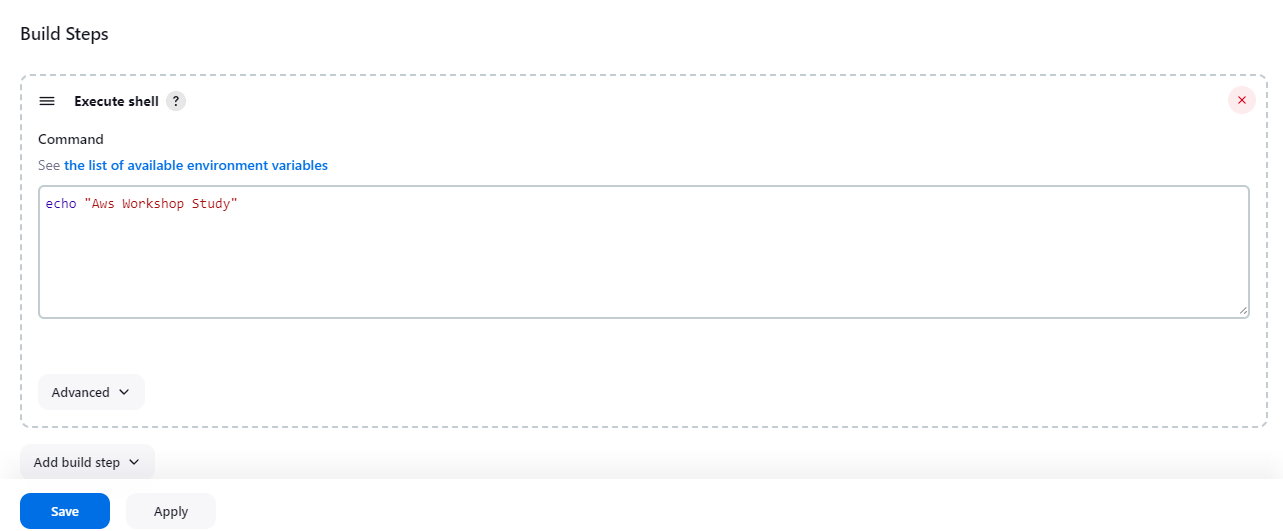
그 다음 나타나는 Configuration 메뉴에서는 세부 구성을 설정할 수가 있다. 그 중 "Build Steps"를 클릭 후 "Add build step" -> "Execute shell"을 선택한 다음, echo "Aws Workshop Study" 와 같이 간단한 문장을 출력하도록 입력한 다음에 하단 "Apply" 및 "Save" 버튼을 클릭하여 저장한다.
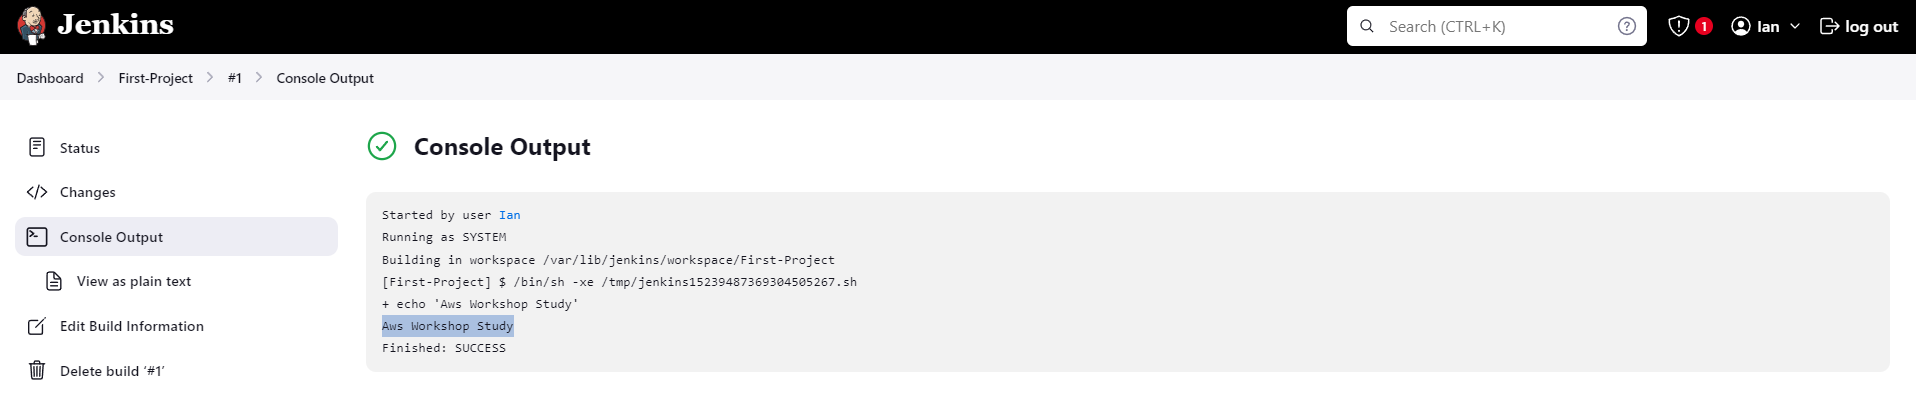
왼쪽 메뉴 중 "Build Now"를 선택하면 실행된 결과가 왼쪽 하단 "Build History"에 보이며 콘솔 출력 결과 또한 확인이 가능하다.

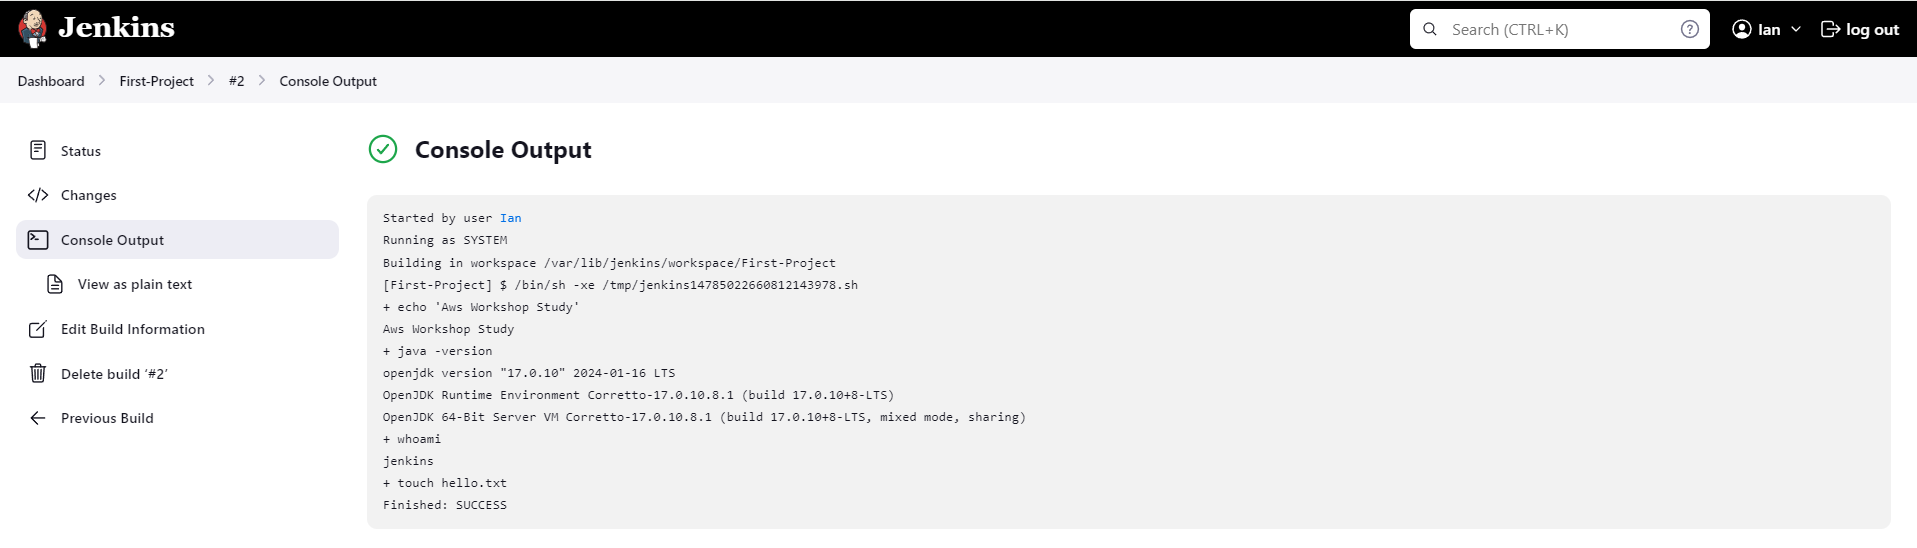
다시 Configuration -> Configure -> Build Environment -> Build Steps에서 "java -version", "whoami", "touch hello.txt"를 추가하고 Apply & Save를 클릭한 다음에 "Build Now"를 클릭하여 실행을 해보자. 콘솔에서도 확인할 수 있으며 특히 "tree /var/lib/jenkins/workspace/First-Project" 명령어를 Bastion EC2에서 실행하면 hello.txt 파일이 /var/lib/jenkins 내 workspace 에서 프로젝트 명 내에 파일이 저장된다는 것을 확인할 수 있다.

그 다음으로는 Jenkins에서 Docker를 사용하도록 설정해본다.
# jenkins 유저로 docker 사용 가능하게 설정
grep -i jenkins /etc/passwd
usermod -s /bin/bash jenkins
grep -i jenkins /etc/passwd
# jenkins 유저 전환
su - jenkins
whoami
pwd
docker info
exit
#
chmod 666 /var/run/docker.sock
usermod -aG docker jenkins
# Jeknins 유저로 확인
su - jenkins
docker info
# Dockerhub로 로그인 하기
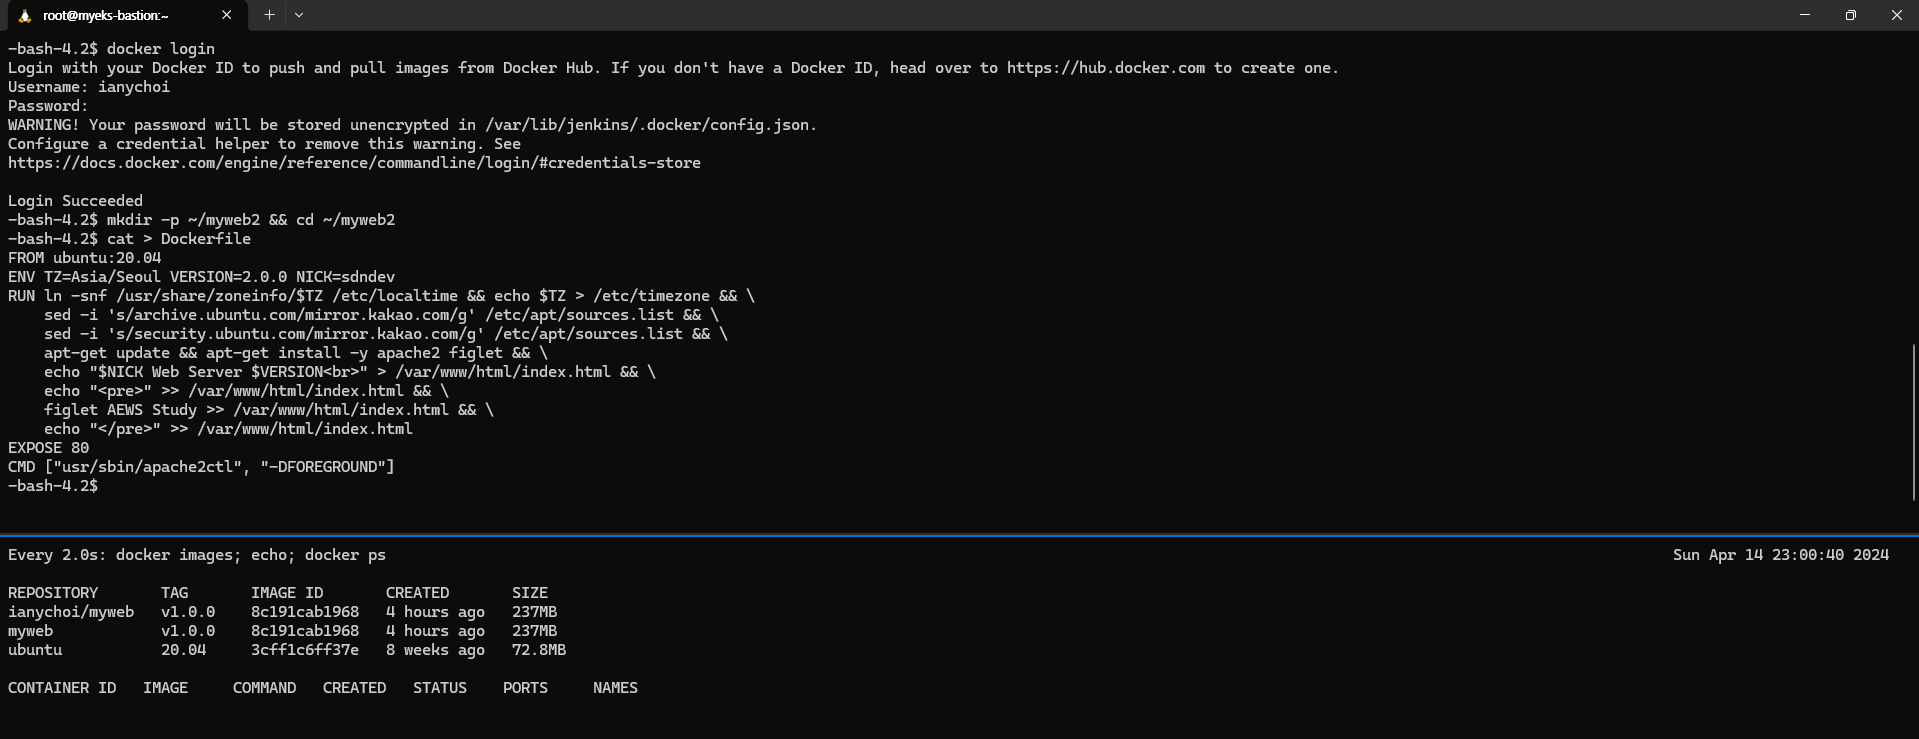
docker login
Username: <자신의 계정명>
Password: <자신의 암호>
# myweb:v2.0.0 컨테이너 이미지 생성을 위한 Dockerfile 준비
# 실습을 위한 디렉터리 생성 및 이동
mkdir -p ~/myweb2 && cd ~/myweb2
# Dockerfile 파일 생성
vi Dockerfile
FROM ubuntu:20.04
ENV TZ=Asia/Seoul VERSION=2.0.0 NICK=sdndev
RUN ln -snf /usr/share/zoneinfo/$TZ /etc/localtime && echo $TZ > /etc/timezone && \
sed -i 's/archive.ubuntu.com/mirror.kakao.com/g' /etc/apt/sources.list && \
sed -i 's/security.ubuntu.com/mirror.kakao.com/g' /etc/apt/sources.list && \
apt-get update && apt-get install -y apache2 figlet && \
echo "$NICK Web Server $VERSION<br>" > /var/www/html/index.html && \
echo "<pre>" >> /var/www/html/index.html && \
figlet AEWS Study >> /var/www/html/index.html && \
echo "</pre>" >> /var/www/html/index.html
EXPOSE 80
CMD ["usr/sbin/apache2ctl", "-DFOREGROUND"]
# 모니터링
watch -d 'docker images; echo; docker ps'
-----------
# (참고) 이미지 빌드
docker build -t myweb:v2.0.0 -f /var/lib/jenkins/myweb2/Dockerfile
# (참고) 컨테이너 실행
docker run -d -p 80:80 --rm --name myweb myweb:v2.0.0
jenkins 사용자에 대해서는 디폴트 쉘이 /bin/false로 되어 있기에 이를 /bin/bash로 변경한 다음 su 명령어를 통해 jenkins 사용자로 shell을 실행하였다. 그런데 docker info를 실행하면 "permission denied"가 나타나는 것을 확인할 수 있다.

이를 위해서는 /var/run/docker.sock 파일에 대해 jenkins 사용자도 액세스할 수가 있어야 한다. 이를 재설정하고 다시 shell에 접속하여 docker info를 실행하면 잘 실행될 것이다.

나머지 명령어도 실행하여 Dockerfile 을 만들고 컨테이너가 구동되는지 확인하기 위한 모니터링 준비를 하자.
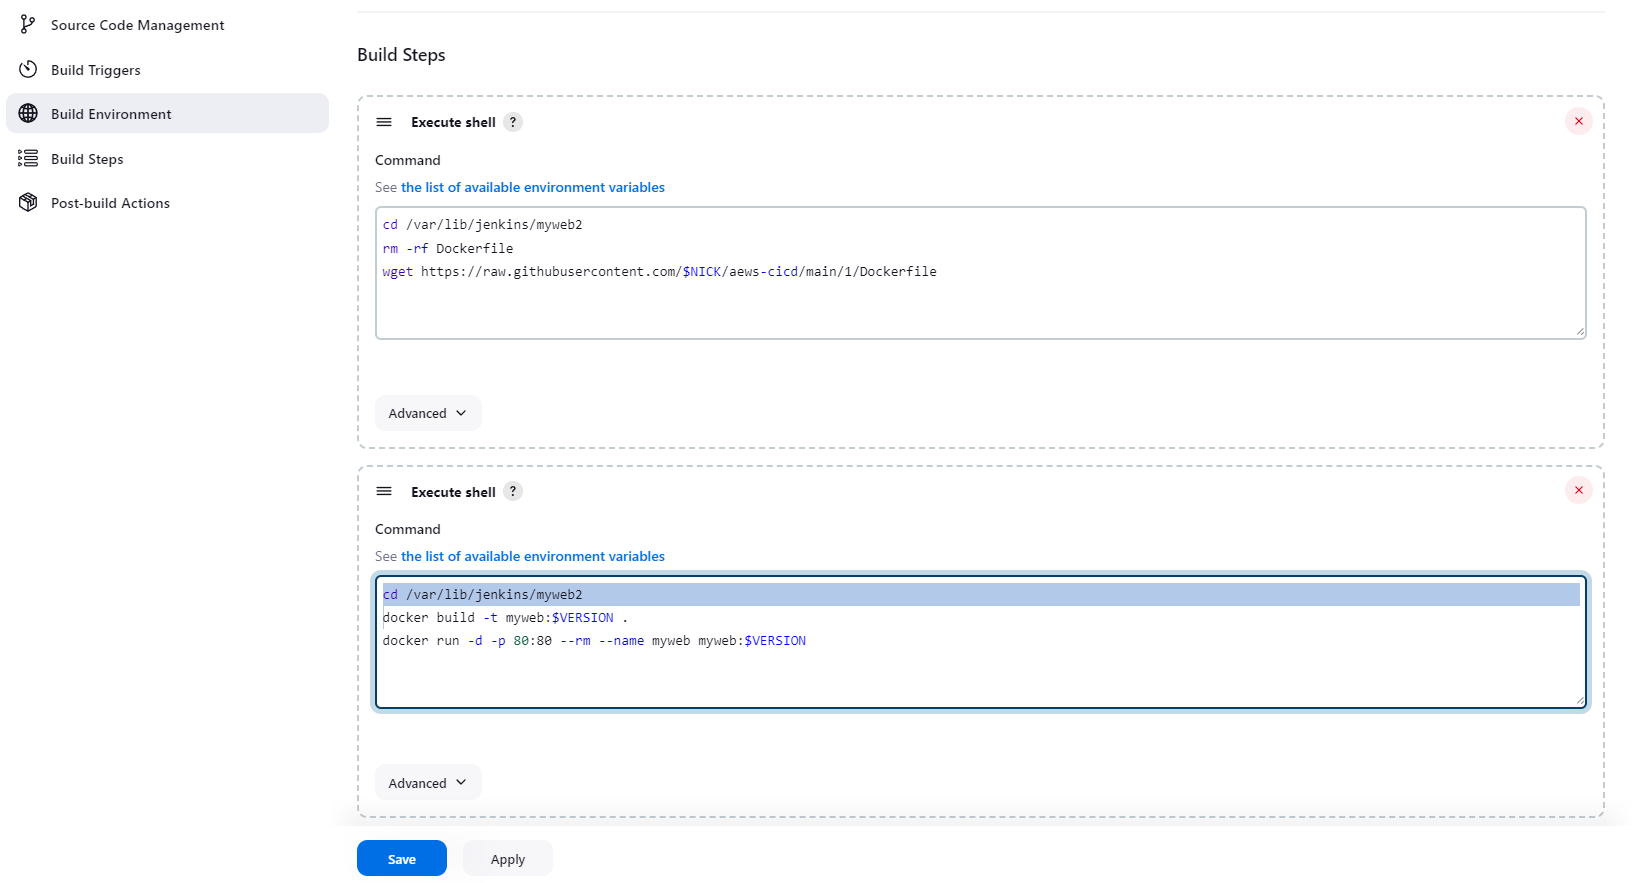
그 다음 다시 Jenkins로 돌아가 Build Step 2개를 추가한 다음 Apply & Save를 클릭한다. 각각은 다음과 같다.
cd /var/lib/jenkins/myweb2
docker build -t myweb:v2.0.0 .
docker run -d -p 80:80 --rm --name myweb myweb:v2.0.0
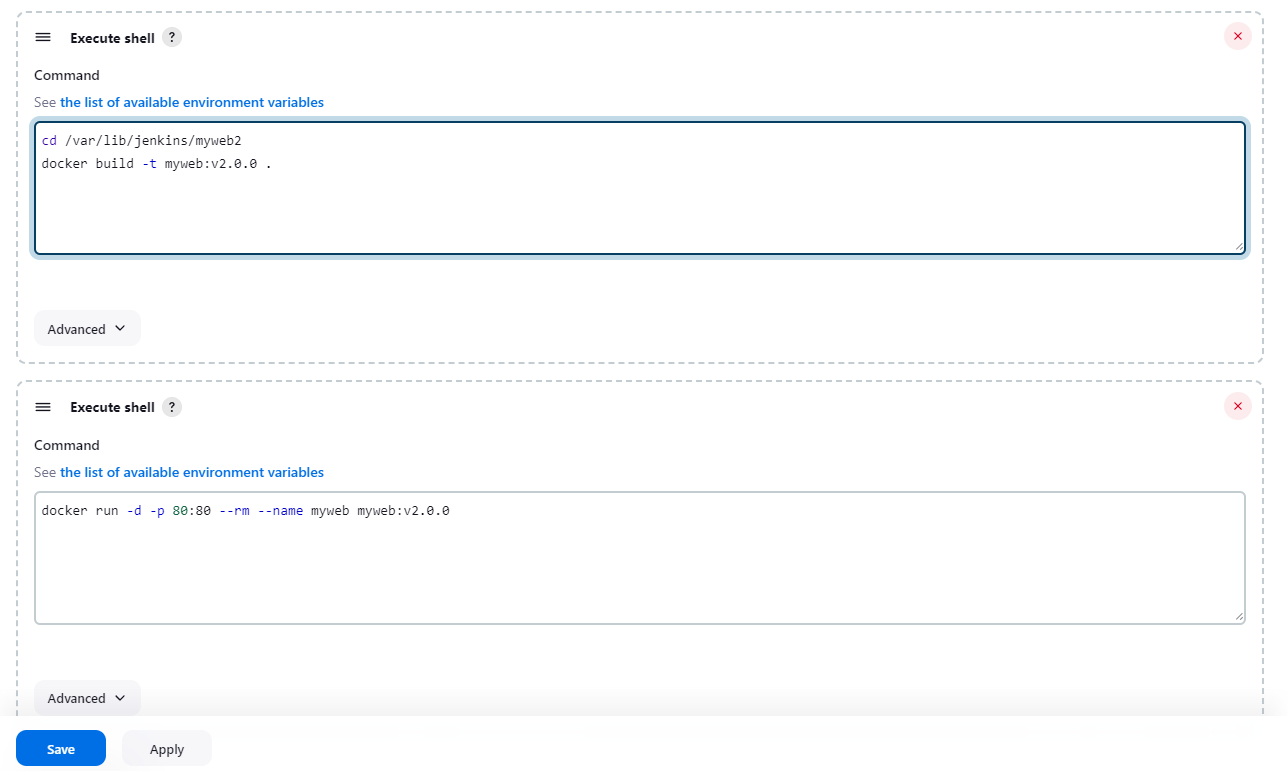
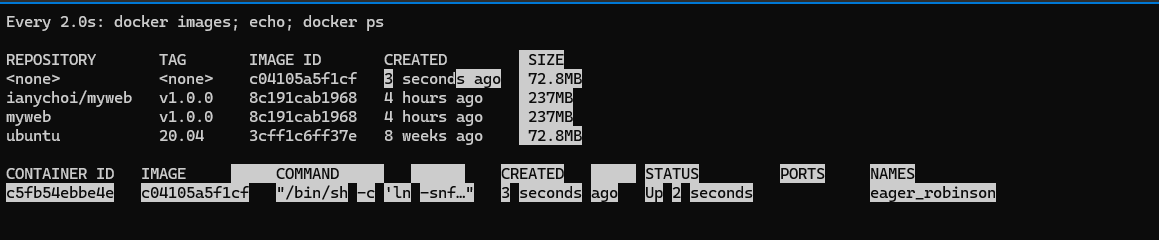
"Build Now"를 해보자. 모니터링하던 부분에서 다음과 같은 변화를 발견할 수 있었다.
"docker images", "docker ps", "curl localhost"와 같은 명령어로 테스트해보자.


완료한 다음에는 실습 리소스를 삭제한다.
docker rm -f myweb
docker rmi myweb:v2.0.0
이제 GitHub 저장소와 연동하는 부분을 실습해보자.
https://github.com/gasida/aews-cicd 를 fork한 다음, fork가 된 저장소를 가지고 실습을 진행할 예정이다.
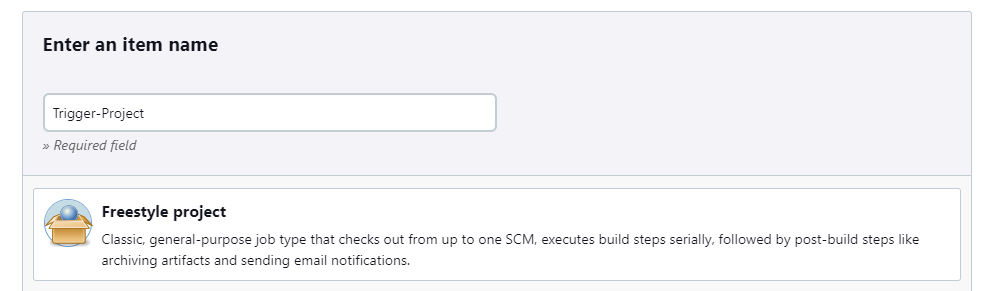
Jenkins에서 Dashboard -> New Item을 클릭하고 "Trigger-Project" 이름으로 "Freestyle project"를 생성하도록 한다.
그리고 "This project is parameterized" 옵션을 선택하면 "Add parameter" 버튼을 통해 파라미터를 추가할 수 있다. "String parameter"로 VERSION에 대해서는 v1.0.0 값을, NICK 이름에 대해서는 본인의 닉네임 값을 추가한다.

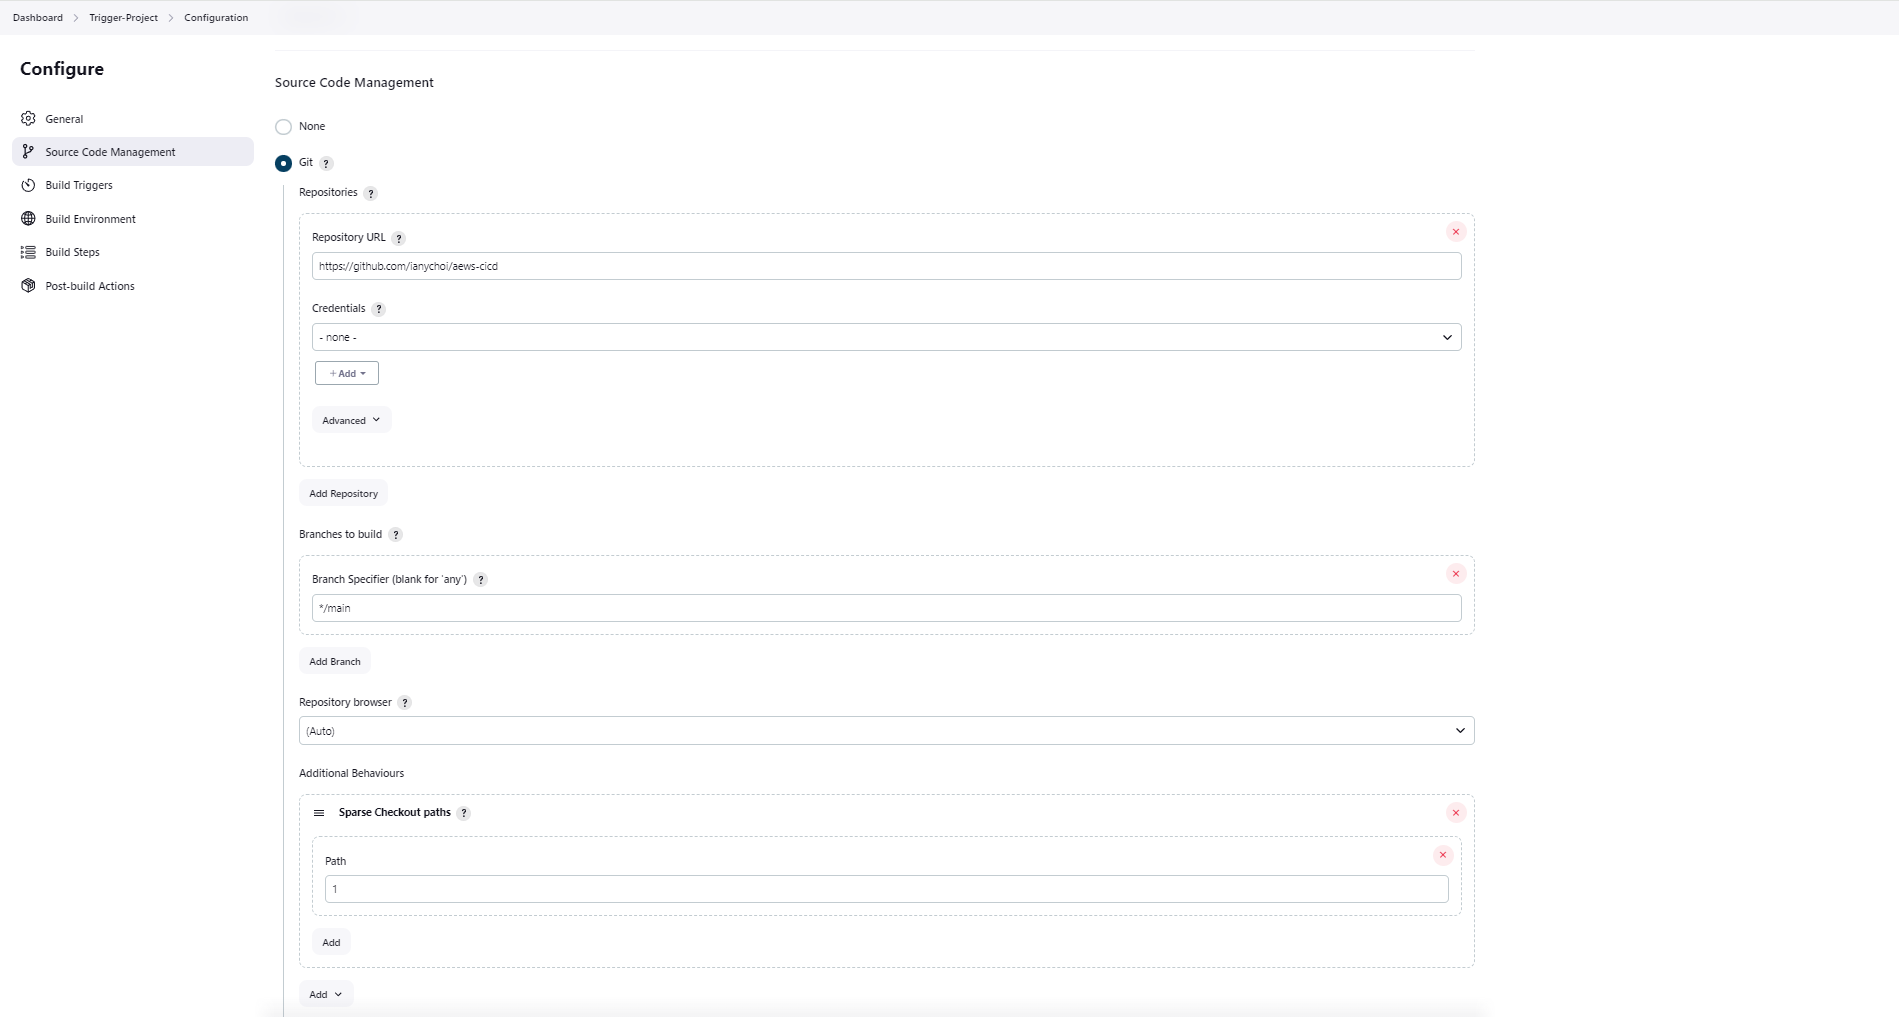
그 다음, Source Code Management에서 "Git"를 선택하고 저장소 URL을 지정, branch는 "*/main"으로 (master 대신 main으로 변경) 설정한 다음, "Additional Behaviours"에서 "Sparse Checkout paths"를 추가, Path 값은 1로 설정한다.
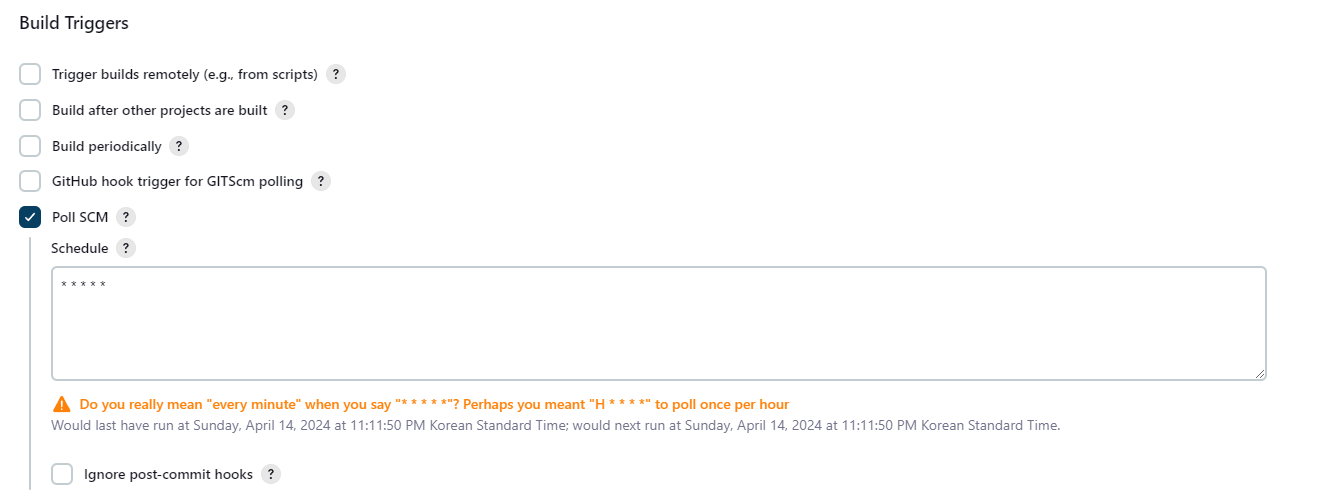
또한 "Build Triggers"에서 "Poll SCM"을 클릭한 다음, Schedule에 "* * * * *" 값을 입력하자.
Build Steps에는 "Execute shell" 2개를 추가한다. 아래 내용을 참고하여 추가하도록 하자.
cd /var/lib/jenkins/myweb2
rm -rf Dockerfile
wget https://raw.githubusercontent.com/$NICK/aews-cicd/main/1/Dockerfile
docker build -t myweb:$VERSION .
docker run -d -p 80:80 --rm --name myweb myweb:$VERSION

여기까지 다 잘 했으면 "Apply" & "Save" 버튼을 클릭한다.
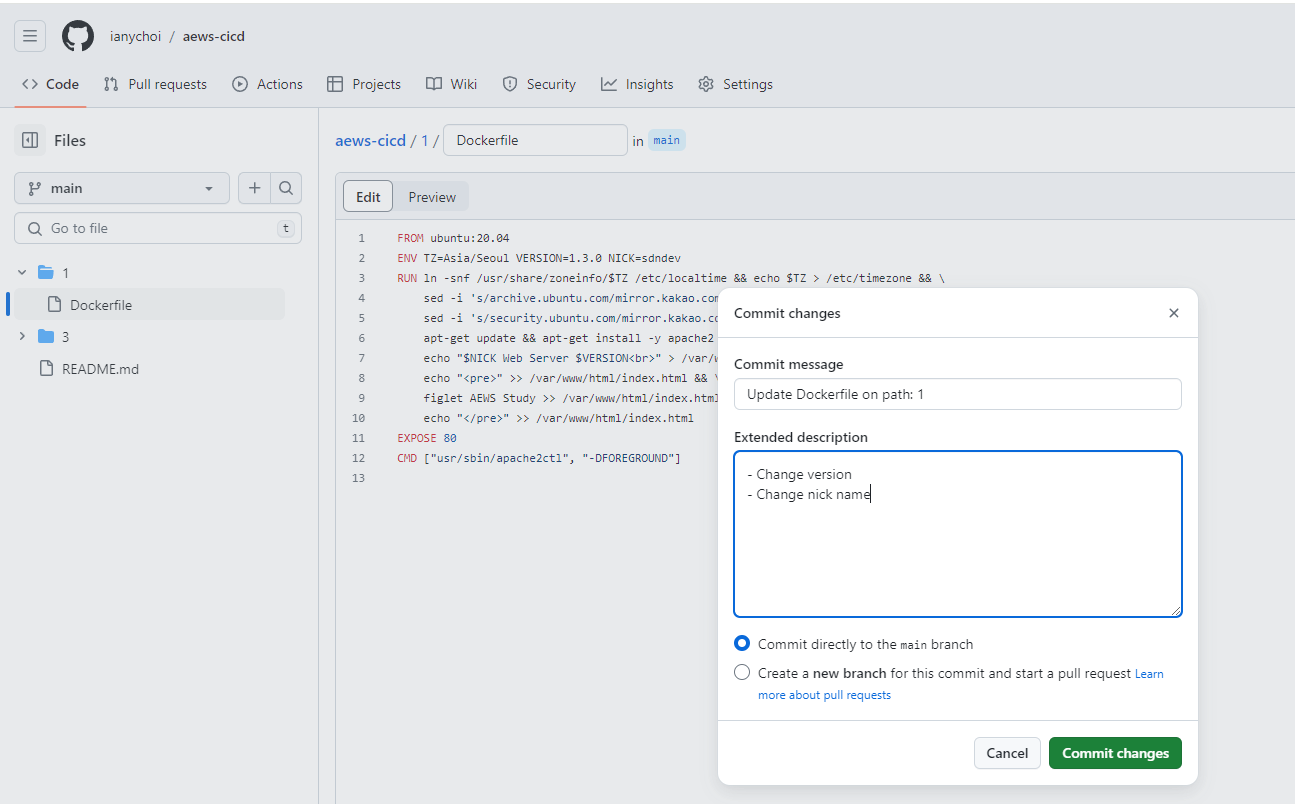
이제 GitHub 저장소에서 Trigger를 발생시켜본다. GitHub 저장소 내 1/Dockerfile 에 대해 버전 정보와 닉네임을 편집하여 커밋을 만들어보자.
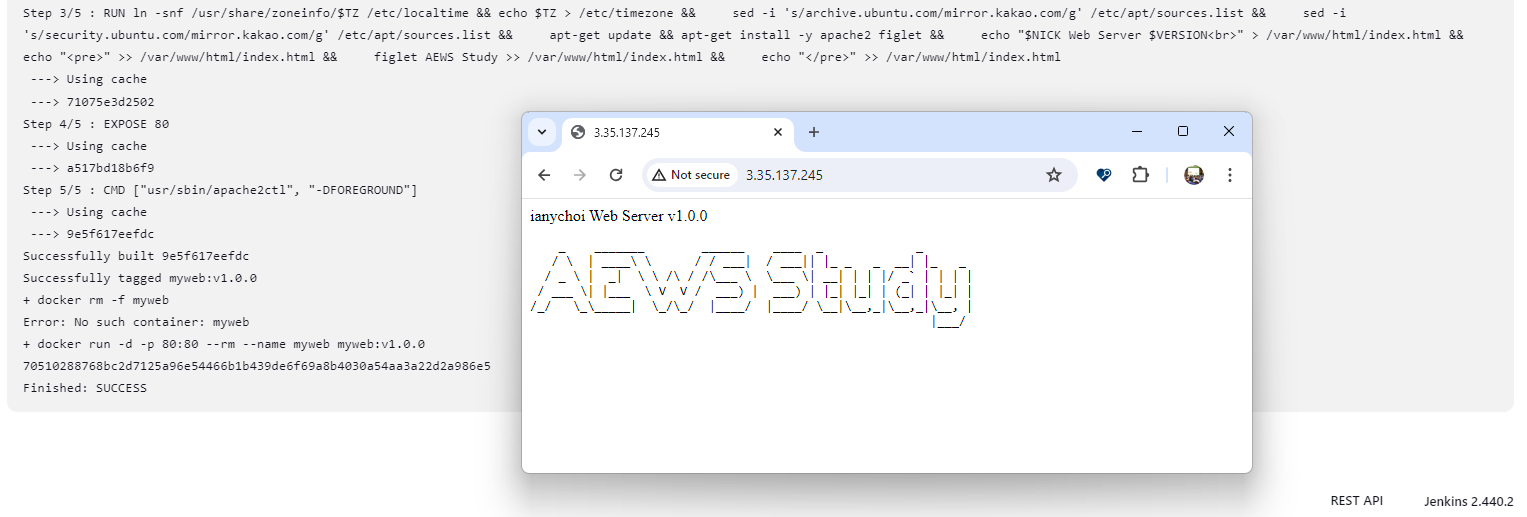
약 1분 정도 이후에 Jenkins에서 확인해보면 오류가 발생한 상황이 보인다. 콘솔에서 세부 내용을 살펴보자.
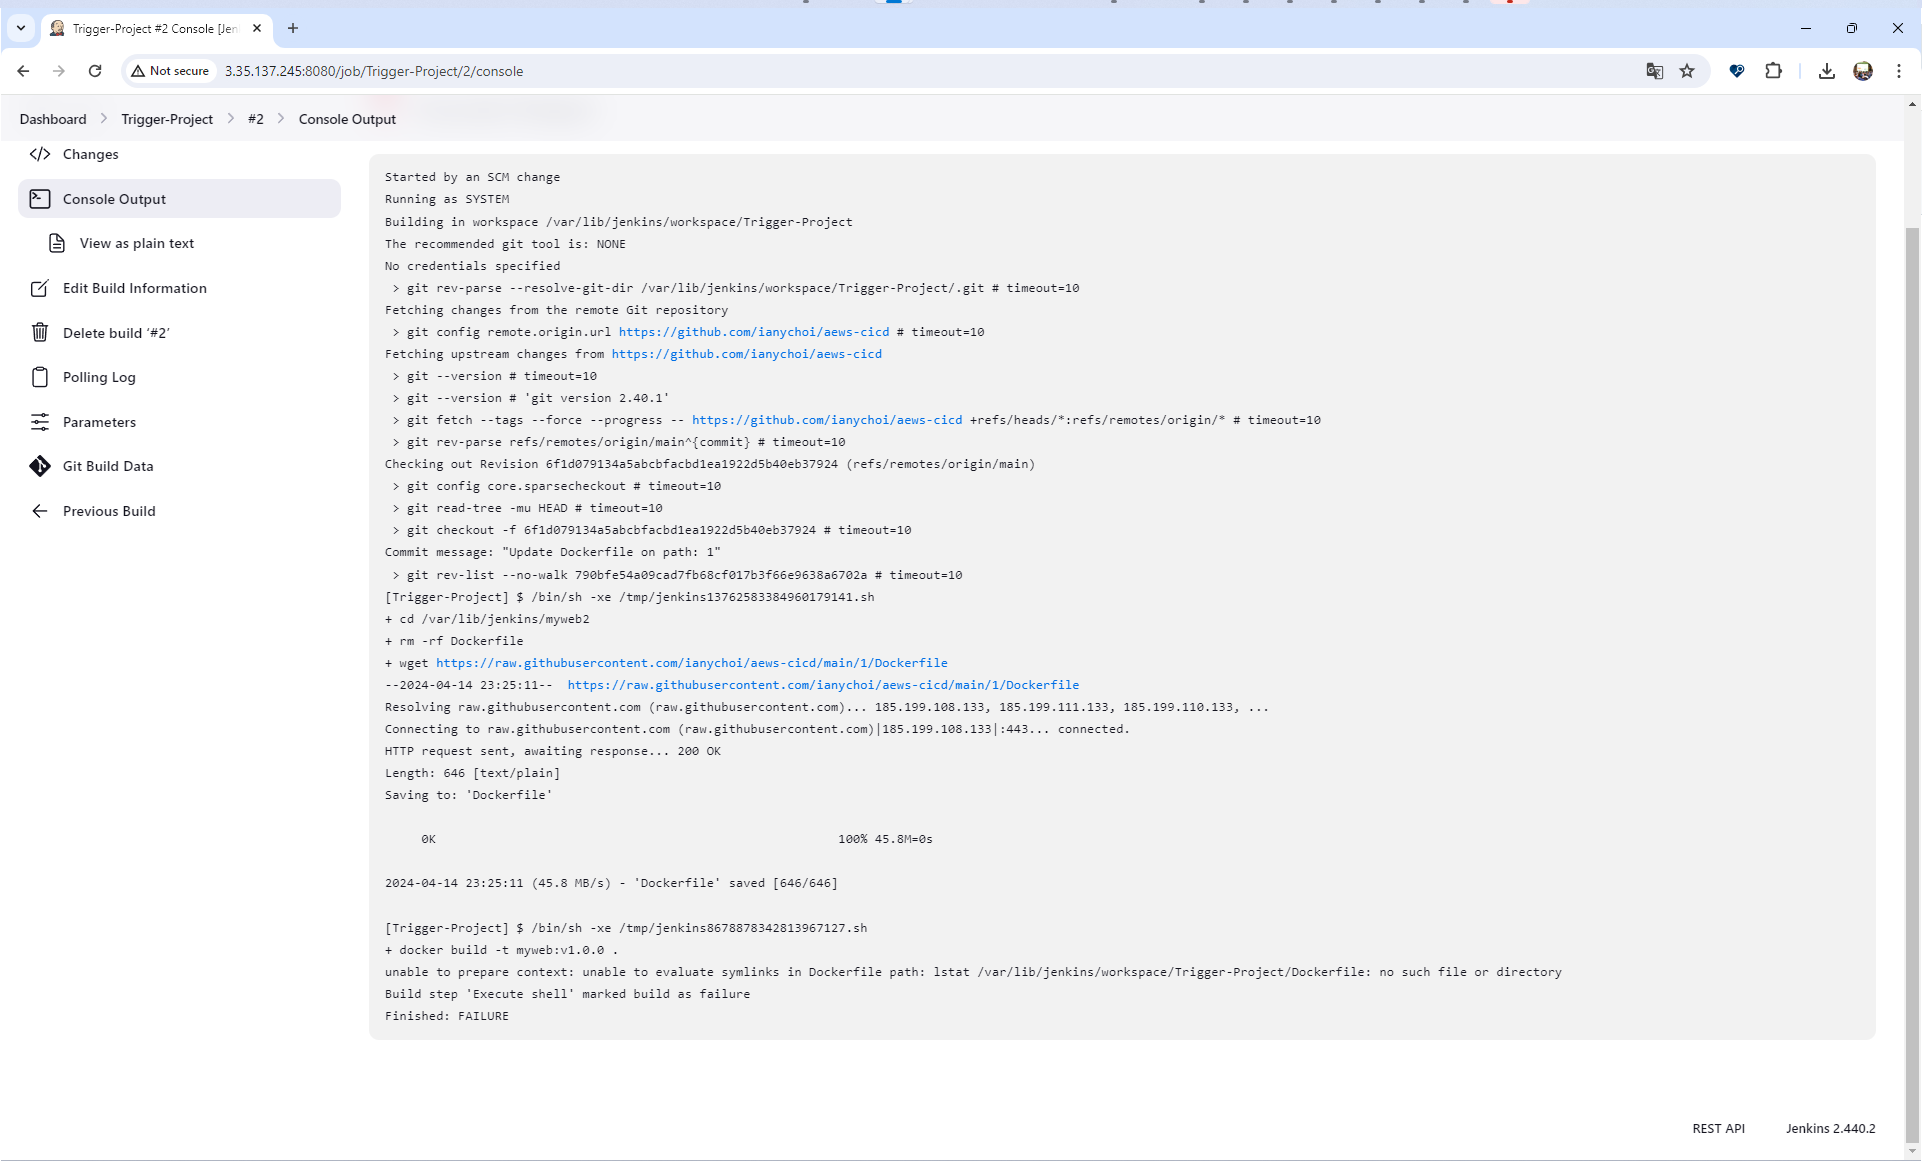
최신 커밋에 따른 파일 내용은 잘 가져왔는데 경로 등이 맞지 않는 것인지 실행이 잘 안되는 것 같다. 다른 "Execute shell"에 있다면 경로가 다를 수 있기에 "cd /var/lib/jenkins/myweb2"를 추가하고 "Build with Parameters" 버튼을 클릭하여 재실행해보았다.

확인해보니 실행은 잘 되었다. 그런데 버전이 다른 것을 확인할 수 있다.

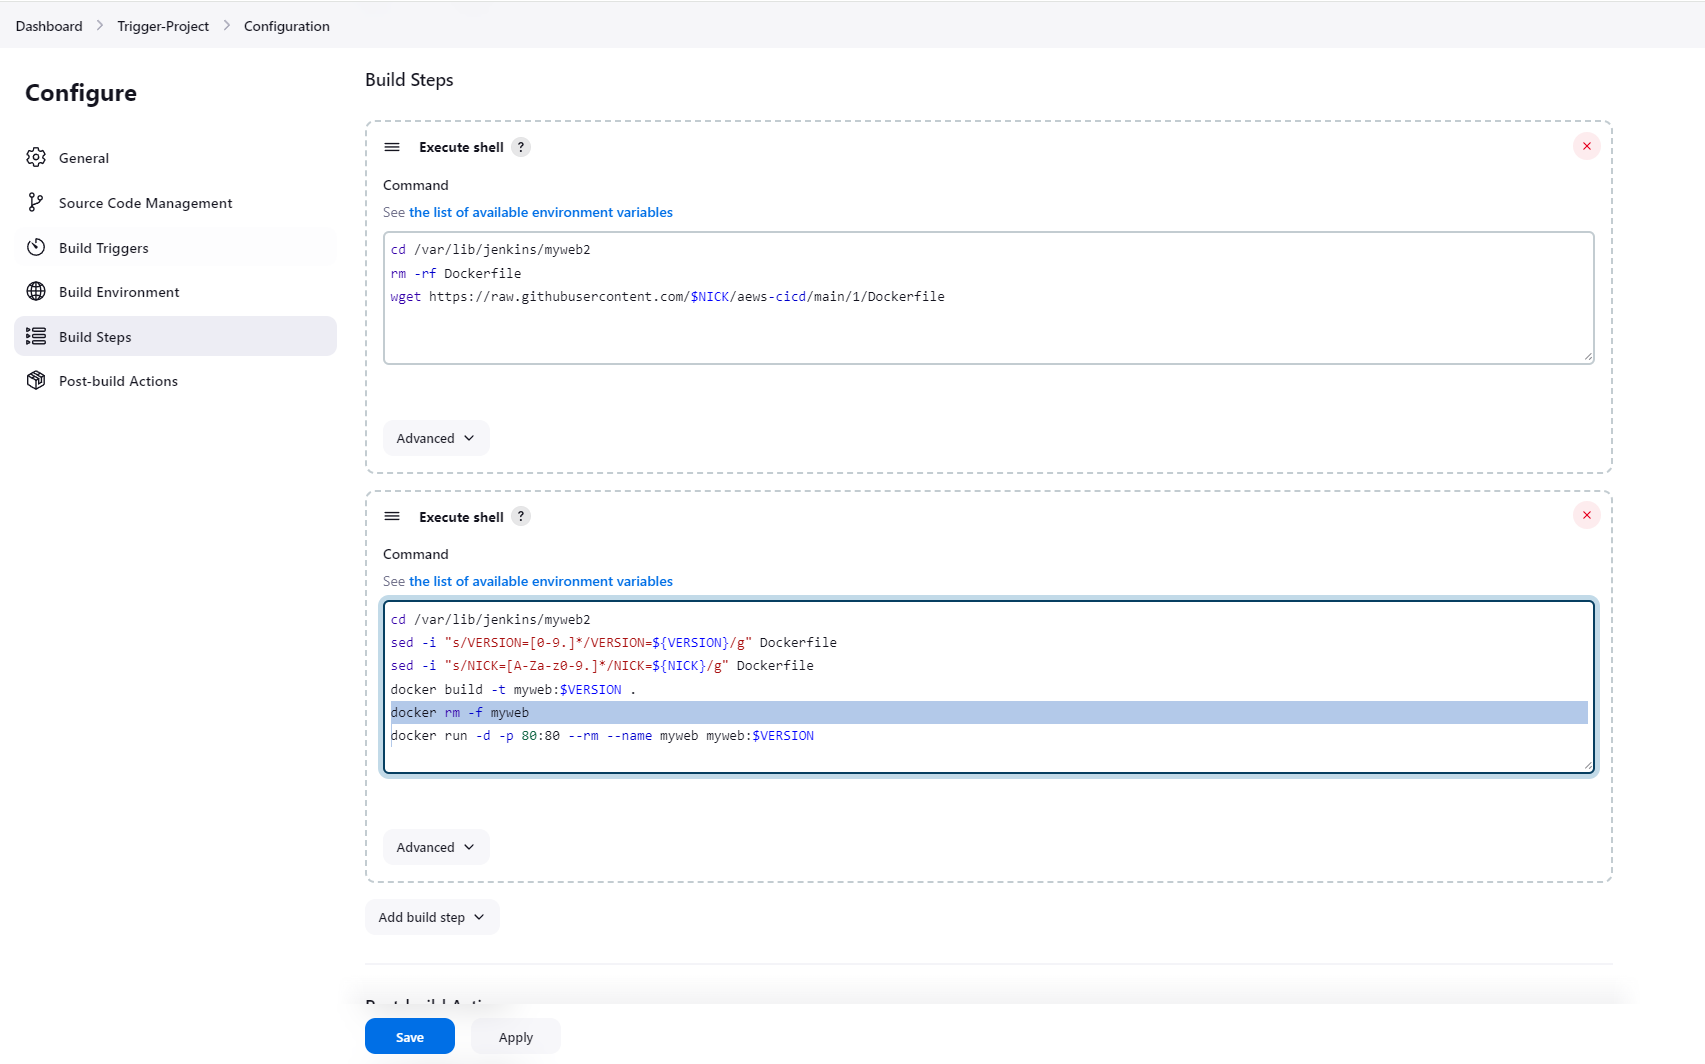
이 부분에서 소스 코드가 우선인지 Jenkins에 있는 파라미터가 우선인지 잠깐 생각해볼 필요가 있겠다. CI/CD 전반적인 관점에서는 소스 코드가 우선되어야 할 것 같으나, 반면 Jenkins 입장에서는 파라미터에 있는 값을 활용하는 것이 우선시되어야한다고 볼 수도 있을 것이다. Jenkins 파라미터를 우선으로 할 경우에는 아래 스크린샷처럼 sed를 활용해 값을 바꾸어주고 그 결과를 확인해보자.
sed -i "s/VERSION=[0-9.]*/VERSION=${VERSION}/g" Dockerfile
sed -i "s/NICK=[A-Za-z0-9.]*/NICK=${NICK}/g" Dockerfile
이렇게 해도 오류가 발생하였는데, 기존 Docker 프로세스를 종료하지 않아서이다. 따라서 "docker rm -f myweb"을 Execute shell 에 추가하는 것으로 해결하였다.

아래 명령어를 실행하여 실습 내용을 정리하도록 하자.
docker rm -f myweb
docker rmi myweb:v1.9.9
docker rmi myweb:v1.0.0
그 다음으로는 Jenkins 파이프라인을 실습해보도록 하자.
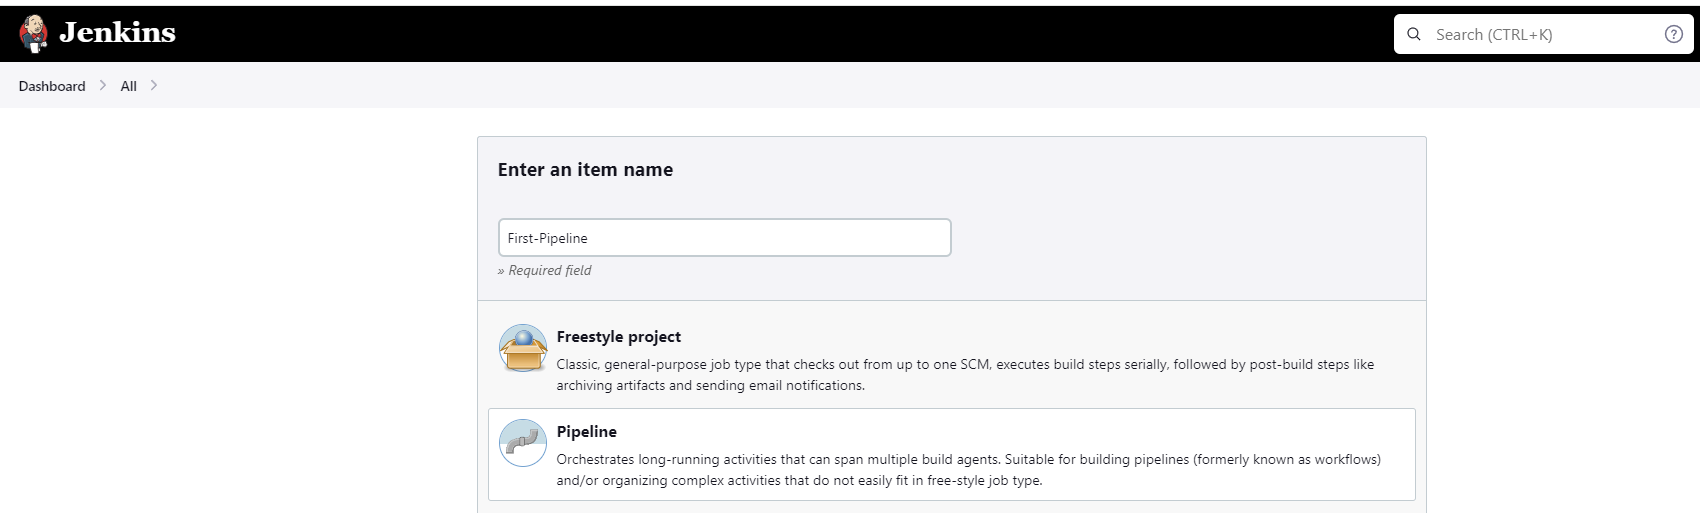
Dashboard -> "New Item"을 클릭한 다음에 "First-Pipeline" 이름을 갖는 "Pipeline"을 생성한다.
파이프라인 스크립트에 아래 내용을 입력하여 테스트해보도록 하자.
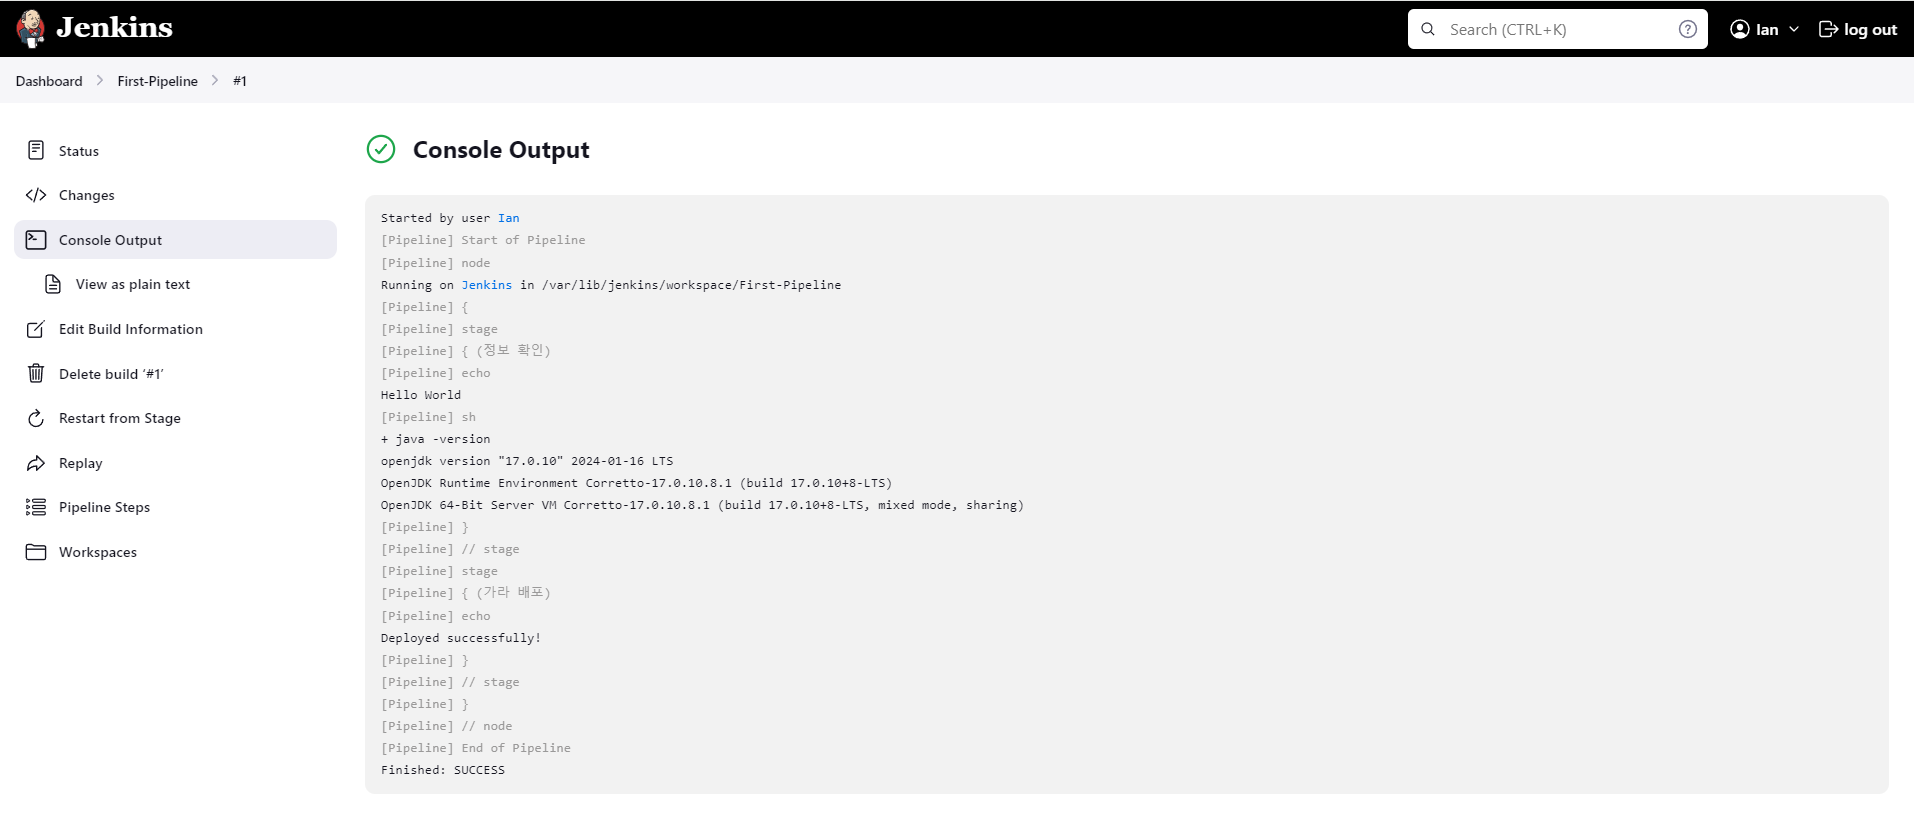
pipeline {
    agent any

    stages {
        stage('정보 확인') {
            steps {
                echo 'Hello World'
                sh 'java -version'
            }
        }
        stage('가라 배포') {
            steps {
                echo "Deployed successfully!";
            }
        }
    }
}
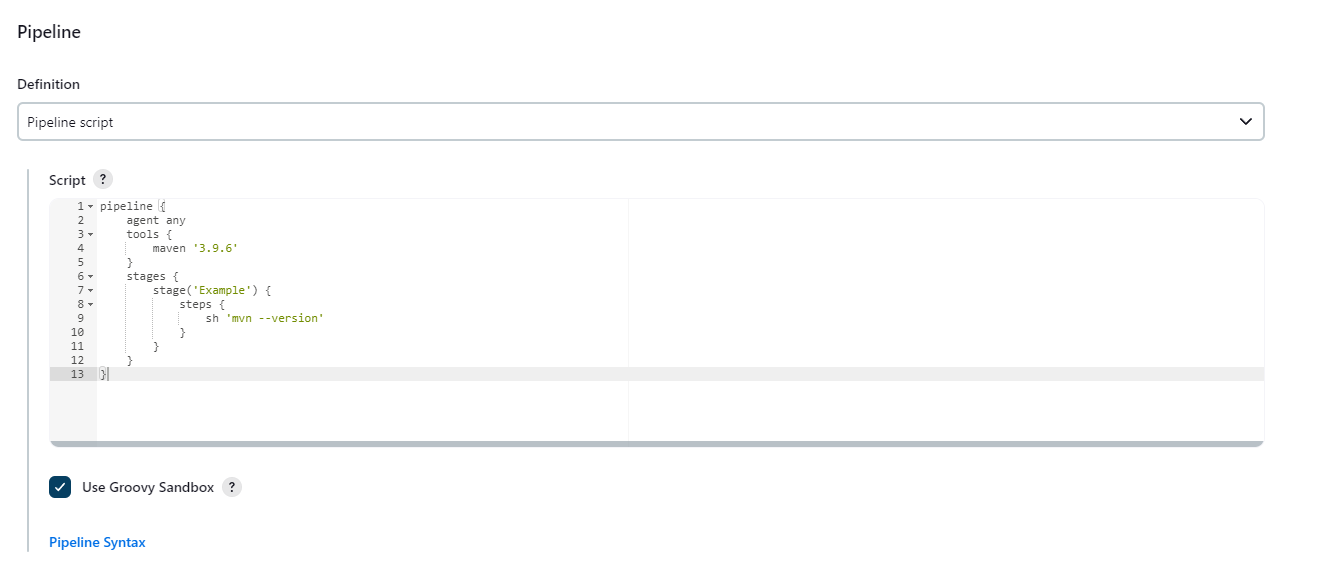
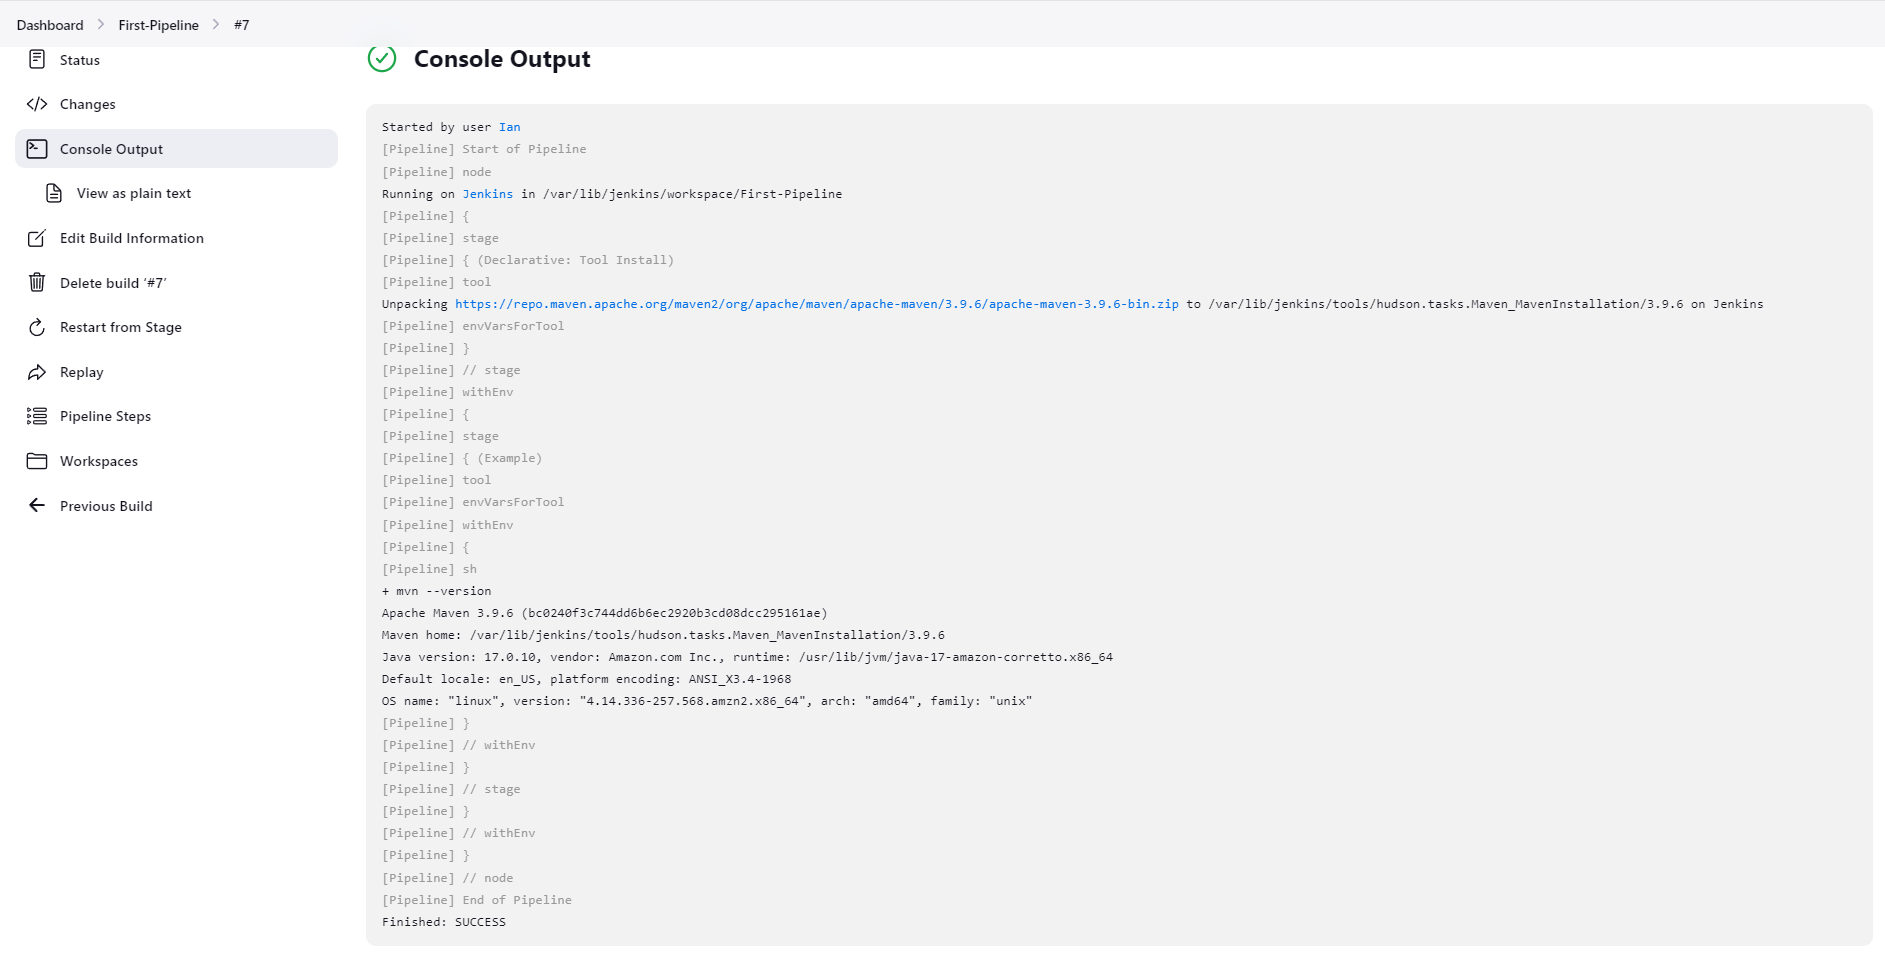
이후 몇 가지 변경 및 실습을 추가로 진행해보았다. Maven의 경우 tools 내 이름이 "Manage Jenkins" -> Tools 내 설정된 이름과 동일해야 한다.

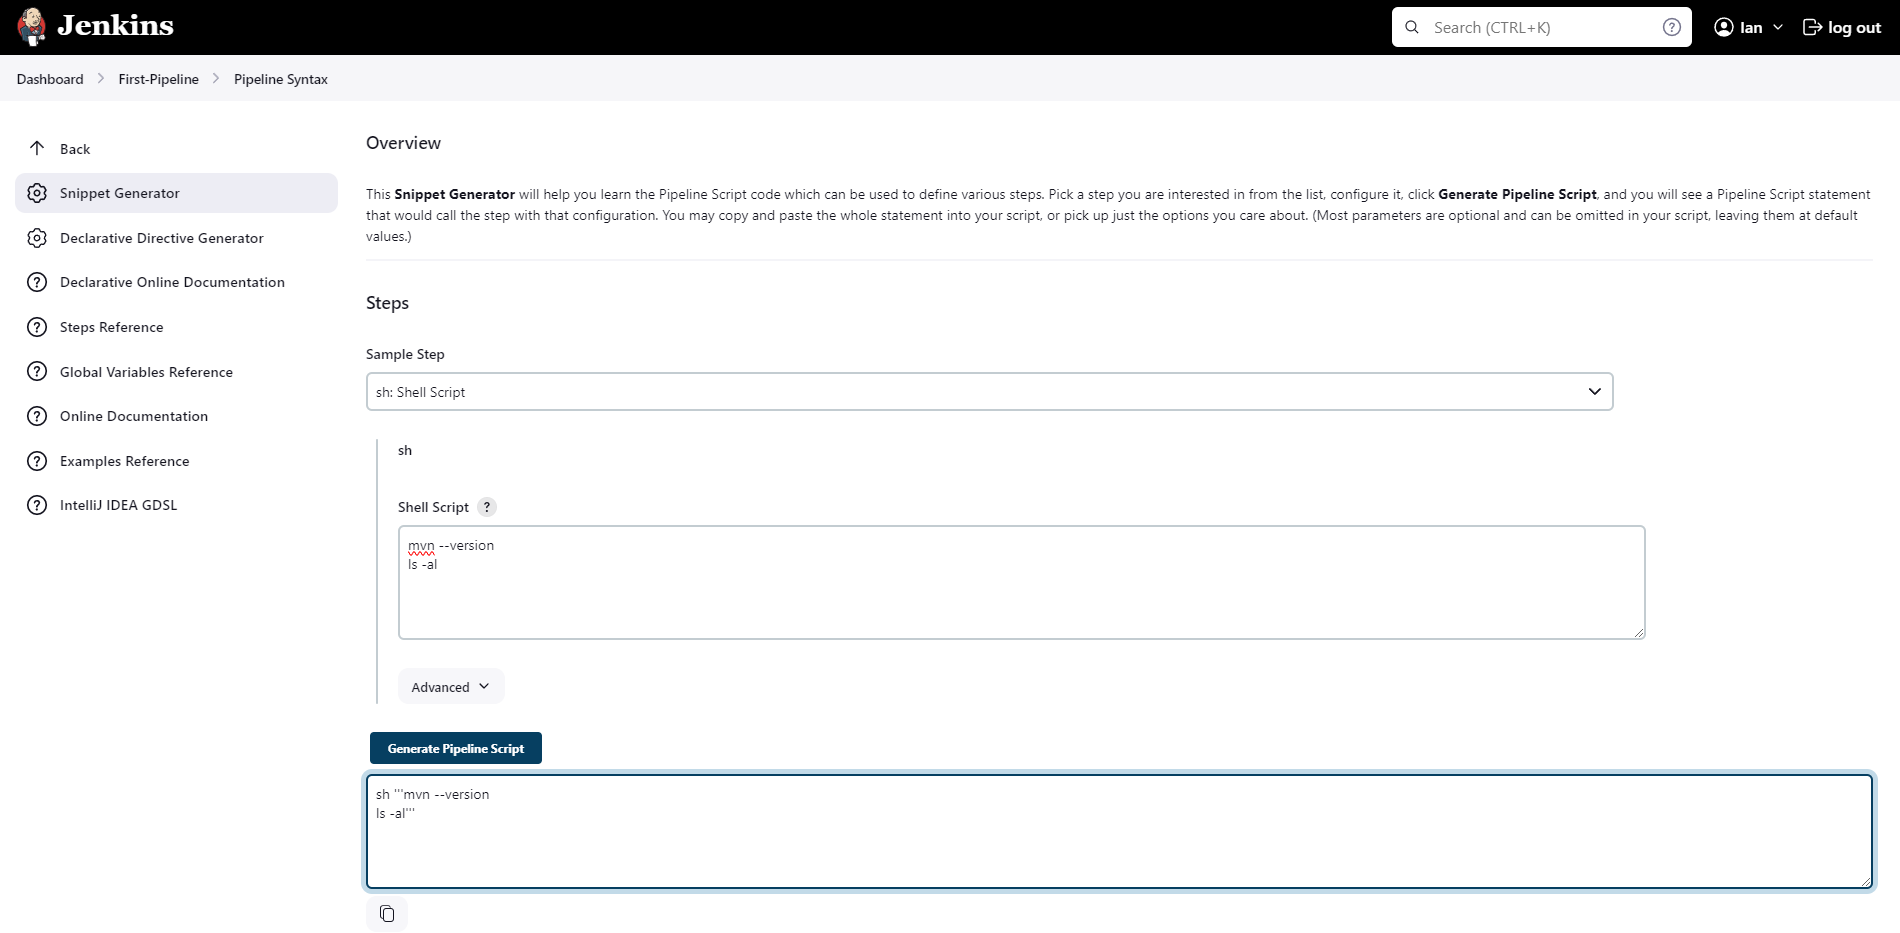
뿐만 아니라 "Pipeline Syntax" 기능을 사용하여 파이프라인 스크립트를 손쉽게 만들 수도 있다. "sh: Shell Script"로 두 줄 명령어에 대해 스크립트를 요청하니 자동으로 작은 따옴표 3개로 감싸주었다.
3. Jenkins with Kubernetes
이제 Jenkins를 쿠버네티스 서비스인 EKS 환경과 연동을 시켜보자.
# jenkins 사용자에서 아래 작업 진행
whoami
mkdir ~/.kube

# root 계정에서 아래 복사 실행
cp ~/.kube/config /var/lib/jenkins/.kube/config
chown jenkins:jenkins /var/lib/jenkins/.kube/config

# jenkins 사용자에서 aws eks 사용(sts 호출 등)을 위한 자격증명 설정
aws configure
AWS Access Key ID [None]: AKIA5ILF2###
AWS Secret Access Key [None]: ###
Default region name [None]: ap-northeast-2

# jenkins 사용자에서 kubectl 명령어 사용 확인
kubectl get pods -A
파이프라인으로 디플로이먼트/서비스를 배포해보고자 한다.
진행하기 위해서는 fork한 GitHub 리포지터리에 3/deploy/deployment-svc.yaml 파일이 있는데 이 파일에서 image 부분에 자신의 도커 허브 이미지를 가리키도록 수정을 할 필요가 있다.
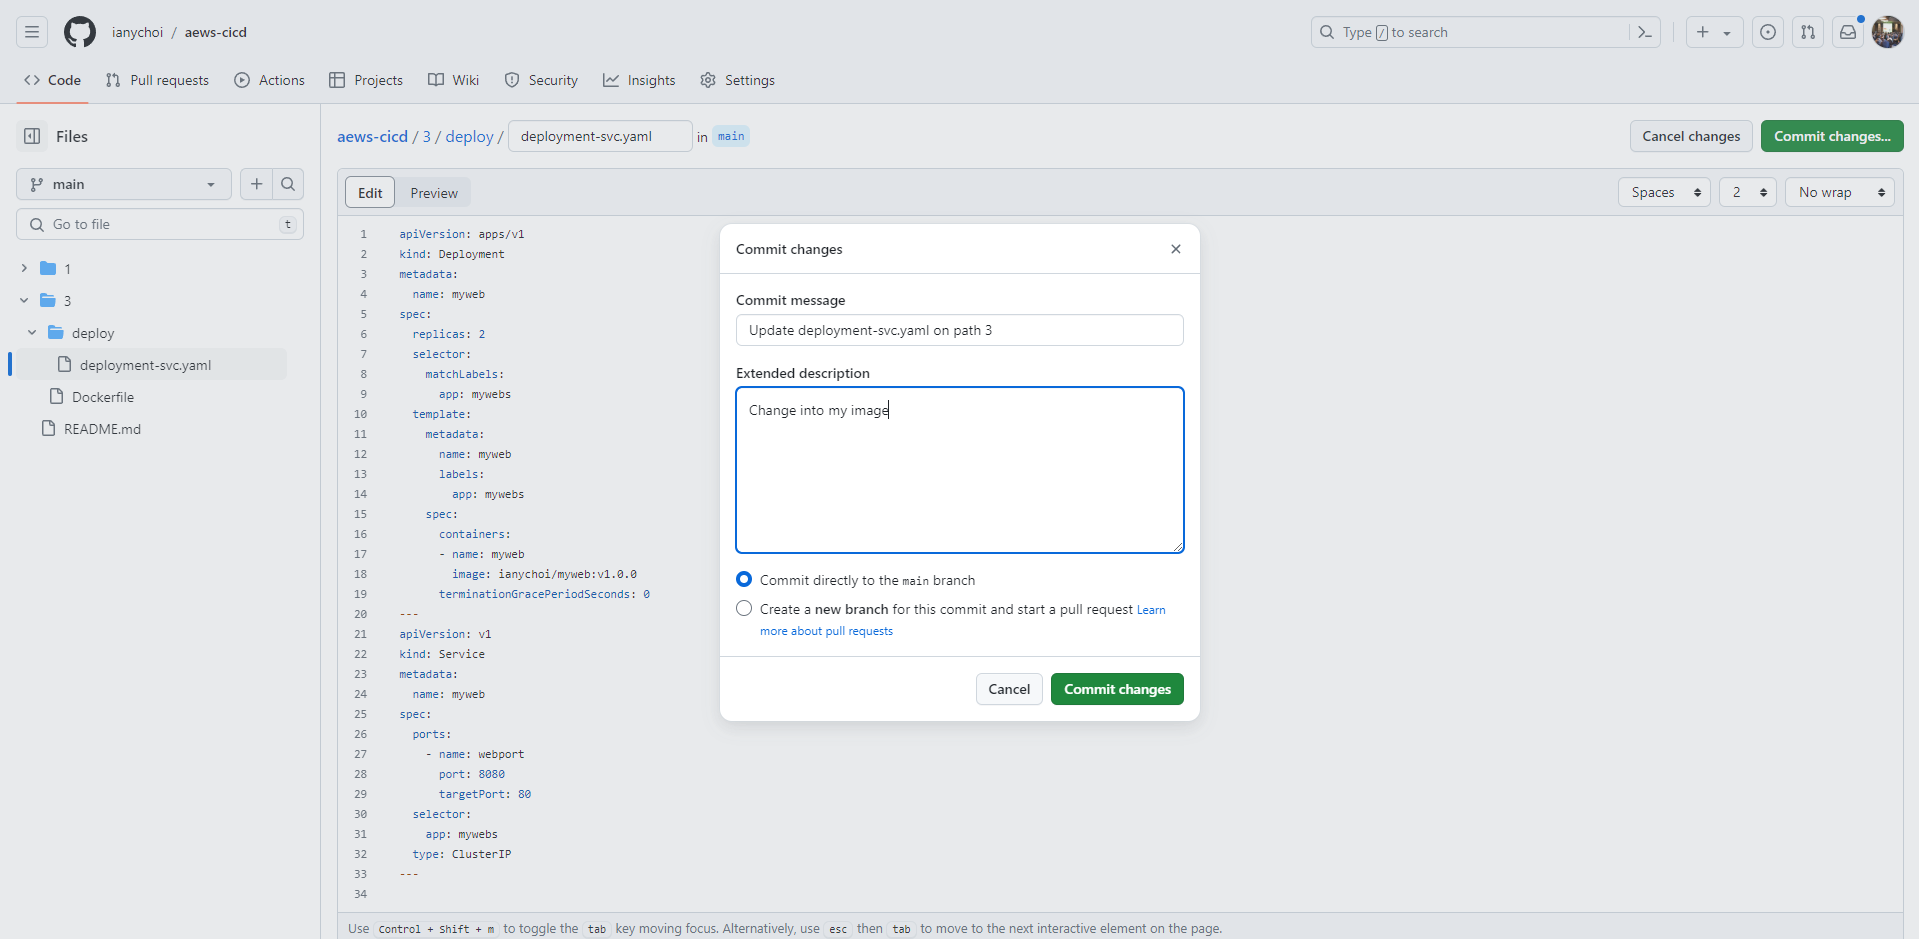
이제 Jenkins에서 새로운 Item을 만들어보자. "k8s-1" 이으로 Pipeline을 생성한다. 아래 내용으로 구성한다.
pipeline {
    agent any

    tools {
        jdk 'jdk-17'
    }

    environment {
        DOCKERHUB_USERNAME = 'ianychoi'
        GITHUB_URL = 'https://github.com/ianychoi/aews-cicd.git'
        // deployment-svc.yaml -> image: ianychoi/myweb:v1.0.0
        DIR_NUM = '3'
    }

    stages {
        stage('Container Build') {
            steps {
                // 릴리즈파일 체크아웃
                checkout scmGit(branches: [[name: '*/main']],
                    extensions: [[$class: 'SparseCheckoutPaths',
                    sparseCheckoutPaths: [[path: "/${DIR_NUM}"]]]],
                    userRemoteConfigs: [[url: "${GITHUB_URL}"]])

                // 컨테이너 빌드 및 업로드
                sh "docker build -t ${DOCKERHUB_USERNAME}/myweb:v1.0.0 ./${DIR_NUM}"
                sh "docker push ${DOCKERHUB_USERNAME}/myweb:v1.0.0"
            }
        }

        stage('K8S Deploy') {
            steps {
                sh "kubectl apply -f ./${DIR_NUM}/deploy/deployment-svc.yaml"
            }
        }
    }
}
모니터링을 위해 준비하고
watch -d kubectl get pod,svc,ep
접속 테스트용 파드를 생성한다.
# 배포
cat <<EOF | kubectl create -f -
apiVersion: v1
kind: Pod
metadata:
  name: netpod
  labels:
    app: pod
spec:
  containers:
  - name: netshoot-pod
    image: nicolaka/netshoot
    command: ["tail"]
    args: ["-f", "/dev/null"]
  terminationGracePeriodSeconds: 0
EOF
실제 잘 동작하는지 아래 명령어를 참고하여 확인해보자.
#
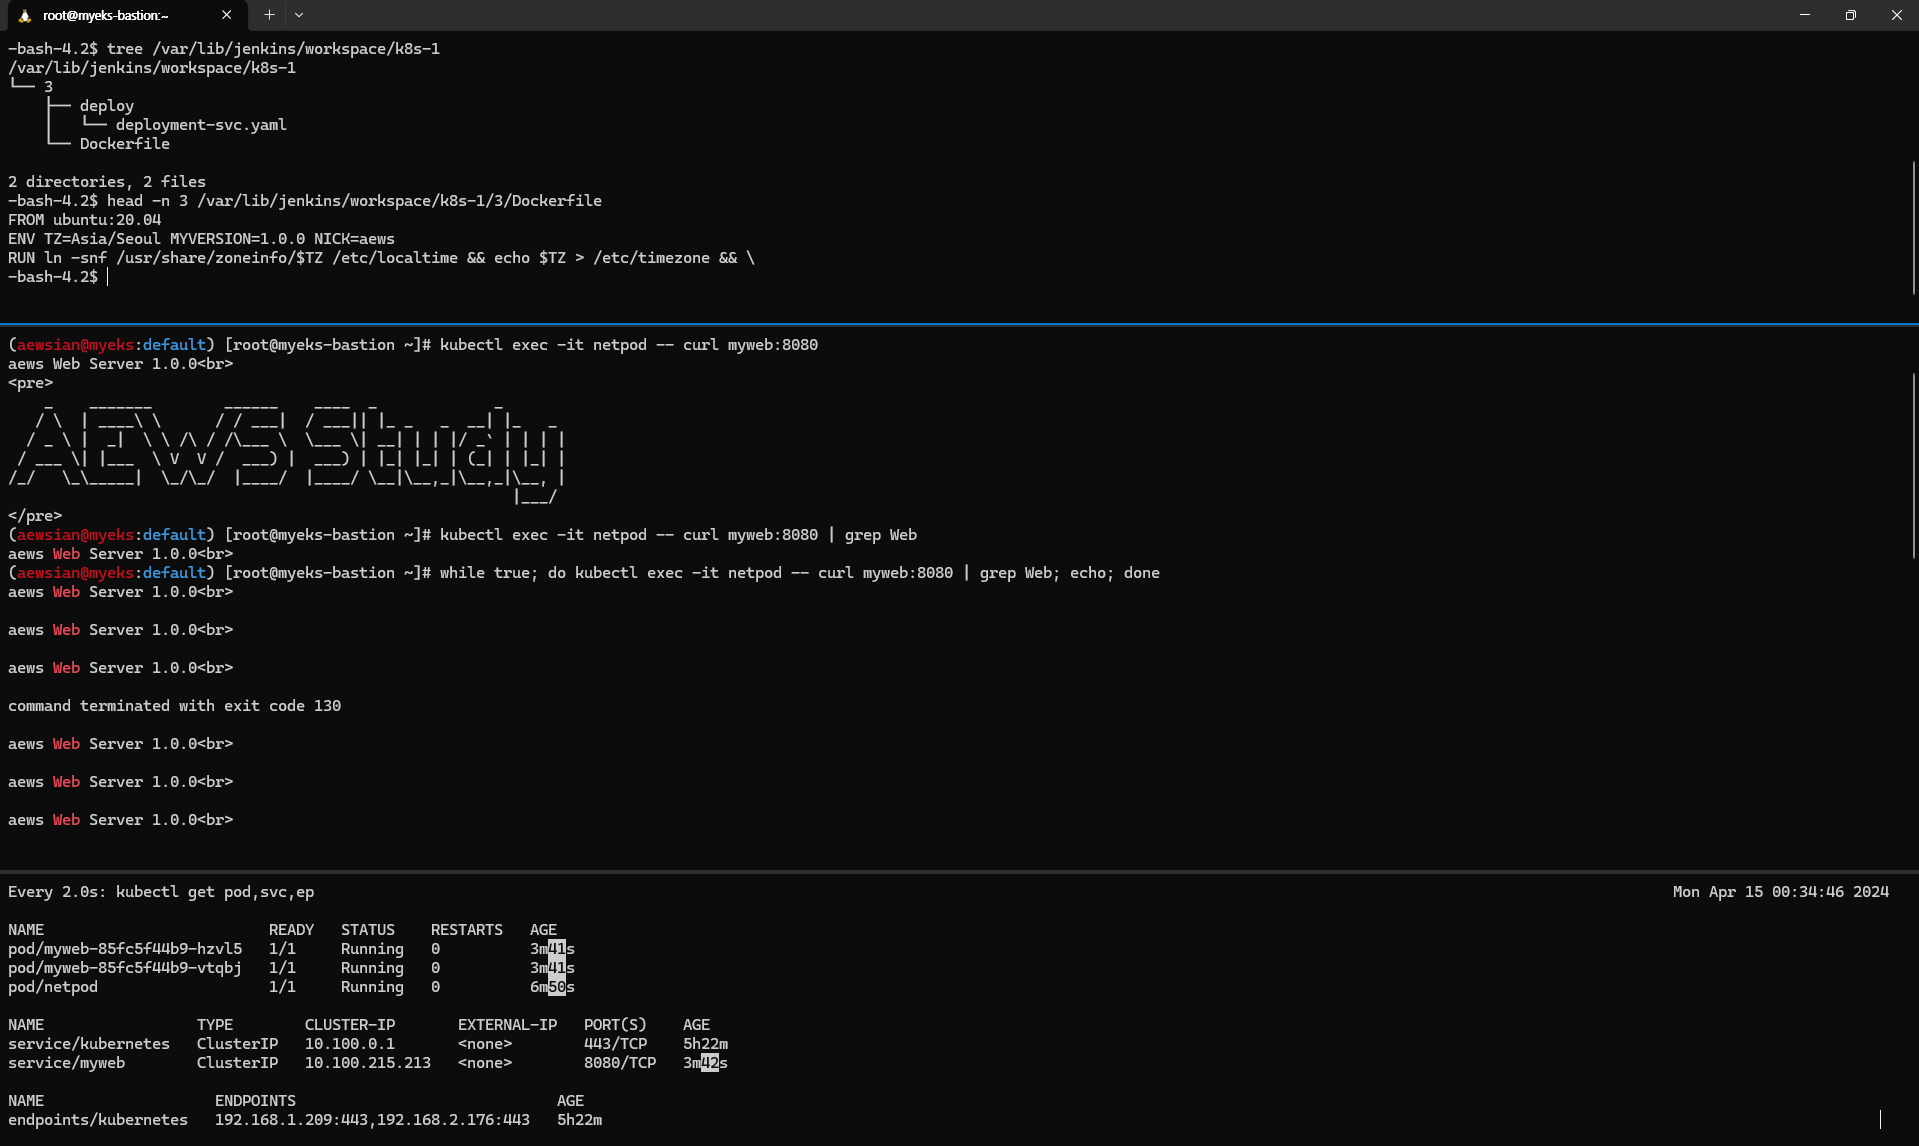
kubectl exec -it netpod -- curl myweb:8080
kubectl exec -it netpod -- curl myweb:8080 | grep Web
while true; do kubectl exec -it netpod -- curl myweb:8080 | grep Web; echo; done
# 작업공간 확인
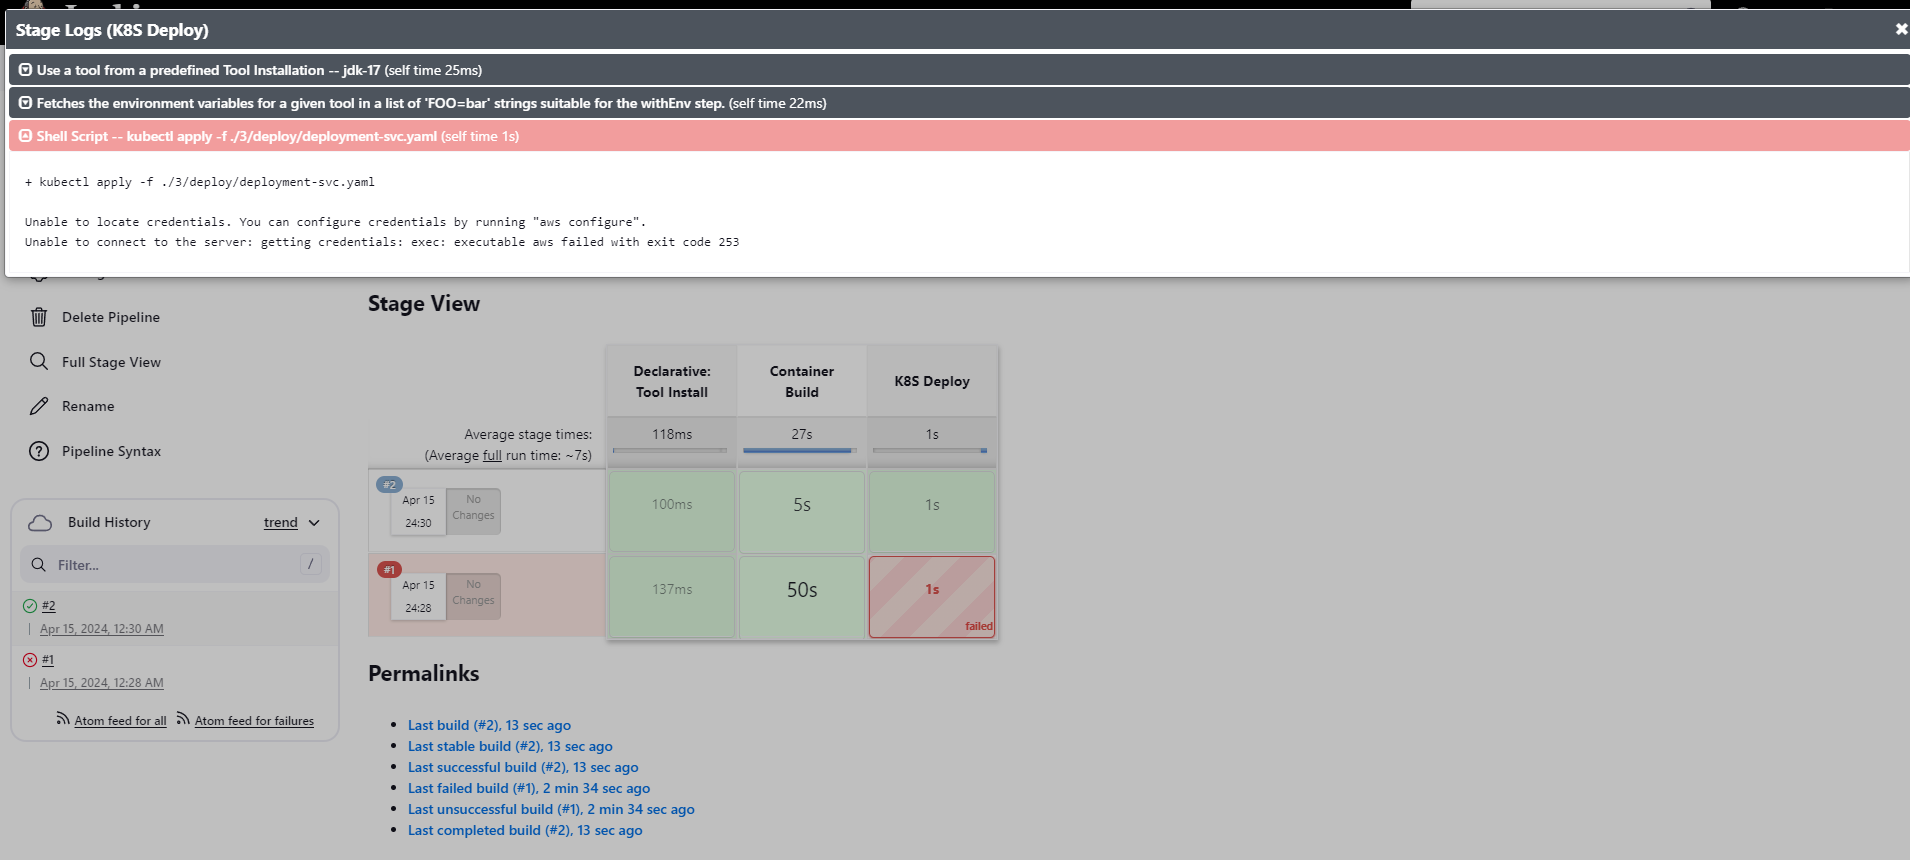
tree /var/lib/jenkins/workspace/k8s-1
cat /var/lib/jenkins/workspace/k8s-1/3/Dockerfile
실행 결과 처음에는 실패하였는데 Jenkins 사용자에 대한 Shell에서 "aws configure"로 구성을 제대로 하지 않았기 때문이었다. 이를 제대로 구성한 후 다시 실행하여 잘 실행됨을 확인할 수 있었다.
실습 완료 후에는 자원을 삭제한다.
kubectl delete deploy,svc myweb
4. Argo
Argo를 설치해본다.
# helm 설치
cat <<EOT > argocd-values.yaml
global:
  domain: argocd.$MyDomain

configs:
  params:
    server.insecure: true

controller:
  metrics:
    enabled: true
    serviceMonitor:
      enabled: true

server:
  ingress:
    enabled: true
    controller: aws
    ingressClassName: alb
    hostname: "argocd.$MyDomain"
    annotations:
      alb.ingress.kubernetes.io/scheme: internet-facing
      alb.ingress.kubernetes.io/target-type: ip
      alb.ingress.kubernetes.io/backend-protocol: HTTP
      alb.ingress.kubernetes.io/listen-ports: '[{"HTTPS":80}, {"HTTPS":443}]'
      alb.ingress.kubernetes.io/certificate-arn: $CERT_ARN
      #alb.ingress.kubernetes.io/success-codes: 200-399
      #alb.ingress.kubernetes.io/load-balancer-name: myeks-ingress-alb
      #alb.ingress.kubernetes.io/group.name: study
      alb.ingress.kubernetes.io/ssl-redirect: '443'
    aws:
      serviceType: ClusterIP
      backendProtocolVersion: GRPC
  metrics:
    enabled: true
    serviceMonitor:
      enabled: true

repoServer:
  metrics:
    enabled: true
    serviceMonitor:
      enabled: true

applicationSet:
  metrics:
    enabled: true
    serviceMonitor:
      enabled: true

notifications:
  metrics:
    enabled: true
    serviceMonitor:
      enabled: true
EOT

kubectl create ns argocd
helm repo add argo https://argoproj.github.io/argo-helm
helm install argocd argo/argo-cd --version 6.7.11 -f argocd-values.yaml --namespace argocd

# 확인
kubectl get ingress,pod,svc -n argocd
kubectl get crd | grep argo
applications.argoproj.io                     2024-04-14T11:16:14Z
applicationsets.argoproj.io                  2024-04-14T11:16:14Z
appprojects.argoproj.io                      2024-04-14T11:16:14Z

# 최초 접속 암호 확인
kubectl -n argocd get secret argocd-initial-admin-secret -o jsonpath="{.data.password}" | base64 -d ;echo
t-SGogfJOsiaMFd8
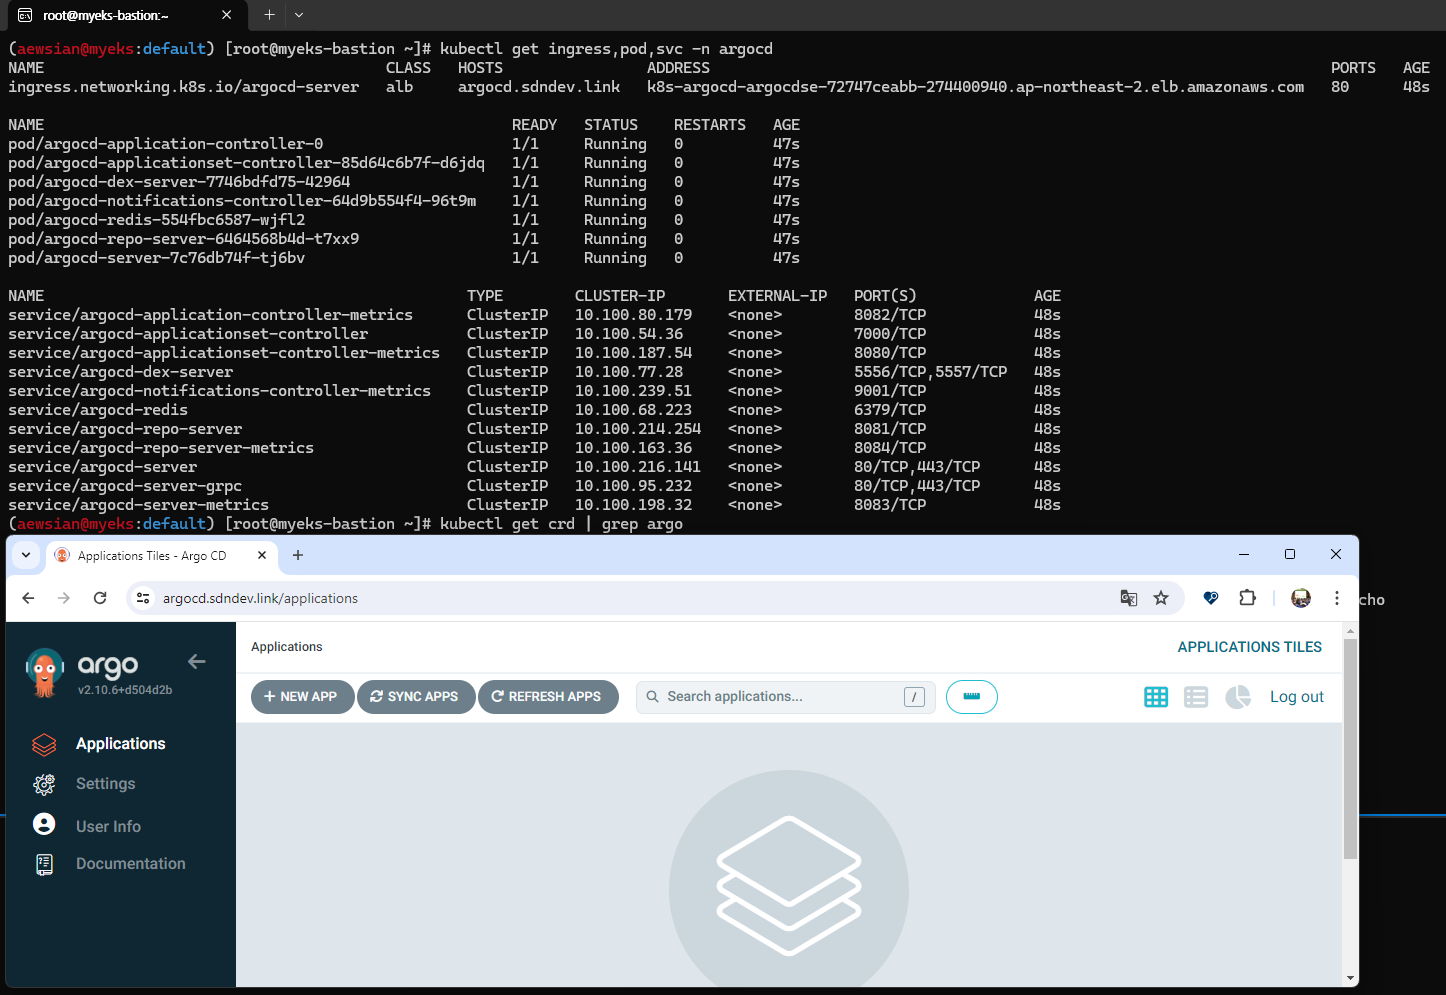
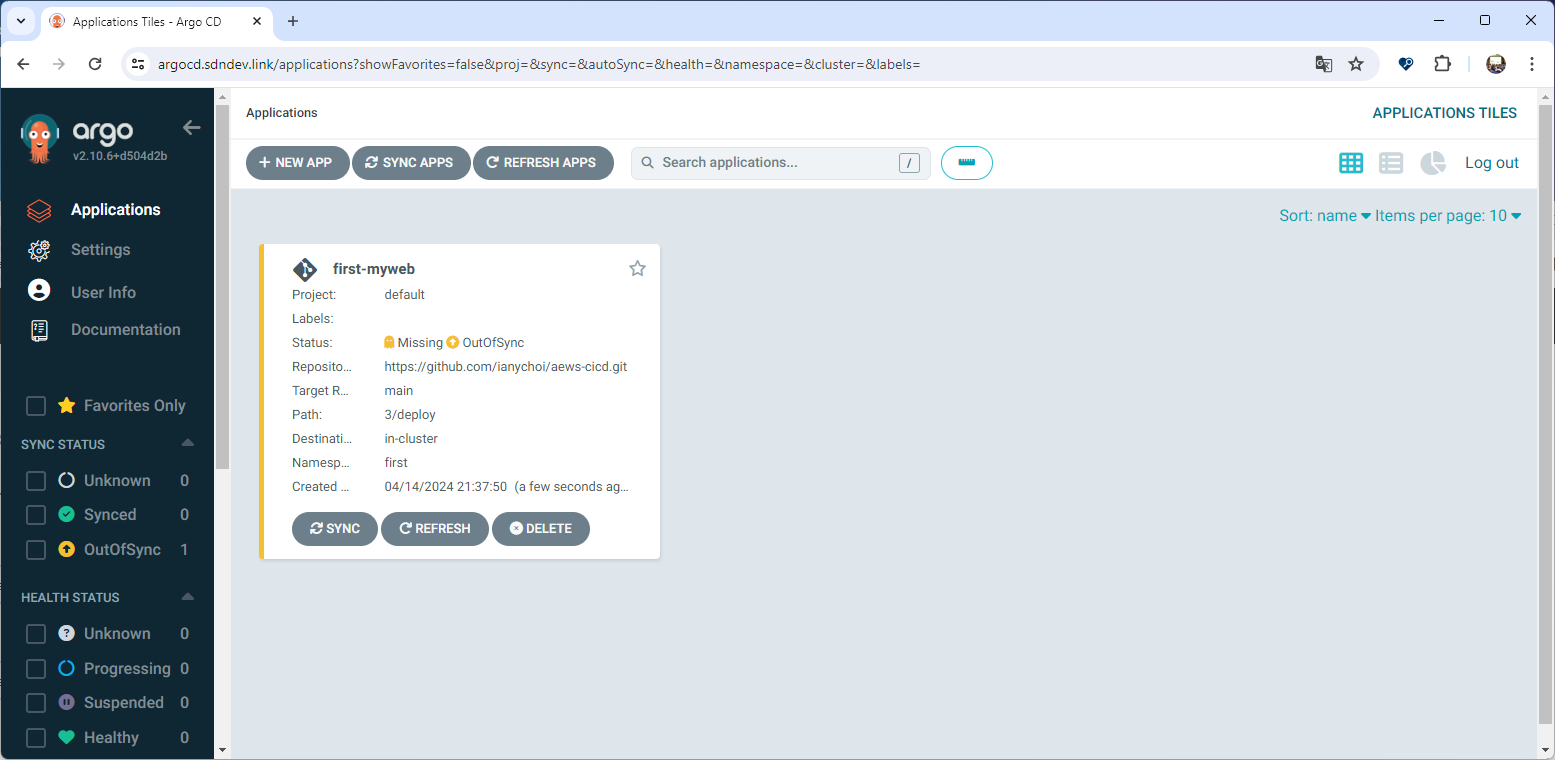
이후 "NEW APP"을 클릭하여 새 앱을 생성한다.
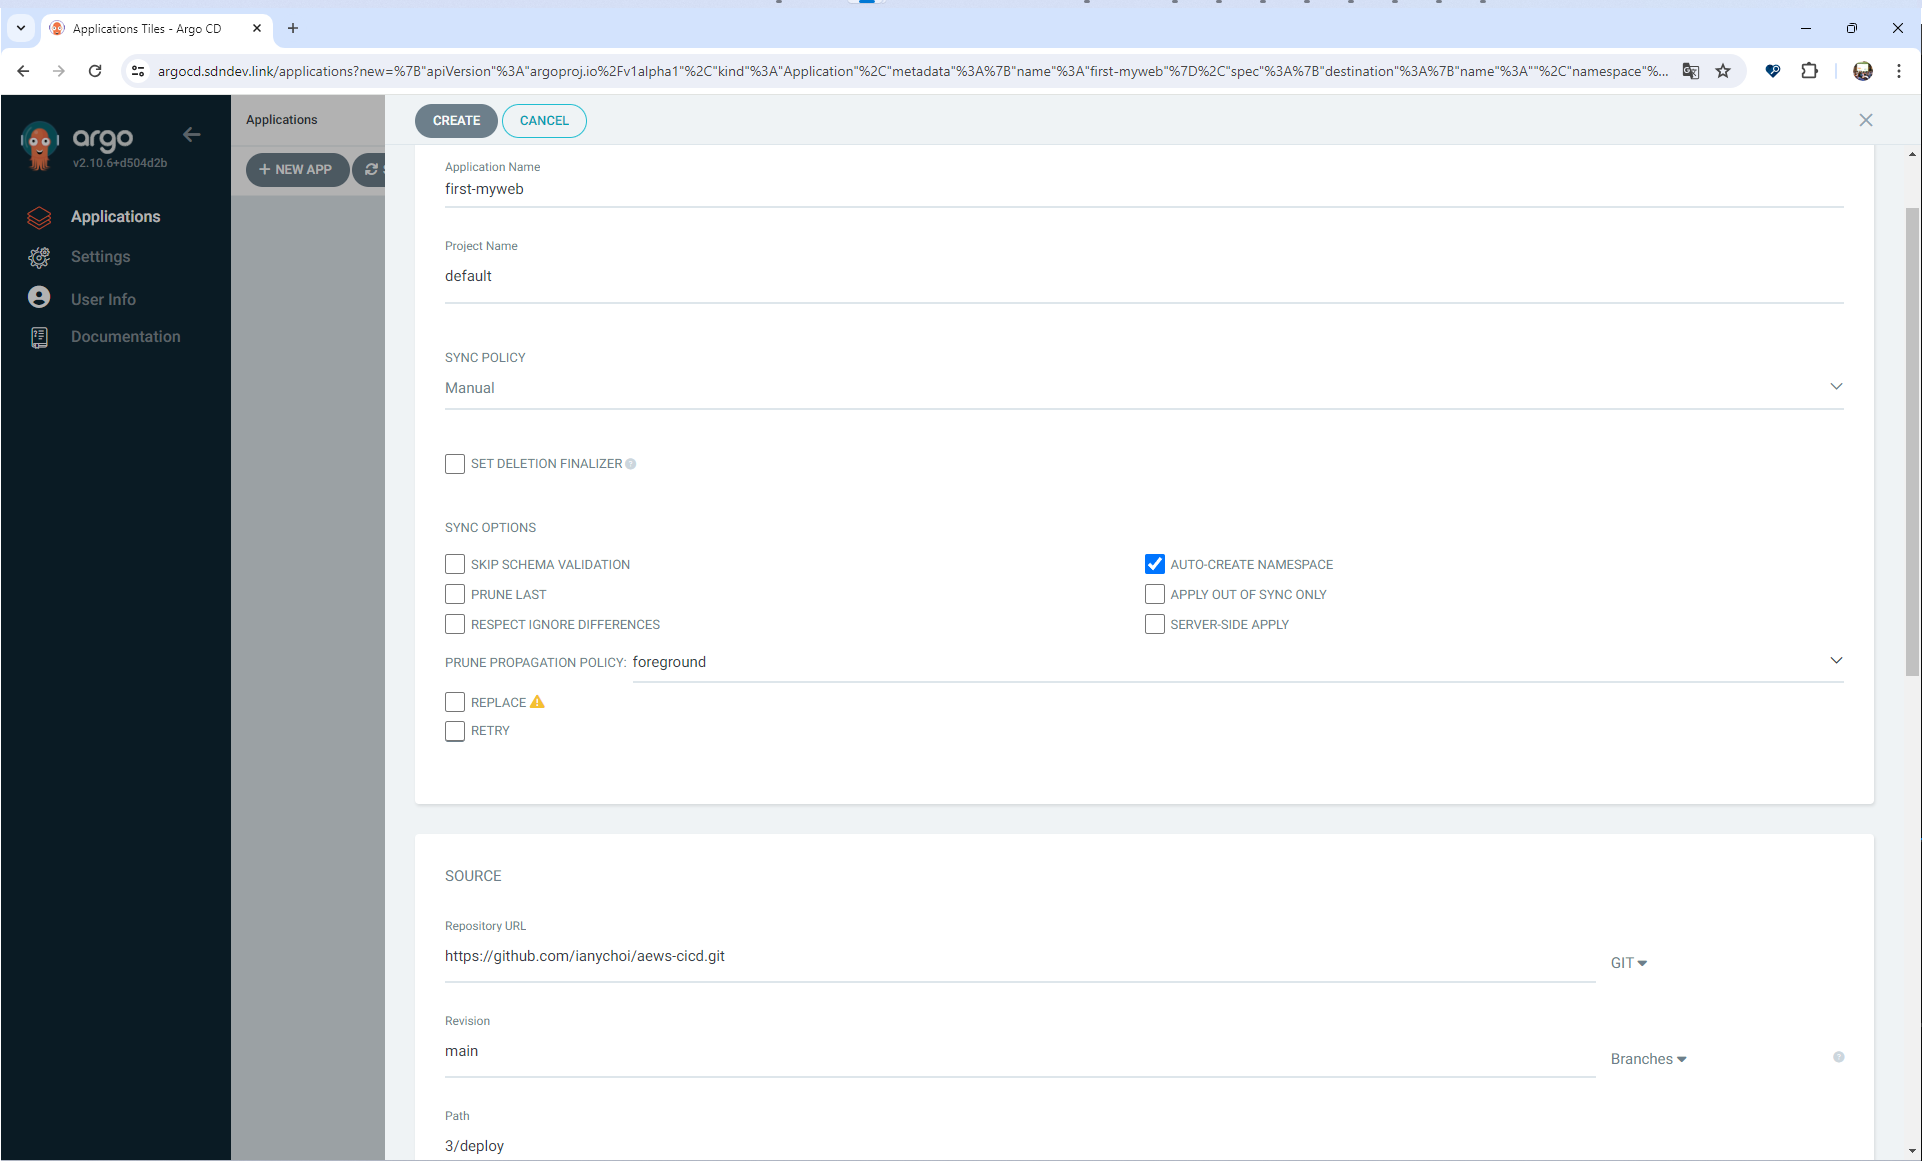
생성하면 바로 "OutOfSync" 상태로 변하는 것을 확인할 수 있다.
"Sync" -> "Synchronize" 버튼을 클릭한다.


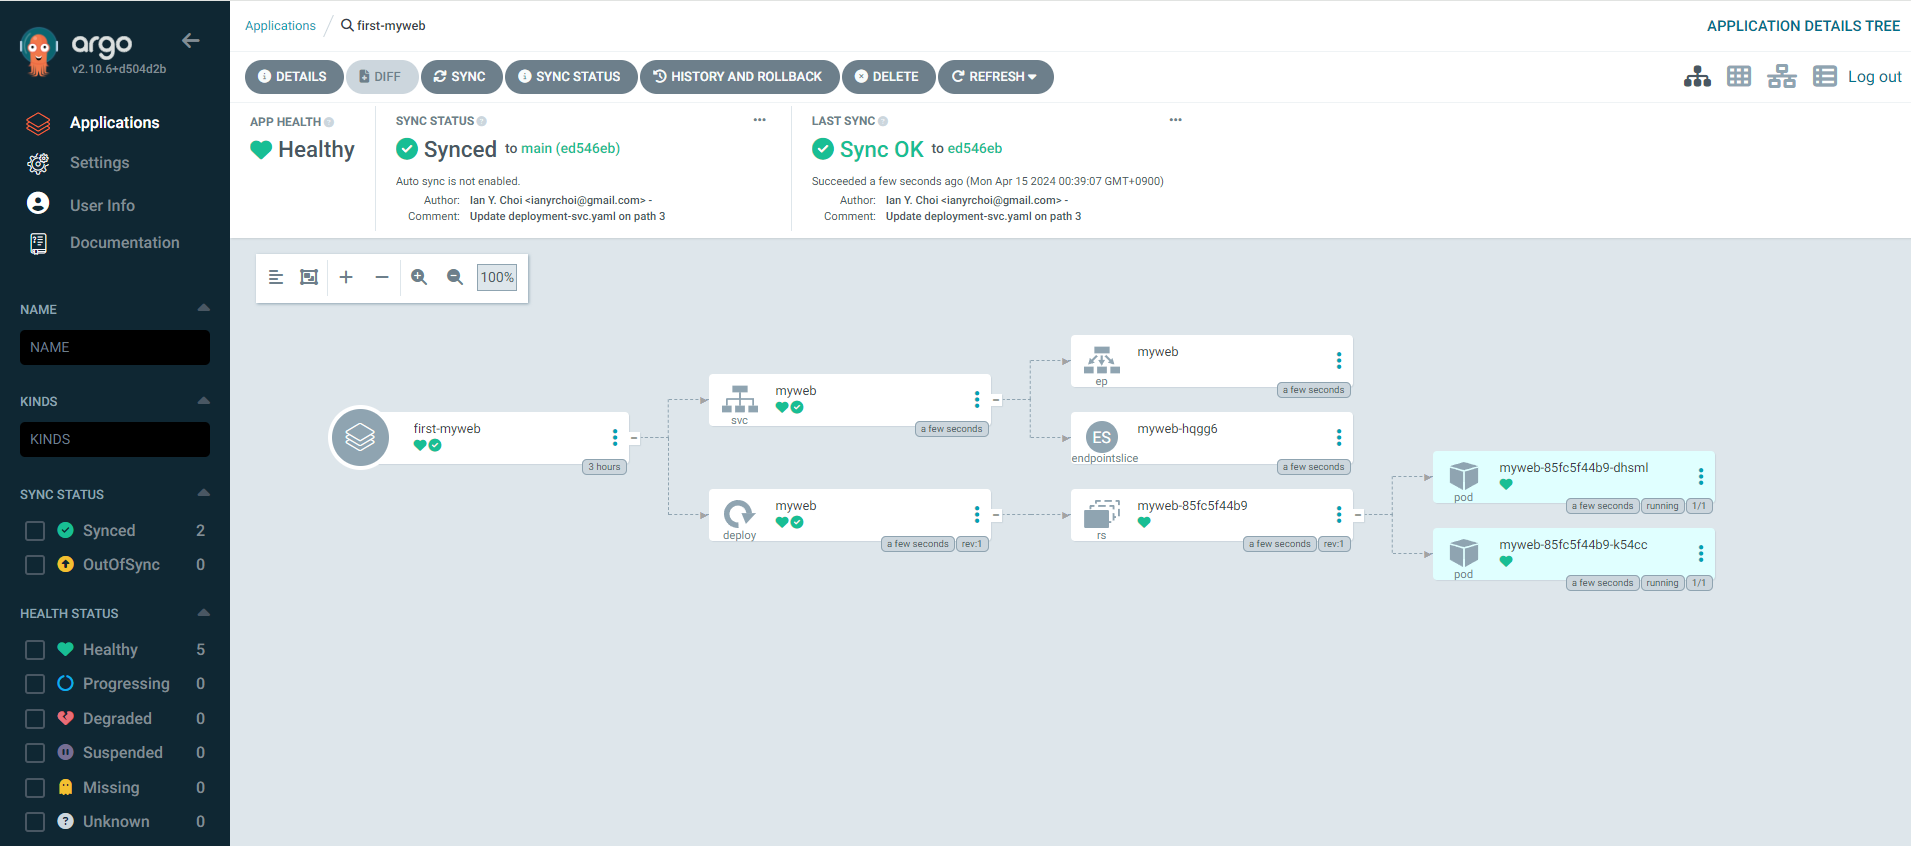
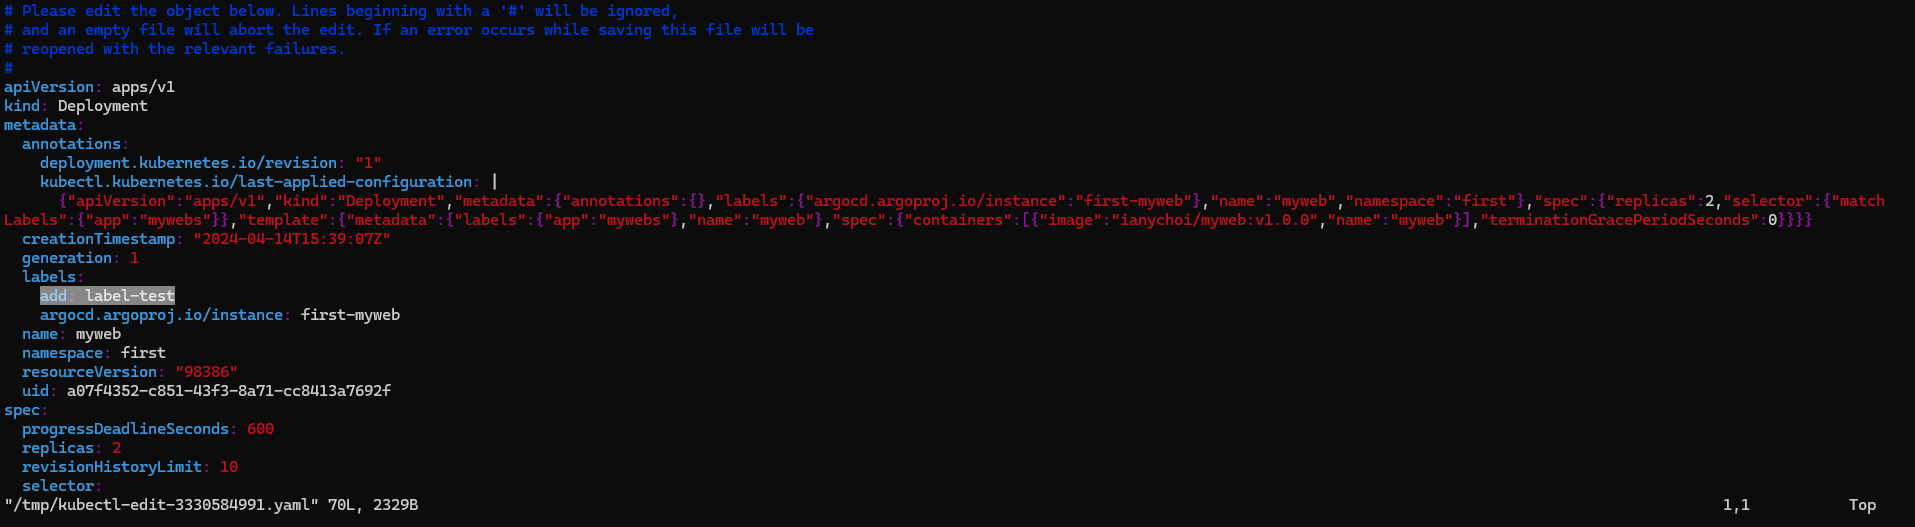
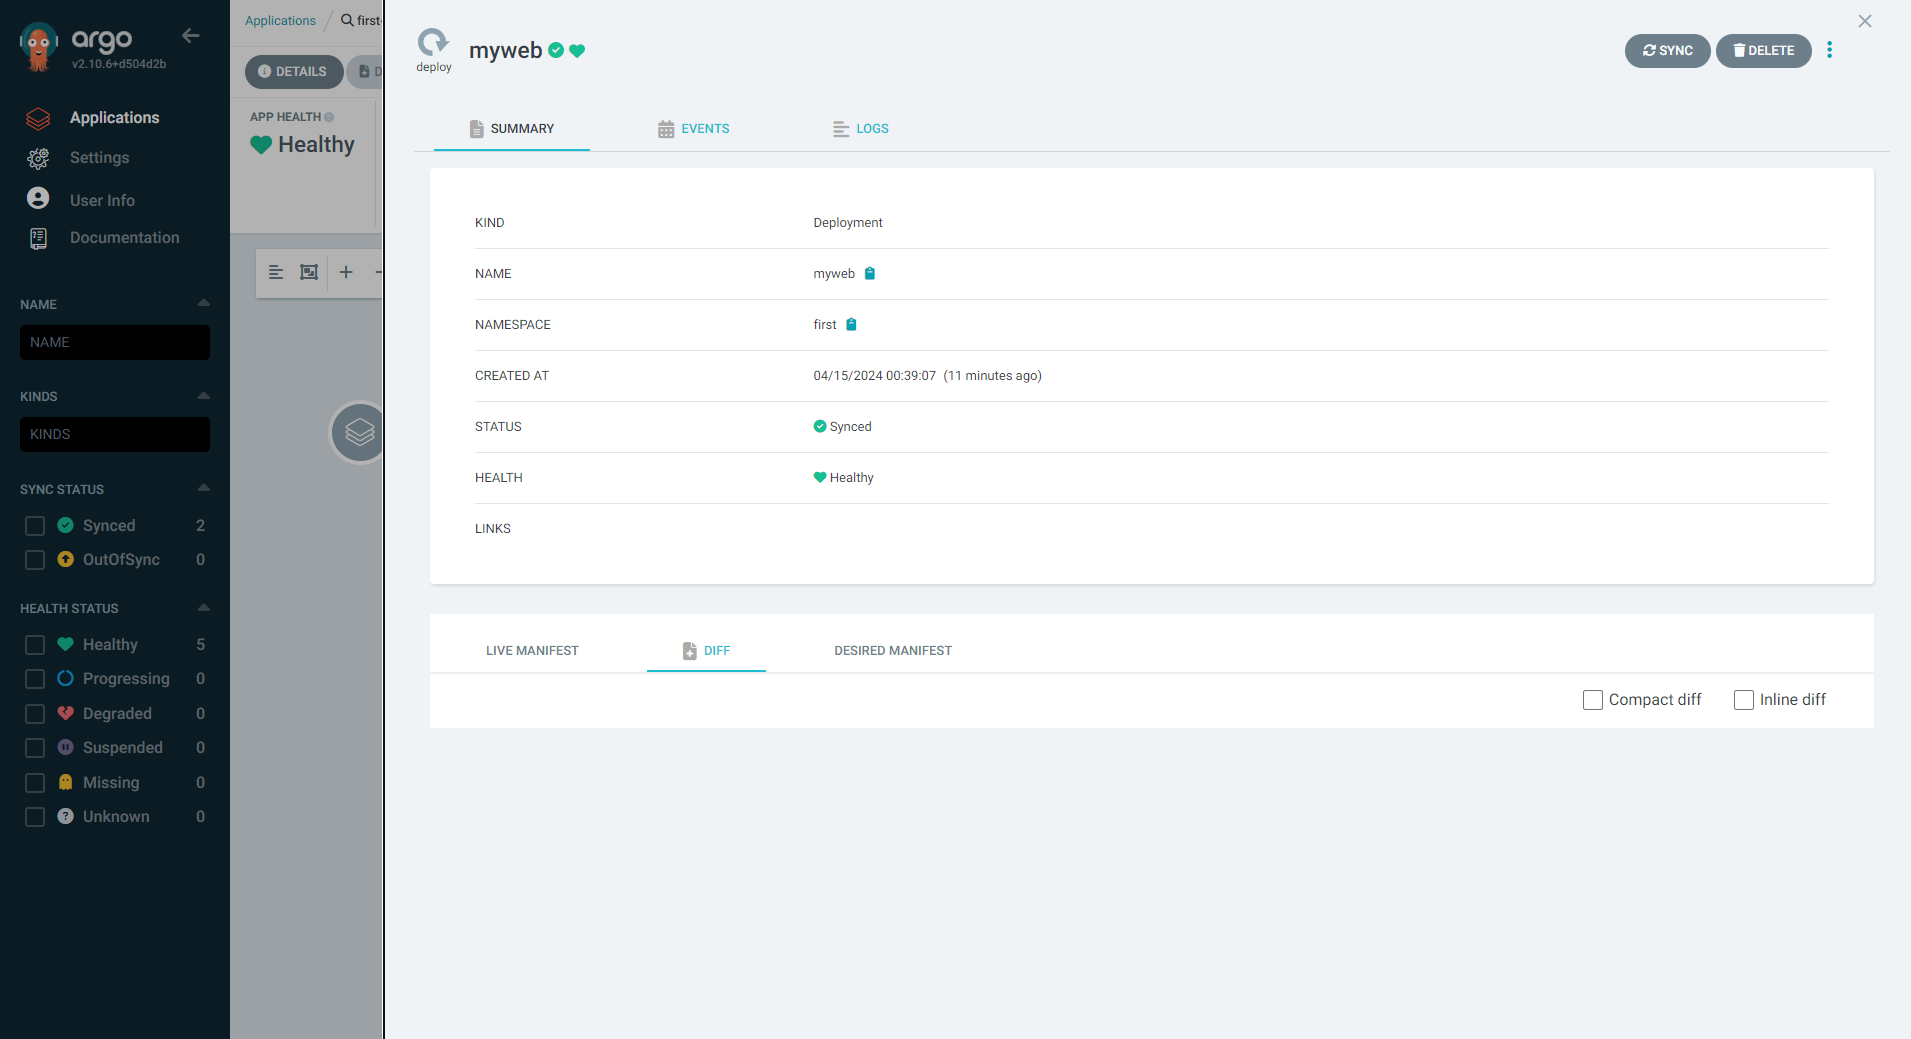
ArgoCD는 Desired Manifest와 비교하여 Sync가 이루어진 후에 Live Manifest 결과로 나타난다. myweb에 대한 Deploy를 선택하고, Live Manifest에서 Edit 버튼을 클릭한 다음 "add: label-test"를 아래 스크린샷과 같이 추가해보자.

아래와 같이 "watch -d kubectl get deploy -n first --show-labels"를 통해 모니터링해보면 Save를 하면 라벨이 추가된 결과를 확인할 수 있다.


"kubectl edit deploy -n first myweb"을 통해 확인하면 "add: label-test"가 있는 것을 확인할 수 있다.
그런데 ArgoCD에서는 diff결과가 나타나지 않는다. 심지어 "add2=k8s-add"와 같은 것을 추가해도 diff 결과가 없다.
반면 소스 코드에서 "gitadd: webedit"와 같은 라벨을 추가해보면 약 3분이 지나서 ArgoCD에서 확인하거나 또는 "Refresh" 버튼을 클릭하여 확인할 수 있다.
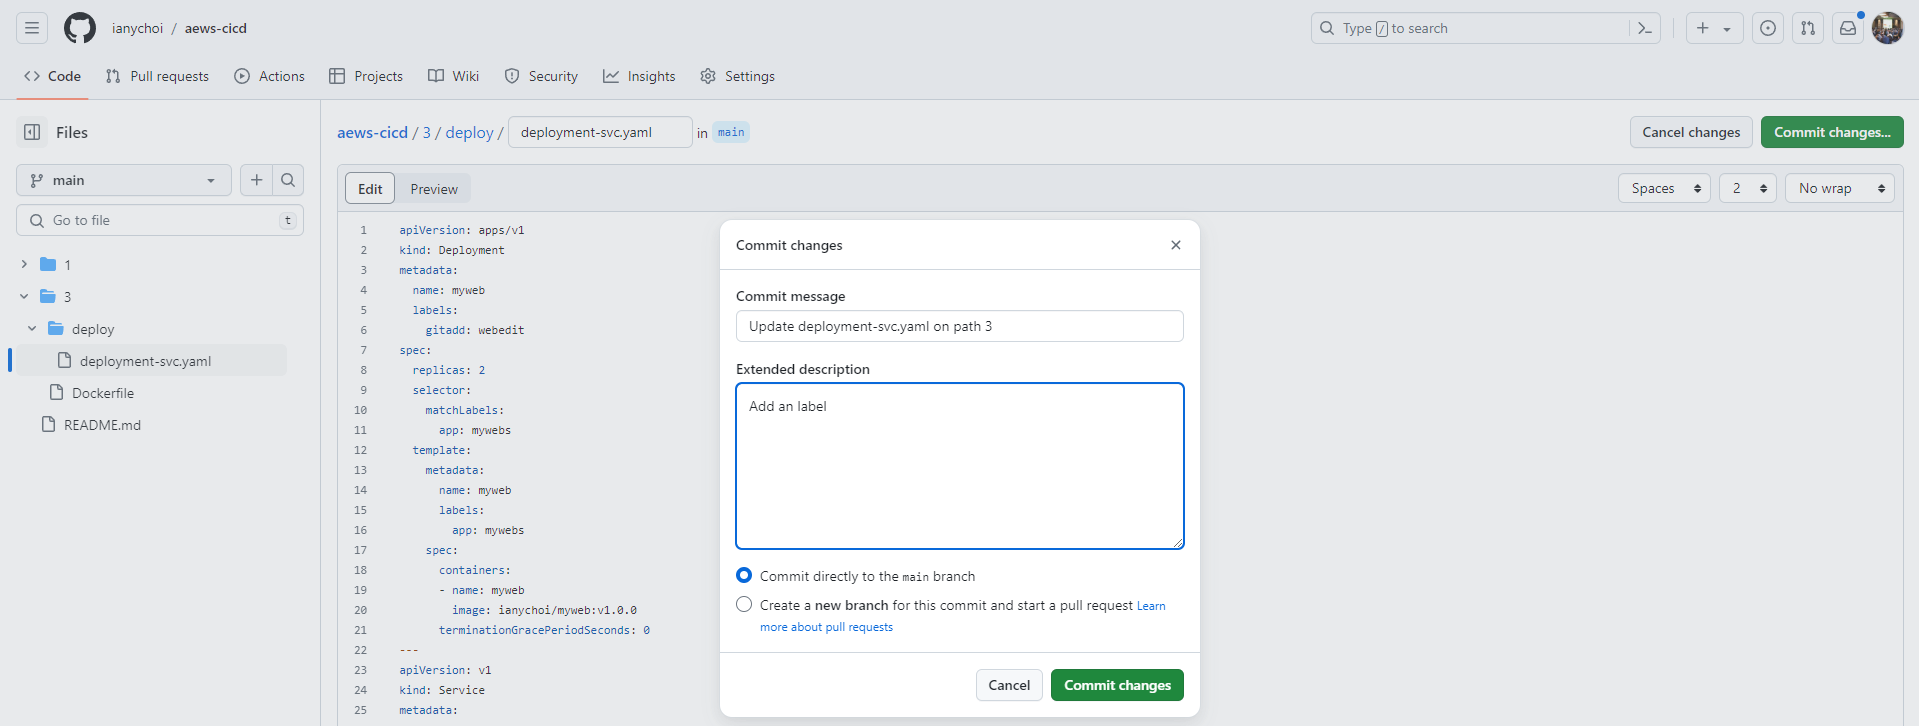
이 부분은 diff에서 차이를 확인할 수 있다.

반영을 하기 위해 "Sync" 버튼을 클릭한다.

해당 상황은 이전에 Jenkins를 실습할 때 살펴보았던 상황과 비슷하게 소스 코드를 우선으로 GitOps가 되어야 한다는 철학이 이유가 되지 않을까 싶다.
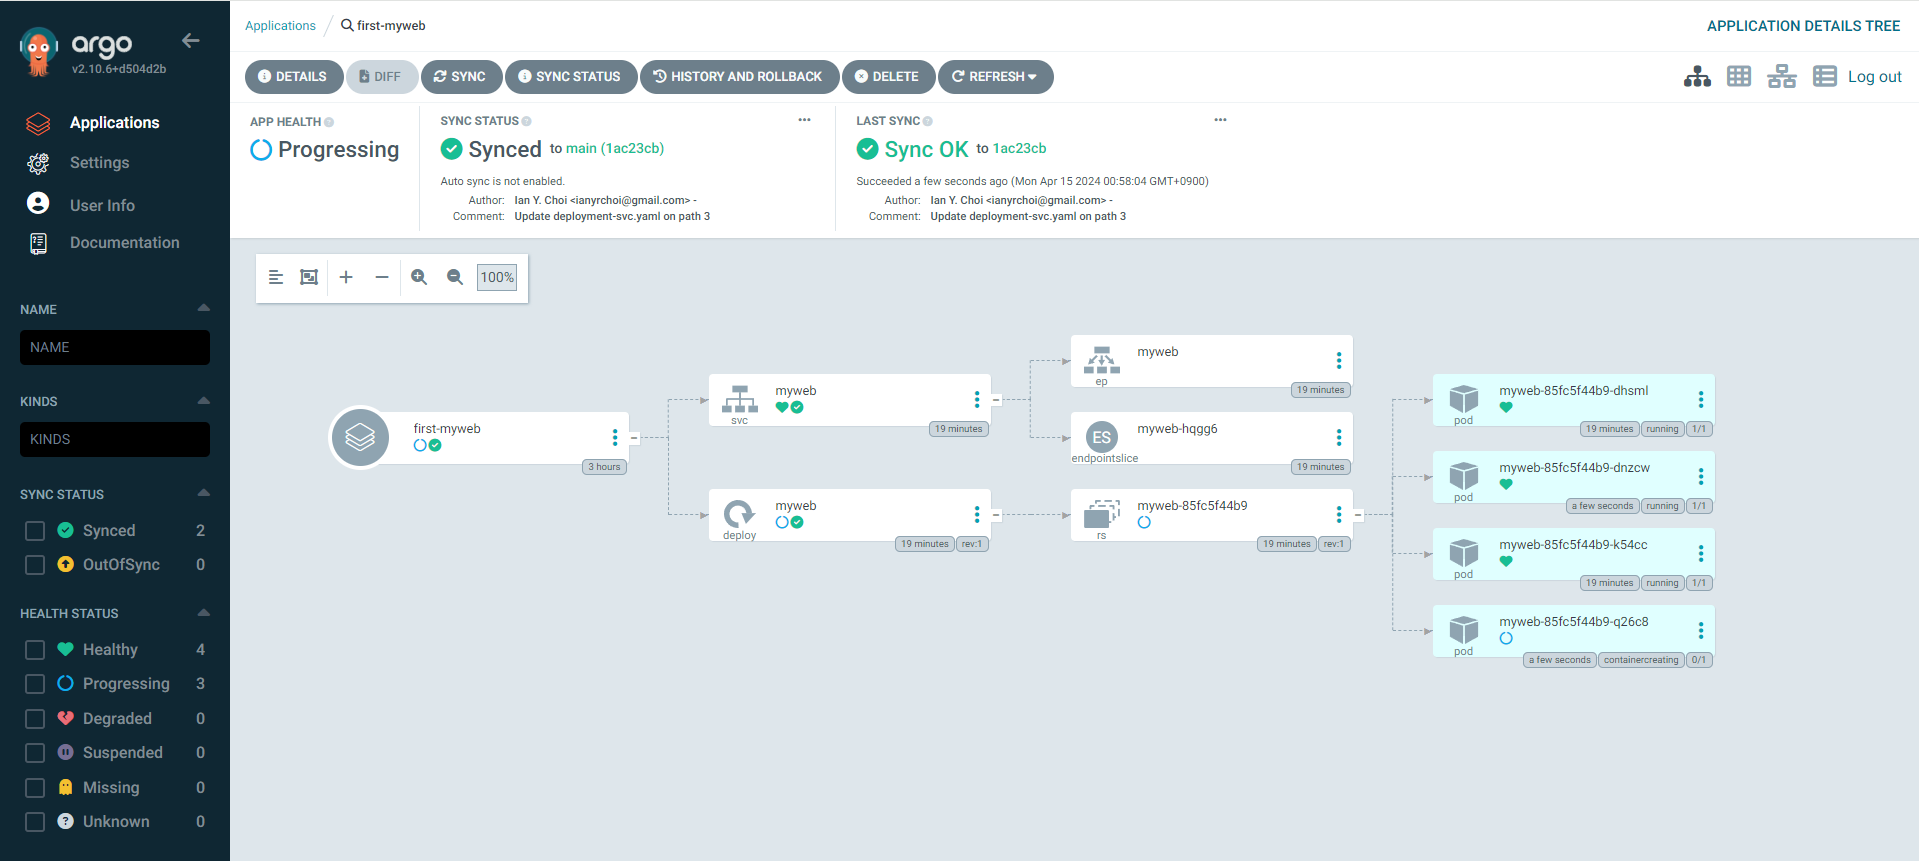
이번에는 Replica 수를 2에서 4로 변경해보자. 역시 마찬가지로 "Refresh" 한 다음 "Sync" -> "Synchronize" 버튼을 클릭하였다.


ArgoCD에서 삭제 또한 편리하게 가능하다고 한다. "Delete" 버튼을 클릭한 후 앱 이름을 한 번 어 입력하고 "OK" 버튼을 클릭해보자.


중요한 결론으로는 "GitOps를 하려거든 대상(k8s)에서 변경하지 말고, 소스(git)에서 변경하자!"가 있겠다.
ArgoCD CLI 버전도 있다. 설치하여 확인해보자.
#
curl -sSL -o argocd-linux-amd64 https://github.com/argoproj/argo-cd/releases/latest/download/argocd-linux-amd64
sudo install -m 555 argocd-linux-amd64 /usr/local/bin/argocd
rm -f argocd-linux-amd64

#
argocd version

#
argocd login argocd.$MyDomain
Username: admin
Password: ###
'admin:login' logged in successfully

#
kubectl config get-contexts -o name
aewsian@myeks.ap-northeast-2.eksctl.io
argocd cluster add aewsian@myeks.ap-northeast-2.eksctl.io
y 입력

#
argocd app list
NAME  CLUSTER  NAMESPACE  PROJECT  STATUS  HEALTH  SYNCPOLICY  CONDITIONS  REPO  PATH  TARGET
앱 생성에 대해 아래와 같이 명령어로 가능하다.
#
kubectl config set-context --current --namespace=argocd
argocd app create guestbook --repo https://github.com/argoproj/argocd-example-apps.git --path guestbook --dest-server https://kubernetes.default.svc --dest-namespace default

#
argocd app list
NAME              CLUSTER                         NAMESPACE  PROJECT  STATUS     HEALTH   SYNCPOLICY  CONDITIONS  REPO                                                 PATH       TARGET
argocd/guestbook  https://kubernetes.default.svc  default    default  OutOfSync  Missing  <none>      <none>      https://github.com/argoproj/argocd-example-apps.git  guestbook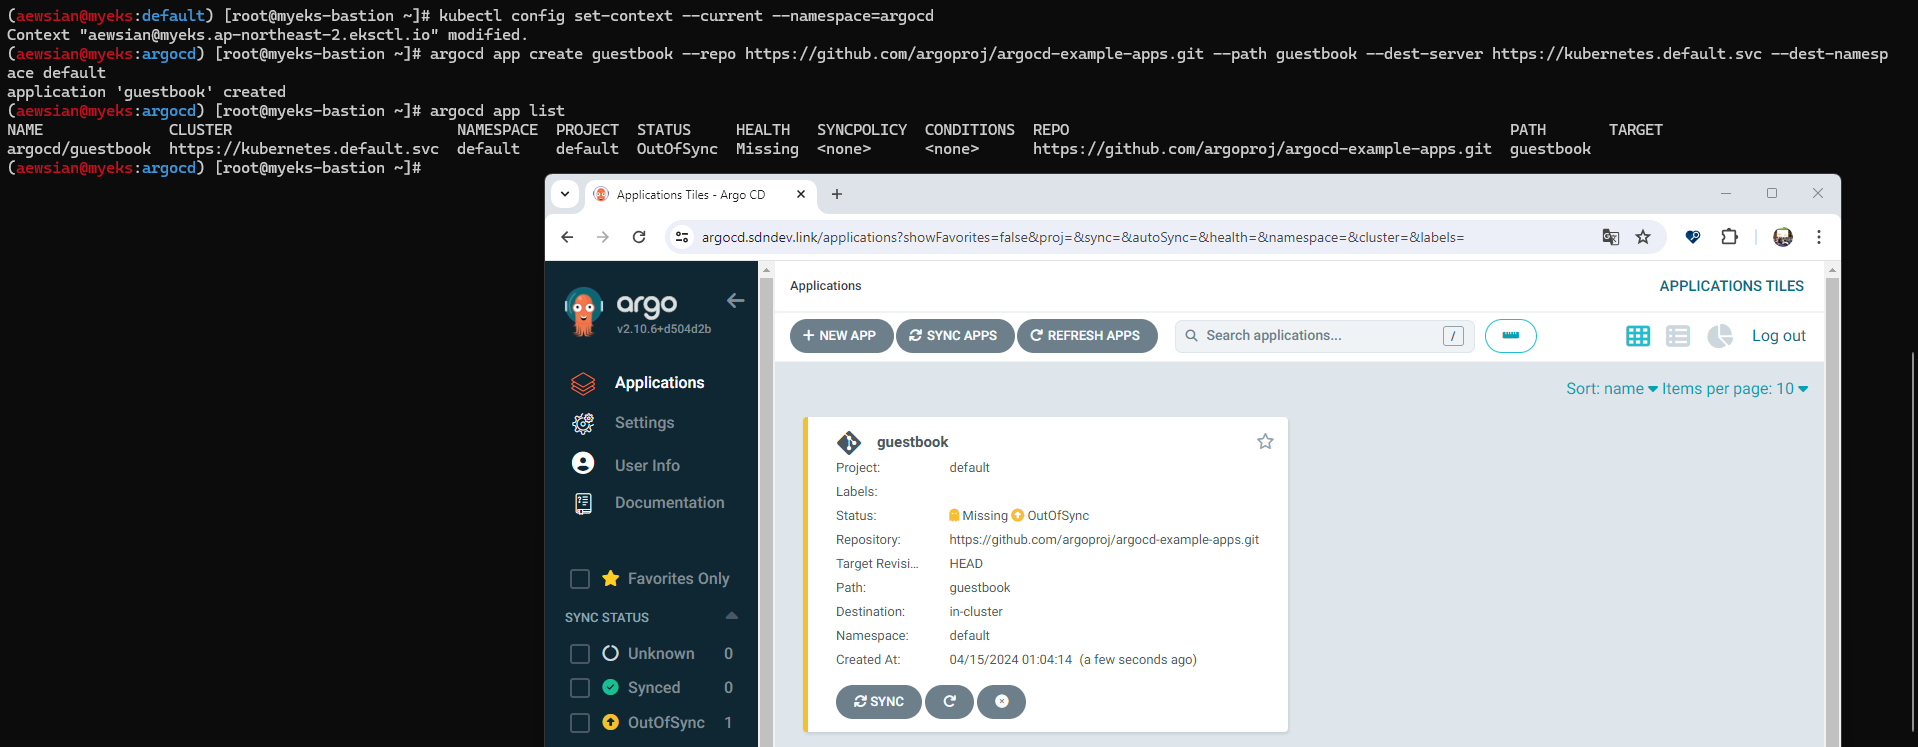
또한 Sync도 가능하다.
#
argocd app get guestbook
...

# 모니터링
watch -d kubectl get pod,svc,ep

#
argocd app sync guestbook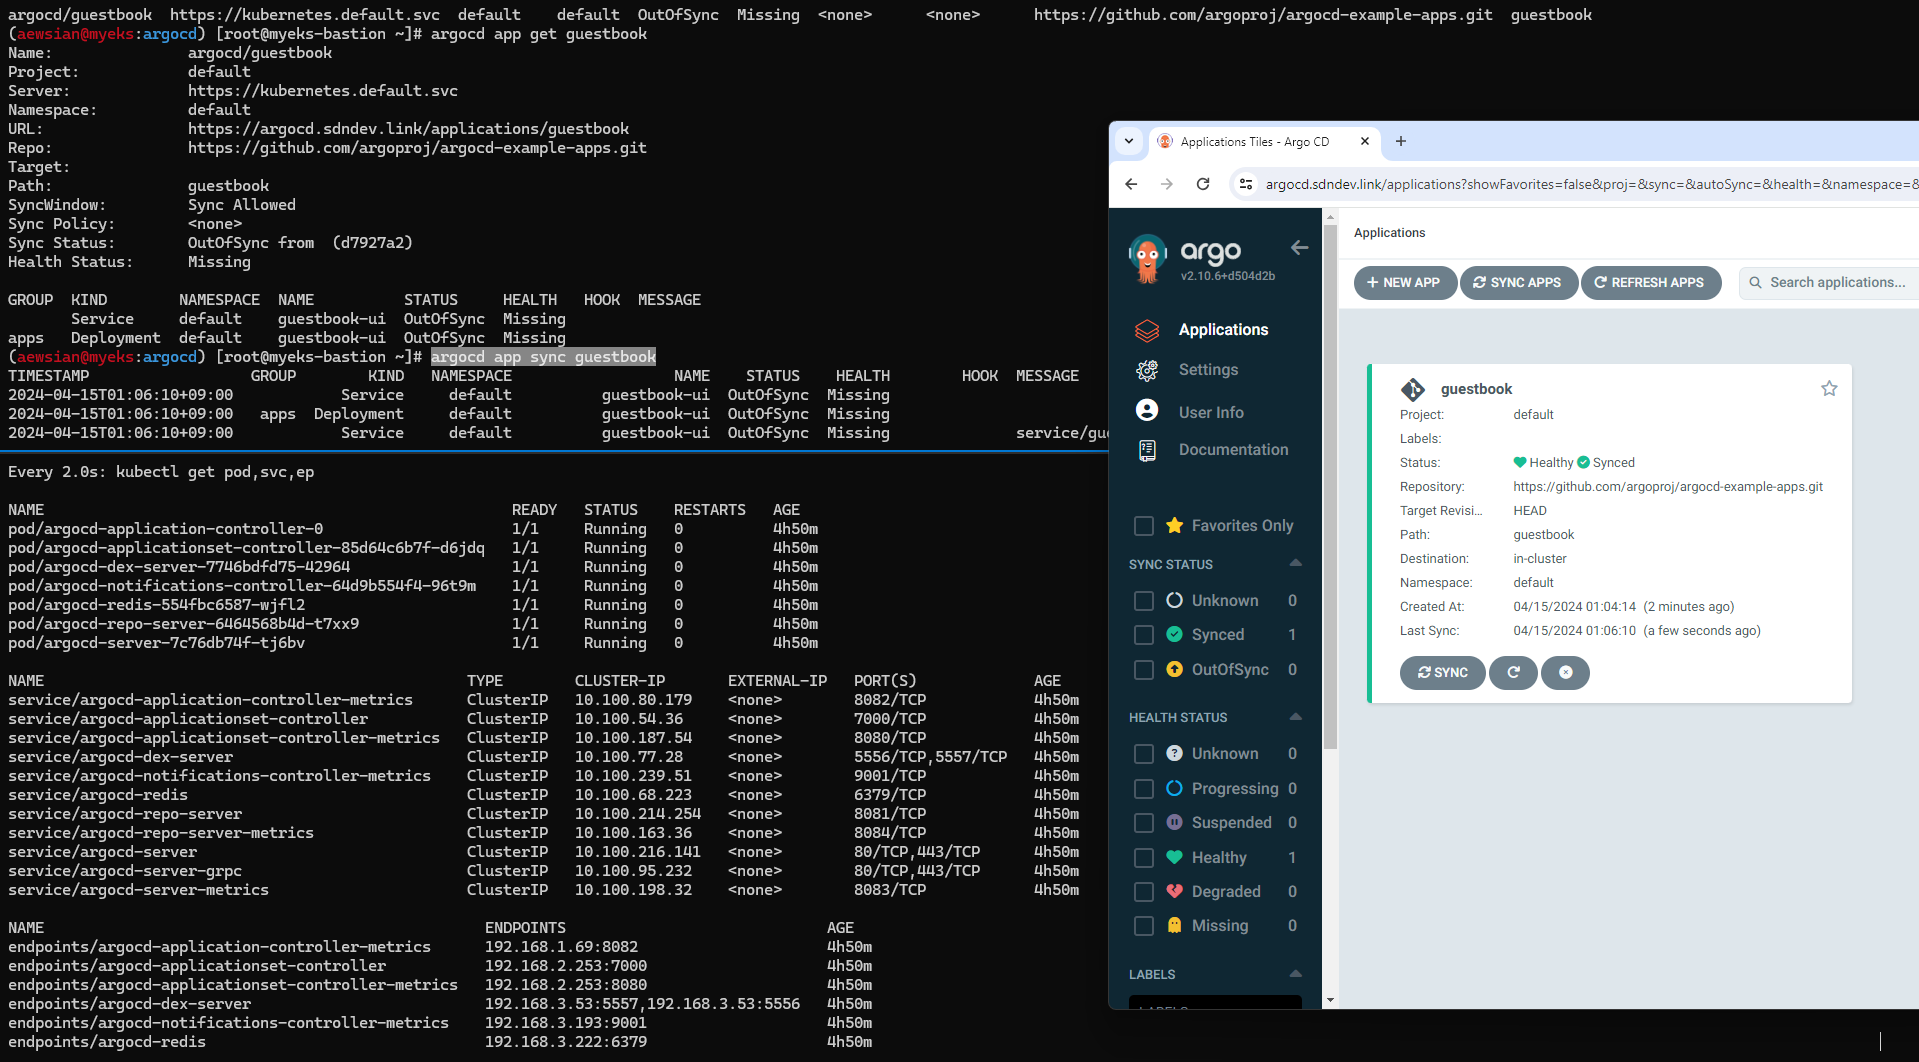
ArgoCD로 배포한 앱을 삭제해보자.
argocd app delete guestbook
Are you sure you want to delete 'guestbook' and all its resources? [y/n] y

# ns default 로 변경
kubectl ns default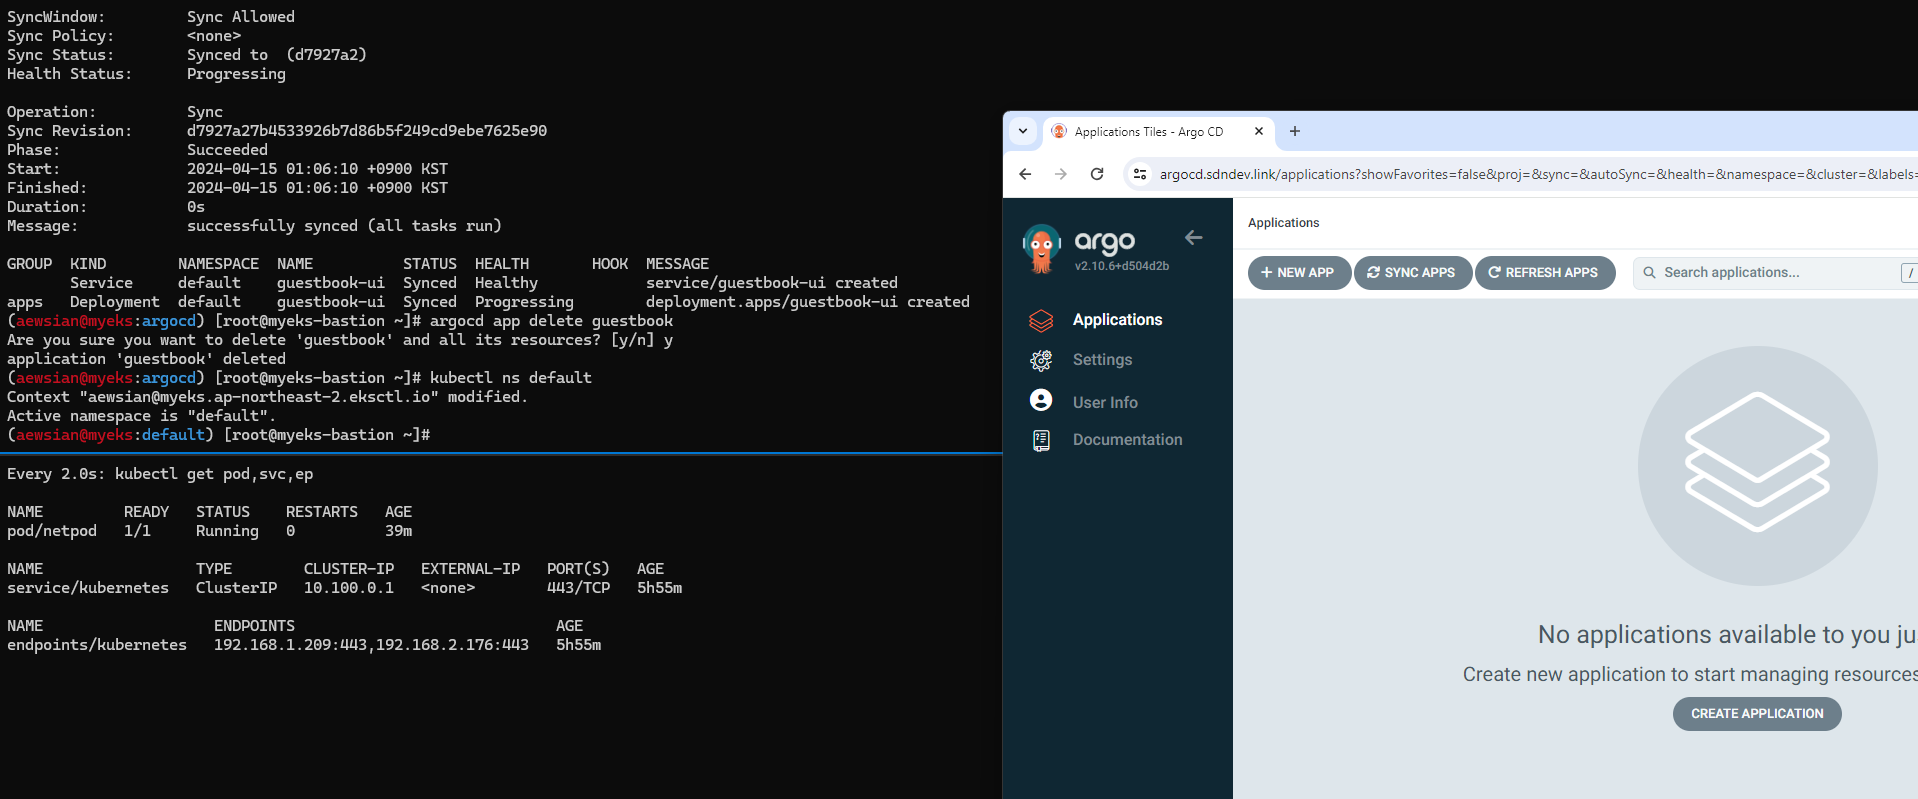
Argo Rollouts이란 것도 있다. Argo Rollouts는 Kubernetes에서 Blue-Green 및 Canary 배포 전략 등 고급 deployment 전략을 제공하는 Kubernetes Controller라고 한다.
Argo Rollouts를 설치해보자. Helm 차트로 설치해본다. (관련 내용: 링크)
#
cat <<EOT > argorollouts-values.yaml
dashboard:
  enabled: true
  ingress:
    enabled: true
    ingressClassName: alb
    hosts:
      - argorollouts.$MyDomain
    annotations:
      alb.ingress.kubernetes.io/scheme: internet-facing
      alb.ingress.kubernetes.io/target-type: ip
      alb.ingress.kubernetes.io/backend-protocol: HTTP
      alb.ingress.kubernetes.io/listen-ports: '[{"HTTPS":80}, {"HTTPS":443}]'
      alb.ingress.kubernetes.io/certificate-arn: $CERT_ARN
      alb.ingress.kubernetes.io/ssl-redirect: '443'
EOT

kubectl create ns argo-rollouts
helm install argo-rollouts argo/argo-rollouts --version 2.35.1 -f argorollouts-values.yaml --namespace argo-rollouts

# 확인
kubectl get all -n argo-rollouts
kubectl get crd | grep argo

Argo Rollouts CLI도 설치하자.
#
curl -LO https://github.com/argoproj/argo-rollouts/releases/download/v1.6.4/kubectl-argo-rollouts-linux-amd64
chmod +x ./kubectl-argo-rollouts-linux-amd64
mv ./kubectl-argo-rollouts-linux-amd64 /usr/local/bin/kubectl-argo-rollouts

# 설치 확인
kubectl argo rollouts version
Canary에 대해 실습을 진행해본다. 다음 전략에 해당한다.
spec:
  replicas: 5
  strategy:
    canary:
      steps:
      - setWeight: 20
      - pause: {}
      - setWeight: 40
      - pause: {duration: 10}
      - setWeight: 60
      - pause: {duration: 10}
      - setWeight: 80
      - pause: {duration: 10}
Rollout 및 서비스를 배포해보자.
# Run the following command to deploy the initial Rollout and Service:
kubectl apply -f https://raw.githubusercontent.com/argoproj/argo-rollouts/master/docs/getting-started/basic/rollout.yaml
kubectl apply -f https://raw.githubusercontent.com/argoproj/argo-rollouts/master/docs/getting-started/basic/service.yaml

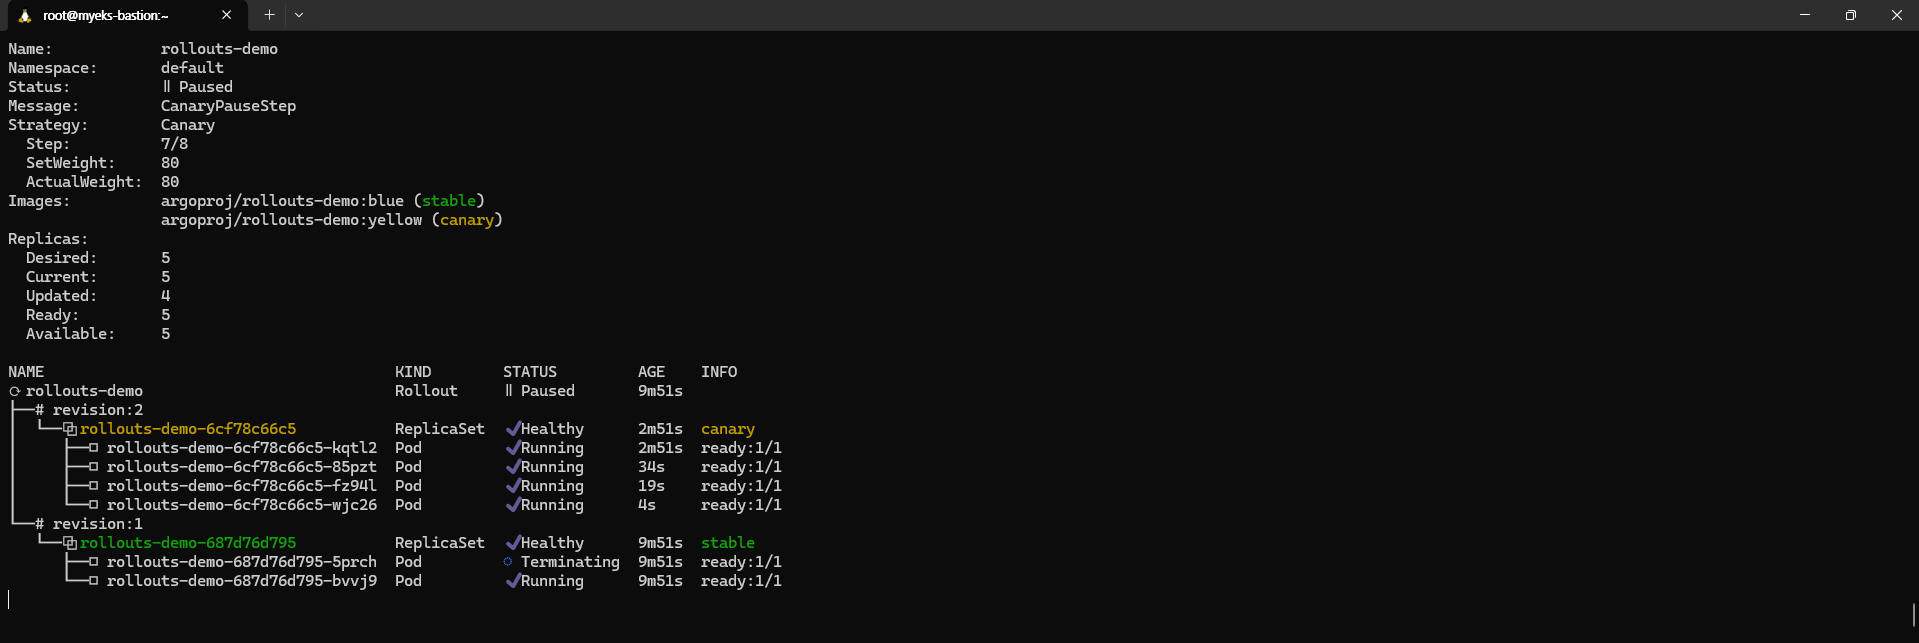
현재 blue에 해당하는 5개 파드가 실행 중인 상황에 있다. 이제 yellow 버전에 대해 rollout을 동작시켜보도록 하자.
kubectl argo rollouts set image rollouts-demo rollouts-demo=argoproj/rollouts-demo:yellow

20%가 진행되었고 멈추어 있는 단계이다. 웹 페이지에서 "Promote" 버튼을 클릭하거나 CLI에서 "kubectl argo rollouts promote rollouts-demo"라고 입력해도 된다. 그러면 다음 과정이 진행되었다가 10초 후 멈추고 그 다음 과정을 계속 진행하는 식으로 동작할 것이다.

이번 역시 실습 완료 후에 자원을 삭제하는 것을 꼭 잊지 말도록 하자.
eksctl delete cluster --name $CLUSTER_NAME && aws cloudformation delete-stack --stack-name $CLUSTER_NAME
'Amazon EKS (Elastic Kubernetes Service)' 카테고리의 다른 글
| [AEWS] 스터디 8주차 - EKS IaC (0) | 2024.04.28 |
|---|---|
| [AEWS] 스터디 6주차 - EKS Security (0) | 2024.04.14 |
| [AEWS] 스터디 5주차 - EKS Autoscaling (0) | 2024.04.07 |
| [AEWS] 스터디 4주차 - Observability (0) | 2024.03.31 |
| [AEWS] 스터디 3주차 - EKS Storage & Nodegroup (0) | 2024.03.24 |